background image

Summary of Contents for 247.88787

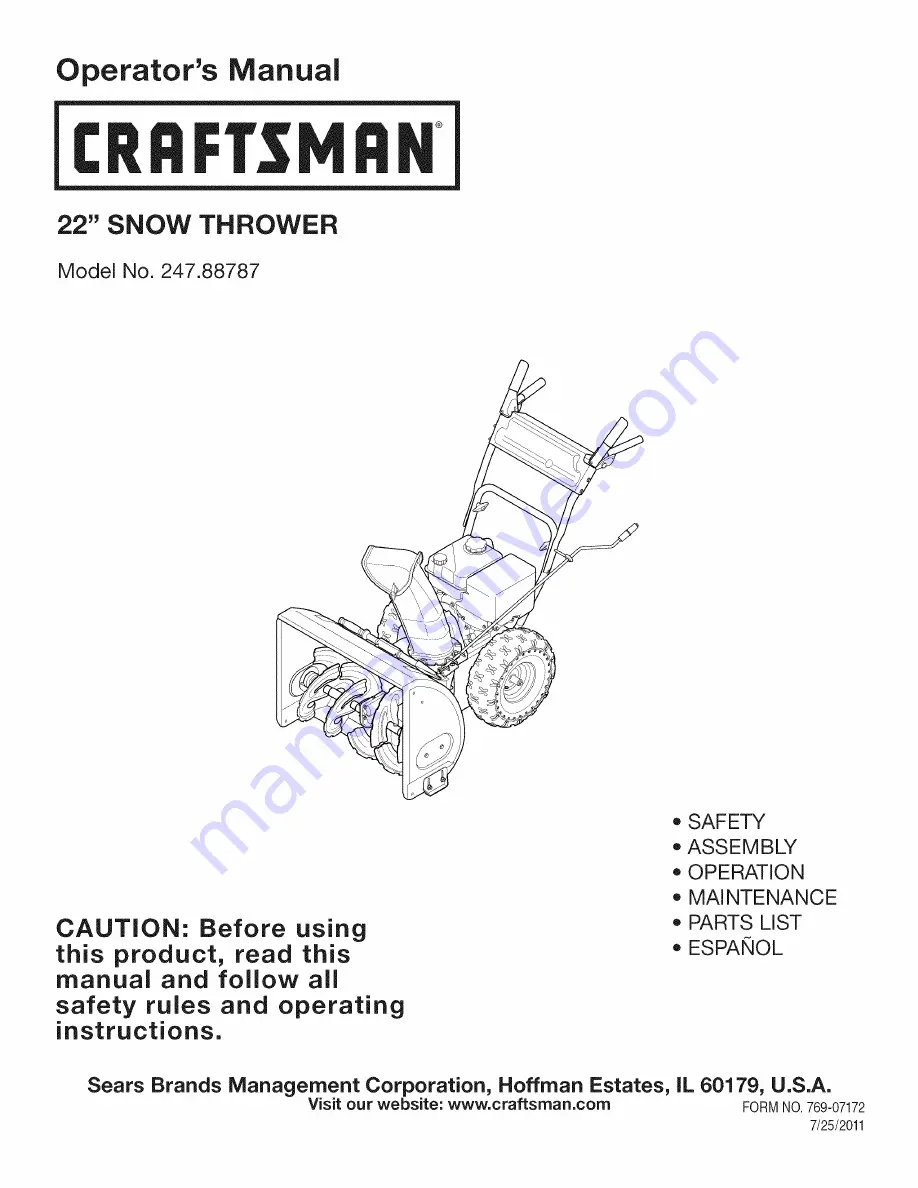
Page 1: ...sing this product read this manual and follow all safety rules and operating instructions o SAFETY ASSEMBLY OPERATION MAINTENANCE PARTS LIST o ESPANOL Sears Brands Management Corporation Hoffman Estates IL 60179 U S A Visit our website www craftsman com FORM1 0 769 07172 7 25 2011 ...

Page 2: ...ent or repaircausedby puncturesfromoutsideobjects suchas nails thorns stumps or glass Tireor wheelreplacement or repairresultingfromnormalwear accident orimproperoperationor maintenance Repairsnecessarybecauseof operatorabuse includingbutnot limitedto damagecausedby over speeding the engine or fromimpacting objectsthat bendthe frame augershaft etc Repairsnecessarybecauseof operatornegligence inclu...

Page 3: ...chineanddisengagethemquickly Neverallowchildrenunder14yearsof ageto operatethis machine Children14andover shouldreadandunderstandthe instructionsandsafeoperationpracticesin thismanualandon the machineandbe trainedandsupervisedby anadult Neverallowadultsto operatethis machinewithoutproper instruction Thrownobjectscan causeseriouspersonalinjury Planyour snow throwing patternto avoiddischargeof mater...

Page 4: ...olor drugs Mufflerandenginebecomehotandcan causea burn Do not touch Keepchildrenaway Exerciseextremecautionwhenoperatingon orcrossinggravel surfaces Stayalertfor hiddenhazardsor traffic Exercisecautionwhenchangingdirectionandwhileoperatingon slopes Do notoperateon steepslopes Planyoursnow throwing patternto avoiddischargetowards windows walls carsetc Thus avoidingpossibleproperty damageor personal...

Page 5: ...properinstructions on off seasonstorage Checkfuelline tank cap andfittingsfrequentlyfor cracksor leaks Replaceif necessary Do notcrankenginewithsparkplugremoved Accordingto the ConsumerProductsSafetyCommission CPSC andthe U S Environmental ProtectionAgency EPA thisproduct hasan AverageUsefulLifeof seven 7 years or 60 hoursof operation At the endof theAverageUsefulLifehavethe machine inspectedannua...

Page 6: ...let and discharge openings while machine is running There are rotating blades inside WARNING ROTATING AUGER Do not put hands or feet near rotating parts in the auger impeller housing or chute assembly Contact with the rotating parts can amputate hands and feet WARNING THROWN OBJECTS This machine may pick up and throw objects which can cause serious personal injury WARNING GASOLINE IS FLAMMABLE All...

Page 7: ...Thispage leftintentionally blank 7 ...

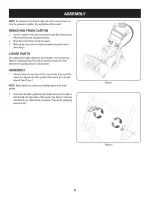
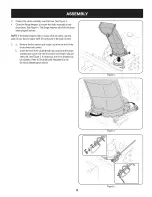
Page 8: ...acementaugershearpinsare includedinthe manualbag Referto ReplacingShearPinsinthe Operationsectionfor more informationregardingshearpin replacement ASSEMBLY 1 Observethe lowerrearareaof the snowthrowerto besure both cablesarealignedwith rollerguidesbeforepivotingthe handle upward See Figure1 NOTE Makecertainthe cablesare seatedproperlyinthe roller guides Securethe handleby tighteningthe plasticwing...

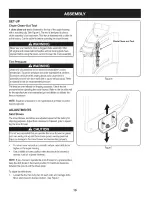
Page 9: ...into place usethe palmof yourhandto applyswift firmpressureto the backof each a b Removetheflatwasherand hairpinclip fromthe endof the chutedirectionalcontrol insertthe endof the chutedirectionalcontrolinto the lower bracketandsecurewiththe flatwasherandhairpinclipjust removed See Figure5 If necessary the lowerbracketcan beadjusted Referto ChuteBracketAdjustmentinthe Service Maintenancesection Fig...

Page 10: ...gthe snowthrower Referto the tire sidewall for tiremanufacturer s recommendedpsianddeflate or inflate the tiresas necessary NOTE Equaltire pressureis to be maintained at alltimesfor perfor mancepurposes ADJUSTMENTS Skid Shoes The snowthrowerskidshoesareadjustedupwardat thefactoryfor shippingpurposes Adjustthemdownward if desired priorto operat ingthe snowthrower It is not recommended thatyouoperat...

Page 11: ...ery littleslack ItshouldNOTbe tight 2 In a well ventilated area start the snowthrowerengine Referto Startingthe Engineinthe Operationsection 3 Whilestandinginthe operator sposition behindthe snow thrower engagethe auger 4 Allowtheaugerto remainengagedfor approximately ten 10 secondsbeforereleasingthe augercontrol Repeatthisseveral times 5 Withtheaugercontrolin thedisengaged up position walkto the ...

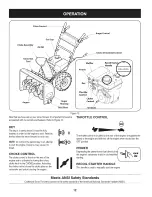
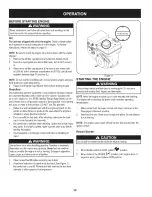
Page 12: ...ine Doingso maycauseit to break CHOKE CONTROL Thechokecontrolis foundonthe rearof the engineandis activatedbyturningthe rotary chokeknobto the CHOKEposition Activating thechokecontrolclosesthechokeplateonthe carburetorandaidsin startingtheengine THROTTLE CONTROL The throttle control is located on the rear of the engine It regulates the speed of the engine and willshut offthe engine when moved into...

Page 13: ...rfaceconditions Adjustupward for hard packedsnow Adjustdownwardwhenoperatingon gravelor crushedrocksurfaces CLEAN OUT TOOL Neveruseyourhandsto cleara cloggedchuteassembly Shut off engineand remainbehindhandlesuntilallmovingpartshave stoppedbeforeusingthe clean outtool to clearthe chuteassembly The chuteclean outtool is conveniently fastenedto the rearof the augerhousingwitha mountingclip Shouldsno...

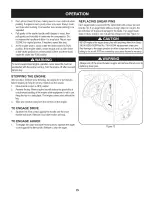
Page 14: ... Do notoverfillthe fuel tank Afterrefueling makesurethe tank cap is closedproperlyandsecurely Becarefulnot to spillfuel when refueling Spilledfuelor fuelvapor mayignite Ifany fuel isspilled makesurethe areaisdry before startingtheengine Avoidrepeatedor prolongedcontactwithskinor breathingof vapor Useextremecare whenhandlinggasoline Gasolineis extremely flammableandthe vaporsareexplosive IVeverfuel...

Page 15: ...earoff to preventdamageto the blade Ifanaugerblade does notturn checkto see if its pinhas shearedoff SeeFigure12 NEVERreplacethe augershearpinswithanythingotherthan Sears SKU 88389 0EM PartNo 738 04124A replacement shearpins Anydamageto theaugergearboxorother components as a resultof failingto do sowill NOTbecoveredbyyour snowthrower swarranty Alwaysturn off thesnowthrower sengineand removethe key...

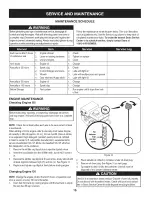
Page 16: ...artshavecometo a complete _stop NOTE Checktheoil levelbeforeeachuseto besurecorrectoil level is maintained Whenaddingoilto the engine referto viscositychart below Engine oilcapacityis 600ml approx 20 oz Donot over fill Usea 4 stroke oran equivalenthighdetergent premiumqualitymotoroilcertified to meetorexceedU S automobilemanufacturer s requirements for serviceclassification SG SR Motoroilsclassifi...

Page 17: ...ation the sparkplugmustbe properly gappedandfreeof deposits 1 Removethesparkplugbootanduse a sparkplugwrenchto removethe plug See Figure15 2 Visuallyinspectthe sparkplug Discardthe sparkplugif thereis apparentwear orif the insulatoris crackedor chipped Cleanthe sparkplugwitha wirebrush if it is to be reused 3 Measurethe pluggapwitha feelergauge Correctas necessary by bendingsideelectrode SeeFigure...

Page 18: ...hoesonthe bottomof the snowthrowerare subjectto wear Theyshouldbecheckedperiodicallyandreplaced whennecessary NOTE Theskidshoeson thismachinehavetwowearedges When onesidewearsout theycan be rotated1800 to usethe otheredge To removeskidshoes 1 Removethe twocarriageboltsandhexflangenutsthatsecure eachskidshoeto the snowthrower 2 Reassemble new skidshoeswiththe fourcarriagebolts twoon eachside and he...

Page 19: ...needof adjustment Proceedas follows 1 Shutoff theengineas instructed inthe Operationsection 2 Loosenthe lowerhexbolt onthe drivecable bracket SeeFigure 19 3 Positionthe bracketupwardto providemoreslack or downward to increasecabletension 4 Retightenthe lowerhex bolt 5 Checktheadjustmentof the drivecontrolas describedabove Chute Bracket If the spiralat the bottomof the chutedirectionalcontrolisnotf...

Page 20: ...he plasticbelt coveronthe frontof the engineby remov ingthe twoself tappingscrews SeeFigure21 3 Rollthe augerbeltoff theenginepulley See Figure22 4 Carefullypivotthe snowthrowerupandforwardso that it restson theaugerhousing 5 Removethe framecoverfromthe undersideof the snowthrower by removingfourself tappingscrewswhichsecureit SeeFigure 23 Figure21 f J Figure22 f 20 Figure23 J ...

Page 21: ...bly section ofthis manual NOTE DoNOT forget toreinstall the shoulder screw and reconnect the spring tothe frame after installing areplacement auger belt Drive Belt Toremoveand replaceyoursnowthrower sdrivebelt proceedas follows 1 Topreventspillage removeallfuel fromtankby runningengine untilit stops 2 Removetheplasticbelt coveronthe frontof the engineby remov ingthe twoself tappingscrews See Figur...

Page 22: ... 7 FRiCTiON WHEEL REMOVAL Ifthe snowthrowerfailsto drive withthedrivecontrolengaged andperformingthe drivecontrolcableadjustmentfailsto correct the problem the frictionwheelmayneedto be replaced Followthe instructionsbelow Examinethe frictionwheelfor signsof wearor crackingandreplaceif necessary 1 Topreventspillage removeall fuel fromtank by runningengine until it stops 2 Carefullypivotthe snowthr...

Page 23: ...efrictionwheeland replacingonly the rubber ring proceedas follows 1 Removethefour screwswhichsecurethe frictionwheel sside platestogether SeeFigure32 2 Removethe rubberringfrombetweenthe plates 3 Reassemble the side plateswitha newrubberring NOTE Whenreassembling the frictionwheelassembly makesure thatthe rubberringis centeredand seatedproperlybetweenthe side plates Tighteneachscrewonlyone rotatio...

Page 24: ...d reinstallthe sparkplug 4 Cleandebrisfromaroundengine andunder around andbehind muffler Applya lightfilmof oilon anyareasthatare susceptible to rust Storeina clean dry andwellventilatedareaawayfromanyap pliancethatoperateswithaflameor pilotlight suchas a furnace waterheater or clothesdryer Avoidany areawitha spark producingelectricmotor or wherepowertoolsareoperated Neverstoresnowthrowerwithfuel ...

Page 25: ...ion 2 Filltankwith clean freshgasoline 3 Drainfueltankby runningengineuntil it stops Refill withfreshfuel 4 ContactyourSearsParts RepairCenter 1 Stopengineimmediately and disconnectsparkplug wire Tightenall boltsand nuts Ifvibrationcontinues haveunit servicedbya SearsParts RepairCenter 1 Connectandtightensparkplugwire 2 Removeiceand snowfromgascap Becertainvent holeis clear 1 Adjustdrivecontrolcab...

Page 26: ...Craftsman Snow Thrower IViodel 247 88787 i35_ 26 ...

Page 27: ...racket 23 946 04230A AugerDriveCable 24 784 5580 4044 SkidShoe 25 741 0663 FlangeBearing 50IDx 75ODx 59 26 710 0703 CarriageScrew 1 4 20x 75 D O 0 712 04064 FlangeLockNut 1 4 20 28 731 04705D ChuteAdapter 5 29 741 0662 FlangeBearing 75IDx 1 00D x 59 30 736 3084 FiatWasher 51x 1 12x 06 31 936 0351 FiatWasher 760IDx 1 50ID 32 721 0327 Oil Seal 75x 1 131 x 188 33 721 0325 Plug 1 4x 437 34 718 04071 T...

Page 28: ...Craftsman Snow Thrower Model 247 88787 28 ...

Page 29: ... 13 749 04190A 0637 UpperRH Handle 14 749 04191A 0637 UpperLH Handle 15 749 04138A 0637 LowerHandle 16 710 0572 CarriageScrew 5 16 18x 2 25 17 631 04131B _ LowerChuteAssembly 18 731 04912B LowerChute 19 710 04071 CarriageBolt 5 16 18x 1 00 20 710 0451 CarriageBolt 5 16 18x 750 21 712 04063 FlangeLockNut 5 16 18 22 784 5647 0637 ChuteCrankBracket 23 731 04426A UpperChute 24 731 04869A FlangeKeeper ...

Page 30: ...Craftsman Snow Thrower Model 247 88787_ _8_ L5 0_ _ _ i S 2x 30 ...

Page 31: ...9 710 0896 Screw 1 4 14x 625 30 748 0190 Spacer 508IDx 75OD x 68 31 756 0625 Cable Roller 32 790 00096 0637 AugerCableFrontGuideBracket D O O 790 00180A 4044 Frame 34 790 00206A 0637 AugerCableGuideBracket 35 790 00207B DriveCableGuideBracket 36 790 00316 4044 FrameCover 37 790 00289A 0637 CoverPlate Standard 38 790 00208C WheelDriveIdler Bracket 39 756 04252 PulleyHalf 3 8 x 1 716OD 40 756 04113 ...

Page 32: ...88787 m 19 20 20 21 22 23 24 25 26 951 11282 710 04911 951 10657 951 11285 712 04214 951 11111 710 04914 710 04915 951 10642A m O O MufflerAssembly StudM8x36 MufflerStudAssembly ExhaustPipeGasket Nut M8 ExhaustPipeShield Bolt M6xl0 Bolt M6x12 MufflerShield 32 ...

Page 33: ...lb Carburetor Assembly Carburetor GasketPlate ChokeShaft ChokePlate ThrottleShaft ThrottlePlate ScrewM3x5 LockWasher Gasket ThrottlePlate IdleJetAssembly IdleSpeedAdjustingScrew n a 951 11699 951 11906 n a n a n a n a n a n a n a 951 11589 n a 951 11348 710 04945 951 11349 710 04938 951 11020A D O O MixtureScrew PrimerHose HoseClamp Carburetor Body FloatPin EmulsionTube NeedleValve MainJet NeedleV...

Page 34: ...Craftsman Engine IViodel 165 SUB 11 For Snow IViodel 247 88787 J_ Jl I 34 ...

Page 35: ...ing 6205 WoodruffKey CrankshaftKit Incl 66 64 65 74 79 GovernorGear ShaftAssembly DowelPin7x14 DowelPin9x14 Crankcase CoverGasket CoverComp LeftCrankcase m 72 73 74 75 76 77 78 79 125 710 04932 951 11283 951 11368 951 11246 951 11350 736 04440 710 04906 951 11370 951 10641 952Z165 SUB 11 951 11248A 951 10661B 951 11061A 951 11062B m O O BoltM8x32 OilFill PlugAssembly OilSeal 25x41 25x6 Crankcase C...

Page 36: ...Craftsman Engine IViodel 165 SUB 11 For Snow IViodel 247 88787 ii 36 ...

Page 37: ...djustingNut Valve RockerArm Bolt Pivot Adjuster Exh Valve Retainer Ex Valve Spring ValveSpring IntakeValveSeal Bolt M8x55 PushRod Guide CylinderHeadAssembly Incl 4 5 7 14 16 17 21 29 30 46 50 51 m 18 46 47 48 49 5O 51 126 951 10292 951 11898 951 10648 951 11899 715 04090 951 10647A 951 10647A 951 11063 m W O SparkPlug F6Rtc Gasket CylinderHead PushRod Kit Tappet DowelPin 10x16 ValveKit ValveKit Va...

Page 38: ...11110 710 04940 710 04919 951 10805 951 10909 951 10911 712 04209 710 04915 951 11509 736 04455 710 04974 951 10658 731 05696 D W O IgnitionCoil Assembly Air FlowShield BoltM6xlO BoltM6x25 Flywheel Fan Cooling Pulley Starter Nut Special M14x1 5 BoltM6x12 BlowerHousing Gasket6 BoltM6xlO RecoilStarter RecoilStarterHandle 38 ...

Page 39: ...g ThrottleLinkage GovernorArm NutM6 GovernorArmBolt FuelHoseClamp FuelHose BoltM6x12 DipstickDecorationCover Bolt BoltM6x12 m 111 112 113 114 115 116 117 118 119 120 121 122 123 124 951 11381 951 11913 951 11904 951 12482 951 10649A 951 11933 951 10653B 710 04914 951 11114 712 04212 710 05197 736 04526 710 04918 951 11109 D O 0 Oil FillTubeO Ring Oil FillTubeAssembly Dipstick O Ring DipstickAssemb...

Page 40: ...42 43 44 45 951 11897 951 11112 951 10634 712 04213 951 11284 951 10757 951 10637 951 10637 731 05632 951 10640 951 10635 710 04919 D 0 0 CarburetorGasketPlate ChokeControl Air CleanerHousing Nut ChokeKnob ThrottleControlKnob KeySwitch KeySwitch Base Key Choke PushRod HeaterBox BoltM6x25 4O ...

Page 41: ...AV 01 t_ 3NIHOV_ 9NIOIAEI3S EIO 9NIOOO IONn IEIO 1 I8 OqddO LS MH SlEIVd9NIAOIN NV lllNn S31ONVH ONIH 18 NIVIN IEI ONV INION I d01S SEFIA II HoInlo IgVgN ISIO _ liflH3 igEIVH3 IIO 9013Nfl 01 1001lflO NV rl3 lsn z 133 10NV SONVH vlnawv NVO EFIgnv EIO tt3 ll3alll HIIM IOVINO3 El lgnvONV EI3II II IWI 9NIIVIOEIWOEI I tWMVdt lH I 777X43688 777S32236 777D16340 777123423 777D16343 777D16415 CHUTE DIRECTI...

Page 42: ... your smalloff roadengineto an AuthorizedMTDServiceDealeras soonas a problemexists Thewarranted repairsshouldbe completedina reasonableamountof time notto exceed30 days Ifyou haveanyquestionsregarding yourwarrantyrightsand responsibilities you shouldcontacta MTDServiceRepresentative at 1 800 800 7310 andaddressis MTDCONSUMER GROUP RO Box361131 ClevelandOH 44136 0019 DEFECTS WARRANTY REQUIREMENTS F...

Page 43: ... without charge tothe owner Such use will not reduce the warranty obligations ofMTD 10 Add on ormodified parts that are not exempted bythe AirResources Board may not beused The use ofany non exempted add on or modified parts shall begrounds fordisallowing awarranty claim made inaccordance with this article The engine manufacturer shall not be liable under this article towarrant failures ofwarrante...

Page 44: ...hind lawn mower is used 20 to 25 hours per year Therefore the Emissions Durability Period of an engine with an intermediate rating would equate to 10 to 12 years The Air index is a calculated number describing the relative level of emissions for a specific engine family The lower the Air Index the cleaner the engine This information is displayed in graphical form on the emissions label After July ...

Page 45: ...tion phone support from a Sears representative Think of us as a talking owner s manual Once you purchase the Repair Protection Agreement a simple phone call is all that it takes for you to schedule service You can call anytime day or night or schedule a service appointment online The Repair Protection Agreement is a risk free purchase If you cancel for any reason during the product warranty period...

Page 46: ... o reparaciones porpinchaduras con objetosexternoscornoclavos espinas toconeso vidrios Reernplazo o reparaci6nde neurn_ ticos o ruedascornoresultado del desgastenormal unaccident o funcionarniento o rnantenirniento incorrectos Reparacionesrequeridascornoresultado del uso inadecuadopot partedeloperador incluyendo entreotrosel da_oocasionadoporobjetos queirnpactanla rn_ quina y quetuercenel bastidor...

Page 47: ... No perrnitanuncaque los ni_osrnenoresde 14a_osutilicen estarn_ quina Los ni_osde 14a_osen adelantedebenleery entenderlas instrucciones de operaci6ny norrnasdeseguridad contenidaseneste manual yen la rn_ quina ydebenser entrena dosy supervisados porun adulto Nuncaperrnitaquelos adultosoperenestarn_ quina sin recibir antesla instrucci6napropiada Losobjetosarrojadosporla rn_ quina puedenproducirlesi...

Page 48: ...arnente a la posici6nde desengrane cuandose lassuelta Nuncaoperela rn_ quina si faltaunrnontajedelcanalo si el rnisrnoest daSado Mantengatodoslosdispositivosde seguri daden su lugaryen funcionarniento Nuncaenciendaelmotorenespacioscerradoso en unazona con pocaventilaci6n Elescapedel motorcontienernon6xidode carbono ungas inodoroy letal Noutilicela rn_ quina bajola influenciadelalcoholo las drogas ...

Page 49: ...rnisrnay paraevitarasi quese congelela barrena irnpulsor SegOn laCornisi6nde Seguridad de Productosparael Consurni dorde los EstadosUnidos CPSC y laAgenciade Protecci6n Arnbientalde los EstadosUnidos EPA esteproductotieneuna vida Qtilmediadesiete 7 a_os 660 horasdefuncionarniento AI finalizarlavida Otilmedia adquieraunarn_ quina nuevao hagainspeccionaranualrnente _staporun distribuidordeservicio a...

Page 50: ...turas de descarga mientras la m_iquina corre Alli hacen girar I_iminas dentro LA ADVERTENCIA TALADRO ROTATIVO No ponga manos o pies cerca del giro de partes en el alojamiento de taladro aspa o asamblea de tolva Contacto con las partes rotativas puede amputar manos y pies OBJETOS LANZADOS POR ADVERTENCIA Esta m_iquina puede recoger y lanzar objetos que pueden causar la herida personal seria GASOLIN...

Page 51: ...ecci6n Barrenas enla secci6nde Servicioy Mantenirniento paraobtenerrn_ s inforrnaci6n sobreel reernplazodelos pasadoresdecuchillade barrena MONTAJE 1 Observeel _ reainferiortraserade la rn_ quina quitanievepara asegurarse de quearnboscablesest_nalineadoscon las gufas rotatoriasantesdegirarla rnanijahacia arriba Vealafigura 1 Figura1 J NOTA AsegQrese de quelos extrernossuperioresdecada cable est_ n...

Page 52: ...a palmade surnanoparaaplcar unapresi6nr_ pida y firmeen la parteposteriorde cadauno a b Quitela arandelaplanay el brochedehorquila delextremo delcontroldireccionaldelcanal Inserteelextremodelcontrol direccional delcanalenel soporte inferior y asegOrelo mediante laarandela planay el broche dehorquilaqueacabade retirar Vealafigura5 Sies necesario puedeajustarse elsoporteinferior Consute Ajuste delso...

Page 53: ...fladosparaprop6sitosde envio Reviselapresi6ndelos neurn_ ticos antesde lanievelanzador Se refierena la paredlateraldelneurn_ tico parael fabricantede neurn_ ti cos recornendado psi y desinfiar o inflar los neurn_ ticos segQnsea necesario NOTA Laigualdadde lapresi6nde los neurn_ ticos debeset man tenidaentodo rnornentoparalos efectosde laperformance AJUSTES Zapatas antideslizantes Laszapatasantides...

Page 54: ...orrna 1 Cuandose sueta el controlde la barrenay est en posici6n desengranada arriba elcable debetenet rnuypocojuego NO debeestartenso 2 Enun_ reabienventilada arranqueel motorde larn_ quina quitanievesegQnse indicaanteriorrnente en estarnisrnasecci6n 3 Paradoenla posici6ndeloperador detr_ s de la rn_ quina quitanieve engranelabarrena 4 Dejela barrenaengranadaduranteaproxirnadarnente diez 10 segund...

Page 55: ... activahaciendogirar elcontroldeobturaci6na posici6nCHOKE AIactivarel controldeobturaci6nse cierrala placadeobturaci6ndel carburadory seayudaa encenderel motor Silenciador Manijadelarrancador _ de retroceso Cebador _ Llave Control del regulador cebador Llene clel ac_ite j Figura10 CONTROL DEL REGULADOR J Elcontroldel regulador est ubicadoenla partetraseradel motor Regulalavelocidaddelmotor y Ioapa...

Page 56: ...CIONAL DEL CANAL CCONTRO1 DiRECCiONAL DEL CANAb DESCARGA IZQUIERDA DESCARGA INCLJHACI6NDEL CANALAJUSTABLE J Paracarnbiarladirecci6nhaciala cualse arrojalanieve gireel controldireccionaldelcanal HERRAMIENTA DE LIMPIEZA Nuncause susrnanosparaliberarun rnontajede canaltapado Antes de destaparlo apagueelmotory perrnanezca detr_ sdelas rnanijas I hasta quetodas as partesrn6v es se hayandetendo 1 Laherr...

Page 57: ...aday conel motor apagado Nofumeni perrnitallamaso chispasenel lugardonde se cargacombustible o se encuentrael dep6sitodecombustible delmotor No Ileneen excesoel tanquede combustible Despu_sdecargar combustible asegQrese de queel tap6ndeltanqueest_bien cerradoy asegurado Tengacuidadode noderrarnarcombustible al realizarla recarga Elcombustiblederrarnado o susvaporesse puedenincendiar Si sederrarnac...

Page 58: ...ento de la transmisi6n PROCEDIMIENTO PARA ENGRANAR LAS BARRENAS 1 Aprieteelcontrolde la barrenacontralamanijay las barrenas rotar_ n Su61tela y las barrenasse detendr_ n BARRENAS Lasbarrenasest_ n ajustadasaleje espiralcon cuatropasadores decuchillay pasadoresdechaveta Sila barrenagolpeaunobjeto extra_oo unabarrade hielo la m_ quina quitanieveest dise_adade maneraque lospasadoresse puedencortar Si...

Page 59: ... Anualmenteo50horas 1 Elaceitede motor 1 Cambio Anualmenteo100horas 1 Bujia 1 Cambio AntesdeAlmacenaje 1 Sistemade combustible 1 Elmotordirigidohastaqueestose parea faltadel combustible MANTENIMIENTO DE MOTOR Antesde realizartareasde lubricaci6n reparaci6no inspecci6n desengranetodosloscontrolesy detengael motor Esperea quese detengantodaslas piezasm6viles Control del aceite del motor NOTA Verifiq...

Page 60: ...sodelAceiteRecornendada Lacapacidaddelaceitedel motor es 20onzas 1o1 40 o 20 o 0o 200 400 oc 30 o 20 o 10o 0o NOutiliceaceitessin detergente o paramotorde dostiernpos Podria acortarlavida Otildelmotor 7 Vuelvaa colocary ajustarel tap6nde Ilenado lavarillade nivel deaceite L_ vese bienlas rnanoscon aguay jab6ninrnediatarnente despu_s de tocaraceiteusado f Tap6n de Drenaje de Aceite Figura14 f I de ...

Page 61: ...ladel ejede la barrena Rode lubricante al interiordel eje alrededorde los separadores Asimismo lubriqueloscojinetesbridadosquese encuentranenambosextremosdeleje Veala figura17 PLACA DE RASPADO Y ZAPATAS ANTIDESLIZANTES Laplacade raspadoy las zapatasantideslizantes ubicadasen la base de lam_ quina quitanieveest_ nsujetasa desgaste Peri6dicamente deberiacontrolarlos pernosy reemplazarlos cuandoseane...

Page 62: ...oajustarel cabledela transrnisi6n Procedadela siguienternanera 1 Apagueel motorcornose indicaen lasecci6nde Operaci6n 2 Aflojelatuercahexagonalinferiordel soportedelcablede la transrnisi6n Veala figura19 3 Ubiquela rn6nsulahaciaarribaparabrindarrn_ s juego o hacia abajoparaaurnentarlatensi6ndel cable 4 Vuelvaa apretarla tuercahexagonalsuperior 5 Cornpruebe el ajustedel rnandode launidadcornose des...

Page 63: ...2 Saquela cubiertapl_ stica de lacorreaubicadaen el frentedel motor Paraello saquelosdos tornillosautorroscantes Veala figura21 3 Saquela correade la barrenade la poleadelmotor Veala figura 22 4 Gireconcuidadola m_ quina quitanievehaciaarribay hacia delantede maneraquequedeapoyadasobrela cajade la barrena 5 Saquela cubiertadelmarcodesdedebajode la m_ quina quitanieveretirandoloscuatrotornillosauto...

Page 64: ...rel torniNo con rebordey volvera conectarel resorteal marcotrasinstalarunacorreade la barrenade repuesto La correa de la transrnisi6n Pararetirary reemplazar la correadela barrenadesu m_ quina quitanieve procedacomose indicaa confinuaci6n 1 Paraprevenirel derramamiento eNmine todo elcombustibledel tanquehaciendofuncionarel motorhastaquese detenga 2 Saquela cubiertapl_ stica de lacorreaubicadaen el...

Page 65: ...quina quitanievenose accionacuandoelcontrolde la trans rnisi6nestb engranado y si al realizarelajustedel cabledecontrolde la transrnisi6n queapareceel problernano secorrige tal vezse deba reernplazarla ruedadefricci6n Sigalas instruccionesqueaparecen a continuaci6n Examinela ruedade fricci6nenbuscadesignosde desgasteogrietasy reernplacesi es necesario 1 Paraprevenirel derramarniento elirninetodoel...

Page 66: ...llo degorna proceda corno seindica acontinuaci6n 1 Saque loscuatro tornillos dernantienen unidas lasplacas laterales delarueda defricci6n Vea lafigura 32 2 Retire elanillo degorna deentre lasplacas 3 Reensarnble lasplacas laterales con unnuevo anillo degorna NOTA AIreensarnblar elconjunto delarueda defricci6n asegQrese deque elanillo degorna esta correctarnente centrado yasentado entre lasplacas l...

Page 67: ...detr_ s del silenciador ApNqueunacapa delgadade aceiteen todaslas _ reas quepuedenNegar a oxidarse Alrnaceneenun sectorlirnpio secoy bienventilado lejosde cualquierartefactoquefuncioneconunaNarna o luz pilotocorno unhomo calentadordeaguao secadorde ropa Evitecualquier sectorcon un motorel_ctricoqueproduzcachispaso dondese utilicenherrarnientas el_ctricas Nuncaalrnacenelarn_ quina quitanieveconcomb...

Page 68: ...tricoy el otro extremoa un triplede 120 voltios detierra tomade CA Elmotorfuncionademanera err_ tica 1 La unidadest funcionandoen laposici6n CHOKE obturaci6n 2 EIcombustibleesviejo 3 Aguao suciedadenel sistemadel combus tible 4 M_ sgobernadosmotor 1 Cambiela palancade obturaci6na la posici6nOFF apagado 2 Lbne el tanquecongasolinalimpiay fresca 3 Drenarel tanquedecombustibleenel motoren marchahasta...

Page 69: ...ireel hieloy la nievedel tap6nde Ilenadodel combustible Cornpruebe queel orificiode venti laci6nnoest_obstruido 1 Ajusteel cabledelcontrolde transrnisi6n Consulte la secci6nde Servicioy Mantenirniento 2 Reernplace la correade latransrnisi6n Consultela secci6nde Servicioy Mantenirniento 3 Ruedade fricci6ndecarnbioo contacteconsu centrode partesy reparaciones Sears 1 Detengael motorde inrnediatoy de...

Page 70: ...te porlafaltade reciboso porsu imposibi lidadde asegurarquese realizar_ n todoslos serviciosdemantenimiento programado Comopropietariodelmotorpeque5oparaequipotodo terreno sinembargo ustedtambi n debesaberque MTDpuededenegarlacoberturadela garantiasi su motorpeque5oparaequipotodoterrenoo unapiezadel mismofallandebidoa usoincorrecto negligencia mantenimiento indebido oa modificaciones noaprobadas U...

Page 71: ...te todo elperiodo degaranfia delmotor definido enlaSubsecci6n a 2 MTD rnantendr_ unsurninistro depiezas cubiertas por garantia suficiente para satisfacer ladernanda esperada para tales piezas 9 Cualquier pieza dereernplazo sepodr_ usar para elcurnplirniento del rnantenirniento oreparaciones bajo garanfia yse surninistrar_ sin cargo alpropietario Dicho uso noreducir_ lasobligaciones degarantia deMT...

Page 72: ...do de Duraci6n de Emisiones de un motor con una clasificaci6n intermedia sena equivaiente a entre 10 y 12 aSos Laciasificaci6n de aire es un nQmero calculado para describir el nivel relativo de emisiones para un grupo de motores en particular Cuanto menor sea la clasificaci6n de aire mayor es la limpieza del motor La informaci6n se presenta de forma grAfica en la etiqueta de emisiones Despu_s del ...

Page 73: ...soluci6n RApida el apoyo telef6nico de un Chamusca al representante Pienseen nosotros como el manual de un dueSohablador Una vezadquirido el Acuerdo puede programar el servicio con tan s61orealizar una Ilamadatelef6nica Puede Ilamaren cualquier momentodel dia o de la noche o programar un servicio en linea ElAcuerdo de Protecci6nde Reparaci6nes unacompra sin riesgo Si usted anula por alguna raz6n d...

Page 74: ...74 ...

Page 75: ...75 ...

Page 76: ...carry in items like vacuums lawn equipment and electronics call anytime for the location of your nearest Sears Parts Repair Service Center 1 800 488 1222 U S A 1 800 469 4663 Canada www sears com www sears ca To purchase a protection agreement on a product serviced by Sears 1 800 827 6655 U S A 1 800 361 6665 Canada Para pedir servicio de reparaci6n a domicilio y para ordenar piezas 1 888 SU HOGAR...

Reviews: