background image

OPERATOR’S MANUAL

7-1/4 in., 19.2 VOLT
CORDLESS DUAL LASER CIRCULAR SAW

Model No. 
315.115850

Save this manual for future reference

WARNING: 

To reduce the risk of injury, 

the user must read and understand the 
operator’s manual before using this 
product.

Customer Help Line: 1-800-932-3188

Sears, Roebuck and Co., 3333 Beverly Rd., Hoffman Estates, IL 60179 USA

Visit the Craftsman web page: www.sears.com/craftsman

983000-797
5-16-06 (REV:00)

BATTERIES AND CHARGERS 

SOLD SEPARATELY

Summary of Contents for 315.115850

Page 1: ...NING To reduce the risk of injury the user must read and understand the operator s manual before using this product Customer Help Line 1 800 932 3188 Sears Roebuck and Co 3333 Beverly Rd Hoffman Estates IL 60179 USA Visit the Craftsman web page www sears com craftsman 983000 797 5 16 06 REV 00 BATTERIES AND CHARGERS SOLD SEPARATELY ...

Page 2: ...te to state Sears Roebuck and Co Dept 817 WA Hoffman Estates IL 60179 INTRODUCTION This tool has many features for making its use more pleasant and enjoyable Safety performance and dependability have been given top priority in the design of this product making it easy to maintain and operate WARNING Some dust created by power sanding sawing grinding drilling and other construction activities conta...

Page 3: ... appropriate conditions will reduce personal injuries Avoid accidental starting Ensure the switch is in the off position before plugging in Carrying power tools with your finger on the switch or plugging in power tools that have the switch on invites accidents Remove any adjusting key or wrench before turning the power tool on A wrench or a key left attached to a rotating part of the power tool ma...

Page 4: ...ed WARNING To reduce the risk of injury user must read instruction manual When servicing a power tool use only identical replacement parts Follow instructions in the Maintenance section of this manual Use of unauthorized parts or failure to follow Maintenance instructions may create a risk of shock or injury SPECIFIC SAFETY RULES DANGER Keep hands away from cutting area and the blade Keep your sec...

Page 5: ...ickback SPECIFIC SAFETY RULES Use extra caution when making a plunge cut into existing walls or other blind areas The protruding blade may cut objects that can cause kickback Check lower guard for proper closing before each use Do not operate saw if lower guard does not move freely and close instantly Never clamp or tie the lower guard into the open position If saw is accidentally dropped lower gu...

Page 6: ...ediately with soap and water then neutralize with lemon juice or vinegar If liquid gets into your eyes flush them with clean water for at least 10 minutes then seek immediate medical attention Following this rule will reduce the risk of serious personal injury If the power supply cord is damaged it must be replaced only by the manufacturer or by an authorized service center to avoid risk LASER GUI...

Page 7: ...shock If extension cord must be used make sure a That pins on plug of extension cord are the same number size and shape as those of plug on charger b That extension cord is properly wired and in good electrical condition and c That wire size is large enough for AC ampere rating of charger as specified below Cord Length Feet 25 50 100 Cord Size AWG 16 16 16 NOTE AWG American Wire Gauge Do not opera...

Page 8: ...ury user must read and understand operator s manual before using this product Eye Protection Always wear safety goggles or safety glasses with side shields and as necessary a full face shield when operating this product Precautions that involve your safety Failure to keep your hands away from the blade will result in serious personal injury Failure to keep your hands away from the blade will resul...

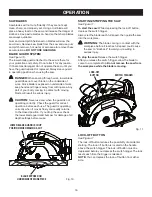
Page 9: ...damage Before beginning power tool operation always wear safety goggles or safety glasses with side shields and when needed a full face shield We recommend Wide Vision Safety Mask for use over eyeglasses or standard safety glasses with side shields Always use eye protection which is marked to comply with ANSI Z87 1 WARNING SAVE THESE INSTRUCTIONS The following signal words and meanings are intende...

Page 10: ...n Cutting Depth at 45 1 13 16 in No Load Speed 3 500 r min RPM Charger Input 120 V 60 Hz AC only Charge Rate 1 hr Laser Guide Class IIIa 5 mW 650nm SWITCH TRIGGER SPINDLE LOCK BUTTON BEVEL ADJUSTMENT KNOB LOCK OFF BUTTON EDGE GUIDE HEX KEY DEPTH ADJUSTMENT KNOB Fig 1 HEX KEY STORAGE LASER GUIDE LASER GUIDE SWITCH LASER GUIDE ...

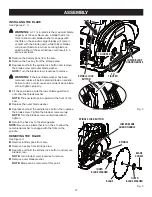
Page 11: ...e the blade when turning the blade screw NOTE Do not run circular saw with spindle lock engaged WIDTH OF CUT SCALE When making straight cross cuts or rip cuts the scale can be used to measure up to 4 1 2 in on the right side of the blade and up to one inch on the left side of the blade UNPACKING This product requires assembly Carefully remove the tool and any accessories from the box Make sure tha...

Page 12: ... blade washer has been removed replace it before placing blade on spindle Failure to do so could cause an accident since blade will not tighten properly Fit the saw blade inside the lower blade guard and onto the inner blade washer NOTE The saw teeth point upward at the front of the saw Replace the outer blade washer Depress and hold the spindle lock button then replace the blade screw Tighten the...

Page 13: ...al temperature range the green LED on charger will come on Allow battery pack to reach normal temperature then the red LED will come on NOTE If the charger does not charge the battery pack under normal circumstances return both the battery pack and charger to your nearest Sears or other qualified service center for electrical check Charge the battery pack only with the charger provided Make sure t...

Page 14: ...ery pack under normal circumstances return both the battery pack and charger to your nearest Sears or other qualified service center for electrical check TO INSTALL BATTERY PACK See Figure 5 Place the battery pack in the saw Align the raised rib on the battery pack with the groove inside the saw then slide the battery pack into the saw Make sure the latches on each side of the battery pack snap in...

Page 15: ...ool incorrectly or misusing the tool To lessen the chance of kickback follow these safety practices Keep blade at the correct depth setting The depth set ting should not exceed 1 4 in below the material being cut Inspect the workpiece for knots or nails before cutting Never saw into a knot or nail Make straight cuts Always use a straight edge guide when rip cutting This helps prevent twisting the ...

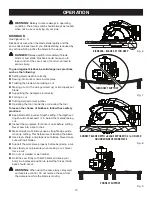
Page 16: ... the guard for correct operation before each use The guard is operating correctly when it moves freely and readily returns to the closed position If you drop the saw check the lower blade guard and bumper for damage at all depth settings before reuse OPERATION Fig 11 STARTING STOPPING THE SAW See Figure 11 To start the saw While depressing the lock off button depress the switch trigger Always let ...

Page 17: ...blade depth will increase the chance of kickback and cause the cut to be rough For more depth of cut accuracy a scale is located on the upper blade guard Remove the battery pack from the saw Loosen the depth adjustment knob Determine the desired depth of cut Locate the depth of cut scale on the back of the upper blade guard Hold the base flat against the workpiece and raise or lower the saw until ...

Page 18: ...d aligned If the lasers become misaligned after time refer to the Adjustments section later in this manual NOTE Make a trial cut on a piece of scrap material to ensure laser is aligned adjusting the laser may be necessary Mark the line to be cut on the workpiece Adjust the depth and angle of the cut as needed Insert battery pack into saw and press the laser guide button to activate the laser Start...

Page 19: ...f control could cause an accident resulting in possible serious injury To make the best possible cut follow these helpful hints Hold the saw firmly with both hands Avoid placing your hand on the workpiece while making a cut Support the workpiece so that the cut kerf is always to your side Support the workpiece near the cut Clamp the workpiece securely so that the workpiece will not move during the...

Page 20: ... TOP VIEW OF SAW GUIDELINE BLADE GUIDE NOTCH TO RIP CUT WITHOUT EDGE GUIDE See Figure 19 Use a guide when making long or wide rip cuts with the saw Secure the workpiece Clamp a straight edge to the workpiece using C clamps NOTE C Clamp both ends of the straight edge before making a cut Saw along the straight edge to achieve a straight rip cut NOTE Do not bind the blade in the cut TO RIP CUT WITH E...

Page 21: ...t knob Raise motor housing end of saw until you reach desired angle setting on bevel scale Tighten bevel adjustment knob securely WARNING Attempting a bevel cut without having the bevel adjustment knob securely tightened can result in serious injury TO BEVEL CUT See Figure 23 Hold the saw firmly with both hands as shown Rest the front edge of the base on the workpiece Start the saw and let the bla...

Page 22: ...saw to climb up on the workpiece and back toward you Release the trigger and allow the blade to come to a complete stop Lift the saw from the workpiece Clear corners out with a hand saw or sabre saw WARNING Never tie the lower blade guard in a raised position Leaving the blade exposed could lead to serious injury OPERATION POSITIVE 0 BEVEL STOP See Figure 24 The saw has a positive 0 bevel stop tha...

Page 23: ...tional direction NOTE Draw a pencil line on a scrap workpiece parallel to the long edge of the base as a straight line guide to aid in the adjusting process To adjust the front laser Remove the blade Insert battery pack into the saw Turn laser on Rest the front of the base on scrap workpiece Adjust screw as necessary Since blade thicknesses vary always make a trial cut in scrap workpiece to ensure...

Page 24: ... heavy duty adhesive tape Do not attempt to destroy or disassemble battery pack or remove any of its components Nickel cadmium batteries must be recycled or disposed of properly Also never touch both terminals with metal objects and or body parts as short circuit may result Keep away from children Failure to comply with these warnings could result in fire and or serious injury MAINTENANCE GENERAL ...

Page 25: ...25 NOTES ...

Page 26: ...26 CRAFTSMAN CIRCULAR SAW MODEL NUMBER 315 115850 19 33 18 15 13 14 16 12 16 15 20 17 25 11 10 27 28 31 30 32 29 22 21 23 24 9 8 7 5 4 2 1 3 6 12 26 34 35 36 37 ...

Page 27: ...15 540510005 Adjustment Knob 2 16 5228001 Washer 2 17 6614301 Carriage Bolt M6 x 100 mm 1 18 660142001 Carriage Bolt M6 x 12 mm 1 19 671795002 Base Assembly 1 20 6802201 Hex Nut M4 x 3 2 mm 1 21 6621204 Screw M4 x 16 mm 1 22 540511006 Knob Bolt 1 23 680001001 Spring 1 24 6620803 Screw M4 x 22 mm 4 25 660145004 Screw M5 x 43 mm 1 26 671901002 Edge Guide 1 27 940213048 Logo Label 1 28 940214116 Lase...

Page 28: ...essional installation of home appliances and items like garage door openers and water heaters 1 800 4 MY HOME 1 800 469 4663 Call anytime day or night U S A and Canada www sears com www sears ca Our Home For repair of carry in items like vacuums lawn equipment and electronics call or go on line for the location of your nearest Sears Parts Repair Center 1 800 488 1222 Call anytime day or night U S ...

Reviews: