background image

Summary of Contents for 315.277150

Page 1: ...ser must read and understand the operator s manual before using this product Customer HeUp Line 1 800 932 3188 Sears Roebuck and Co 3333 Bevedy Rd Hoffman Estates IL 60179 USA Visit the Craftsman web page www sears com craftsman 983000 481 6 04 Save this manual for future reference ...

Page 2: ...THE UNITED STATES and Sears wil repair it free of charge This warranty gives you specific legal rights and you may also have other rights which vary from state to state Sears Roebuck and Co Dept 817WA Noffman Estates IL 60179 This tool has many features for making its use more pleasant and enjoyable Safety performance and dependability have been given top priority in the design of this product mak...

Page 3: ...er on the switch or plugging in tools that have the switch on invites accidents Remove adjusting keys or wrenches before turning the tool on A wrench or a key that is left attached to a rotating part of the too may result in personal injury Do not overreach Keep proper footing and balance at all times Proper footing and balance enables better control of the too in unexpected situations Use safety ...

Page 4: ...al injury recommended for an extension cord 50 feet or less Protect your lungs Wear a face or dust mask if the in length A cord exceeding 100 feet is not recom mended If in doubt use the next heavier gauge operation is dusty Fo lowing this rule wil reduce the risk of serious personal injury The smaller the gauge number the heavier the cord An undersized cord wil cause a drop in line volt Protect y...

Page 5: ...damp locations Read The Operator s Manual To reduce the risk of injury user must read and understand operator s manual before using this product Eye Protection Always wear safety goggles or safety glasses with side shields and a full face shield when operating this product Safety Alert Precautions that involve your safety Failure to keep your hands away from the blade will result in No Hands Symbo...

Page 6: ... suggest you return the product to your nearest AUTHORIZED SERVICE CENTER for repair When servicing use only identical replacement parts WARNING To avoid serious personal injury do not attempt to use this product until you read thoroughly and understand completely the operator s manual Save this operator s manual and review frequently for continuing safe opera tion and instructing others who may u...

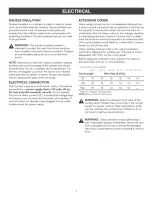
Page 7: ...ble check the power supply EXTENSmON CORDS When using a power tool at a considerable distance from a power source be sure to use an extension cord that has the capacity to handle the current the tool will draw An undersized cord will cause a drop in line voltage resulting in overheating and loss of power Use the chart to deter mine the minimum wire size required in an extension cord Only round jac...

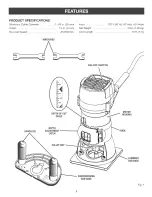
Page 8: ...n 29 mm Collet 1 4 in 6 mm No Lead Speed 25 000 min input 120 V 60 Hz AC enly 4 5 Amps Net Weight 3 Ibs 1 86 kg Cord Length 10 ft 8 m WRENCHES ON OFF SWITCH E 1 2 DEPTHOF gUT SCALE HANDLE S DEPTH ADJUSTMENT LATCH BASE COLLETNUT WOODWOBKING SUB BASE Fig 1 ...

Page 9: ...items listed in the packing list are included hspect the tool carefully to make sure no breakage or damage occurred during shipping Do not discard the packing material unti you have carefully inspected and satisfactorily operated the tool If any parts are damaged or missing please call 1 800 932 3188 for assistance PACKING LIST Laminate Trimmer with Laminate Sub base Woodworking Sub base Sub base ...

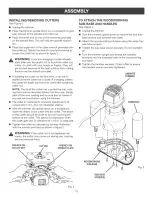
Page 10: ... before using the trimmer The collet is machined to precision tolerances to fit cutters with 1 4 in 6 4 mm diameter shanks With the trimmer stil upside down on a workbench insert the shank of the cutter into the collet The shank of the cutter should be close to but not touching the bottom of the collet This aNows for expansion when the cutter gets hot A clearance of 1 16 in is adequate Tighten the...

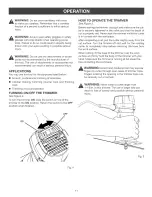
Page 11: ...he OFF position when finished OFF ON HOW TO OPERATE THE TRIMMER See Figure 5 Before starting the trimmer unplug it and make sure the cut ter is securely tightened in the collet and that the depth of cut is properly set Never start the trimmer while the cutter is in contact with the workpiece After completing a cut pull the cutter slightly away from the cut surface Turn the trimmer off and wait for...

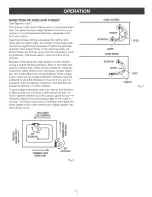
Page 12: ...ery ittle kick back to contend with under normal conditions However shoutd the cutter strike a knot hard grain foreign object etc that would affect the normal progress of the cutting action there will be a slight kickback Kickback could be sufficient to spoil the trueness of your cut if you are not prepared Such a kickback is always in the direction op posite the direction of cutter rotation To gu...

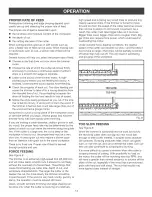
Page 13: ...er rate of feed is learned through practice and use FORCE FEEDmNG See Figure 8 The trimmer is an extremely high speed tool 25 000 min and will make clean smooth cuts if al owed to run freely without the overload of a forced feed Three things that cause force feeding are cutter size depth of cut and workpiece characteristics The larger the cutter or the deeper the cut the more slowly the trimmer sh...

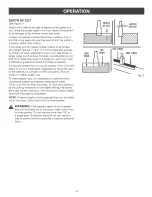
Page 14: ... you do not exceed 1 8 in 3 2 mm depth of cut in a single pass regardless of the cutter size or the softness or condition of the workpiece This will result in a higher quality cut To make deeper cuts it is necessary to make as many successive passes as required lowering the cutter 1 8 in 3 2 mm for each new pass To save time perform a l the cutting necessary at one depth setting then lower the cut...

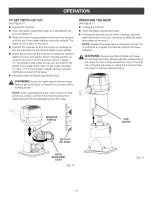
Page 15: ...n the base Securely close the depth adjustment latch WARN NG Avo d the open area of tr mmer base Serious personal injury w I resu t from contact w th a rotating cutter NOTE When adjusting the base note the groove that serves as a stop to prevent the motor housing from s iding directly off and separating from the base REMOV NG THE BASE See Figure 11 Unp ug the trimmer Open the depth adjustment atch...

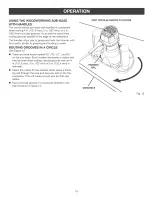
Page 16: ...UTmNG GROOVES mNA CmRCLE See Figure 12 There are three holes marked R2 R2 1 2 and R3 on the sub base Each number represents a radius and may be used when cutting circular grooves that are 4 in 101 6 mm 5 in 127 mm or 6 in 152 4 mm in diameter Select the radius for the desired circle place a finish ing nail through the hole and securely tack it into the workpiece This will create a pivot axis for t...

Page 17: ... on the sub base to the guiding portion of the straight guide Tighten the knob on the straight guide securely Using C clamps and a board to act as the straight edge place the cutter at the desired position on the workpiece and make the cut from right to left as shown by the arrow in figure 13 NOTE The board being used as a straight edge must be 1 4 in 6 4 mm thick or tess to prevent contact with t...

Page 18: ...re failure because the fiberglass chips and gdndings are highly abrasive to bear ings brushes commutators etc Consequently we do not recommended using this tool for extended work on these types of materials However if you do work with any of these materials it is extremely important to clean the tool using compressed air LUBRICATmON All of the bearings in this tool are lubricated with a suffi cien...

Page 19: ...cover Replace the screws on the top cover of the trimmer Reassemble by reversing the steps listed above Tighten a l screws securely Do not overtighten RED BLACK LEAD LEAD CLAMP SCREWS BRUSHTUBE CLAMPS BRUSH ASSEMBW BLACK LEAD BRUSH ASSEMBLY F g 14 Remove the brush assemblies Check for wear Rep ace both brush assemblies when either has ess than 1 4in length of carbon remaining Do not rep ace one si...

Page 20: ...own represents an important part of the Double hsulated System To avoid the possibility of alteration or damage to the System service should be performed by your nearest Sears Repair Center Contact your nearest Sears Retail Store for Service Center information 2O ...

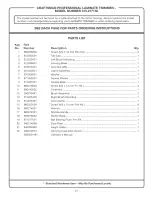
Page 21: ...0 660279004 11 690190002 12 290075041 13 512225403 14 512225301 15 660203003 16 690214001 17 690274001 18 550818002 19 671277001 20 940214068 21 940299363 22 300912074 983000 481 Description Qtyo Screw M4 X 16 mm Pan Hd 2 Top Cap 1 Left Brush Mounting 1 Housing Base 1 Lock Nut M5 1 Clamp Assembly 1 Washer 1 Square Washer 1 Square Base 1 Screw M4 x 12 mm Fi Hd 4 Collet Nut 1 Brush Assembly 2 Right ...

Page 22: ...ronics call or go on line for the location of your nearest Sears Parts Repair Center 1 800 488 1222 Call anytime day or night U S A only www sears com To purchase a protection agreement U S A or maintenance agreement Canada on a product serviced by Sears 1 800 827 6655 U S A 1 800 361 6665 Canada Pard pedir servicio de reparacien Au Canada pour service en frangais a domicilio y para ordenar piezas...

Reviews: