background image

10

OPERATION

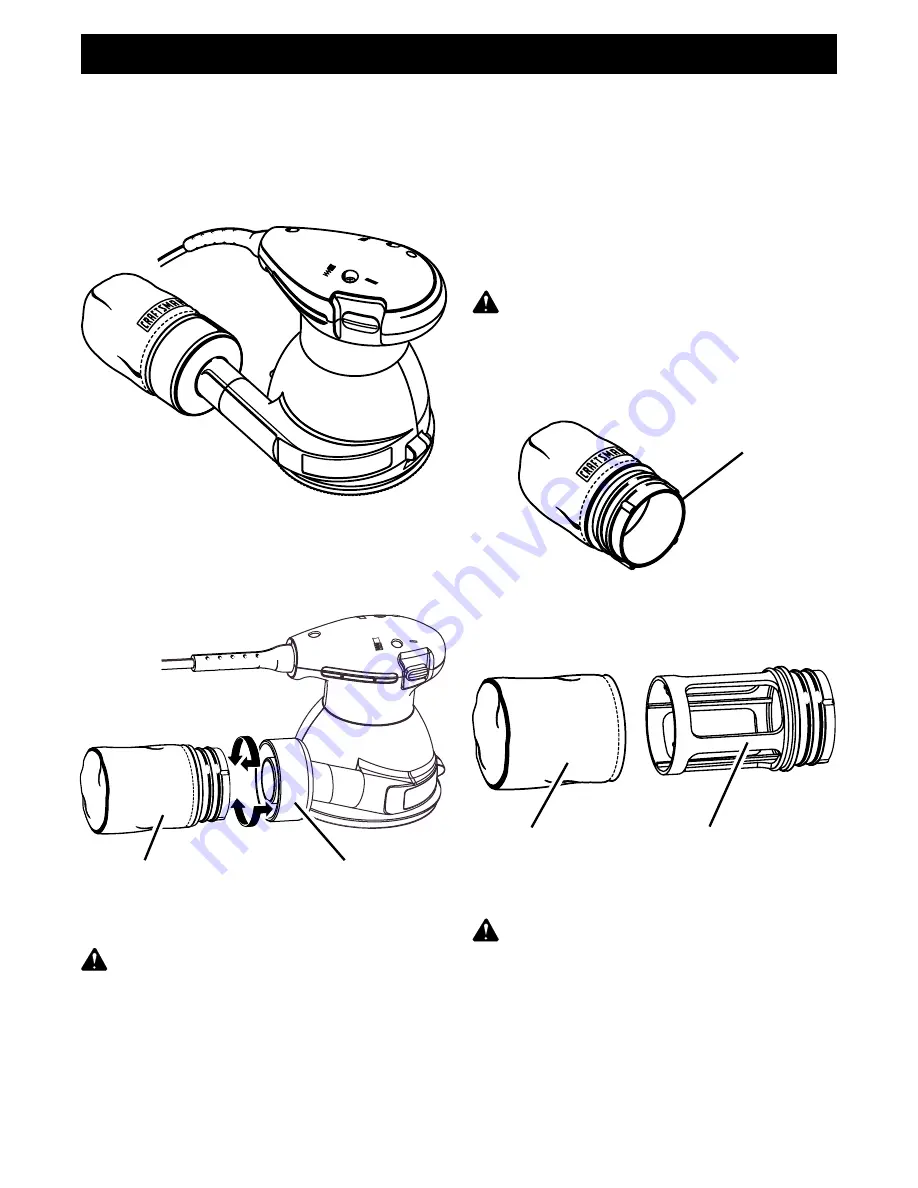
DUSTLESS SANDING

See Figures 4 and 5.

The dust bag assembly provides a dust collection
system for your sander. Sanding dust is drawn up
through the holes of the sanding disc to be collected
in the dust bag during a sanding operation.

CLEANING DUST BAG ASSEMBLY

See Figures 5 – 7.

For more efficient operation, empty dust bag when no
more than half full. This will permit the air to flow
through the bag better. Always empty and clean dust
bag thoroughly upon completion of a sanding opera-
tion and before placing sander in storage.

TO EMPTY DUST BAG

Unplug your sander.

WARNING:

 Failure to unplug your sander could

result in accidental starting causing possible
serious personal injury.

Remove dust bag assembly from sander and
shake out dust. 

See Figures 5 and 6.

TO ATTACH DUST BAG ASSEMBLY

See Figure 5.

For a more thorough cleaning of the dust bag,
remove dust bag from frame, as shown in figure 7,
and shake out dust.

DUST BAG

ASSEMBLY

Fig. 6

Replace dust bag over frame then install dust bag
assembly on sander.

WARNING:

 Collected sanding dust from

sanding surface coatings such as polyurethanes,
linseed oil, etc., can self-ignite in your sander
dust bag or elsewhere and cause fire. To reduce
the risk of fire, always empty your dust bag
frequently (10-15 minutes) while sanding and
never store or leave a sander without totally
emptying its dust bag. Also follow the recommen-
dations of the coatings manufacturers.

Fig. 7

DUST BAG

FRAME

Fig. 4

SANDER SHOWN WITH DUST

BAG ASSEMBLY INSTALLED

Fig. 5

DUST BAG

ASSEMBLY

PULL AND TWIST

TO REMOVE

PUSH AND TWIST

TO ATTACH

BLOWER

EXHAUST

Unplug your sander.

WARNING:

 Failure to unplug your sander could

result in accidental starting causing possible
serious personal injury.

Using a slight twisting motion as shown in figure 5,
firmly slide dust bag assembly in blower exhaust
on sander.

Your sander is now ready for operation.

Summary of Contents for 315.279570

Page 1: ... future reference CAUTION Read and follow all Safety Rules and Operating Instructions before first use of this product Customer Help Line 1 800 932 3188 Sears Roebuck and Co Hoffman Estates IL 60179 USA Visit the Craftsman web page www sears com craftsman 972000 807 11 01 Safety Features Operation Maintenance Parts List R ...

Page 2: ...ebuck and Co Dept 817WA Hoffman Estates IL 60179 Your sander has many features for making your sanding operations more pleasant and enjoyable Safety performance and dependability have been given top priority in the design of this sander making it easy to maintain and operate CAUTION Carefully read through this entire owner s manual before using your new sander Pay close attention to the Rules For ...

Page 3: ...y Dress properly Do not wear loose clothing or jewelry Contain long hair Keep your hair clothing and gloves away from moving parts Loose clothes jewelry or long hair can be caught in moving parts Avoid accidental starting Be sure switch is off before plugging in Carrying tools with your finger on the switch or plugging in tools that have the switch on invites accidents Remove adjusting keys or wre...

Page 4: ...its intended function Check for alignment of moving parts binding of moving parts breakage of parts mounting and any other conditions that may affect its operation A guard or other part that is damaged should be properly repaired or replaced by an authorized service center Following this rule will reduce the risk of electric shock fire or serious injury Make sure your extension cord is in good con...

Page 5: ...safety warning may result in property damage or personal injury to yourself or to others Always follow the safety precautions to reduce the risk of fire electric shock and personal injury NOTE Advises you of information or instructions vital to the operation or maintenance of the equipment SYMBOL MEANING SAVE THESE INSTRUCTIONS Important Some of the following symbols may be used on your tool Pleas...

Page 6: ...owing recommended accessories are currently available at Sears Retail Stores Pressure Sensitive Adhesive Sanding Discs Velcro Type Sanding Discs WARNING The use of attachments or accessories not listed might be hazardous ACCESSORIES WARNING If any parts are missing do not operate this tool until the missing parts are replaced Failure to do so could result in possible serious personal injury The op...

Page 7: ... with a simple switch control To turn your sander ON slide the switch in the direction shown by the arrow in figure 2 To turn your sander OFF slide the switch in the opposite direction as shown by the arrow in figure 2 VARIABLE SPEED SWITCH Model No 315 279570 only See Figure 2 The variable speed feature on Model No 315 279570 allows your sander to operate at speeds that can be adjusted by rotatin...

Page 8: ...ing WARNING Do not allow familiarity with your sander to make you careless Remember that a careless fraction of a second is sufficient to inflict severe injury OPERATION APPLICATIONS Use only for the purposes listed below Sanding on wood surfaces Removing rust from and sanding steel surfaces WARNING Your sander should never be connected to power supply when you are assem bling parts making adjustm...

Page 9: ...o stick properly REMOVING SANDING DISC BEFORE STORAGE Do not store your sander with the sanding disc installed Heat generated from sanding causes the pressure sensitive adhesive to flow and form a tight bond between the backing pad and sanding disc Removing the sanding disc soon after you have finished a sanding operation avoids letting the adhesive set up If the sanding disc is left on the backin...

Page 10: ...cleaning of the dust bag remove dust bag from frame as shown in figure 7 and shake out dust DUST BAG ASSEMBLY Fig 6 Replace dust bag over frame then install dust bag assembly on sander WARNING Collected sanding dust from sanding surface coatings such as polyurethanes linseed oil etc can self ignite in your sander dust bag or elsewhere and cause fire To reduce the risk of fire always empty your dus...

Page 11: ...nding area Hair could be drawn into sander causing serious injury SANDING See Figures 10 and 11 Place sander on workpiece so that all of sanding disc surface is in contact with workpiece CAUTION Be careful not to let your hand cover the air vents Start your sander and move it slowly over workpiece making successive passes in parallel lines circles or crosswise movements Upon completion of sanding ...

Page 12: ...out totally emptying its dust bag Also follow the recommendations of the coatings manufacturers MAINTENANCE WARNING When servicing use only identical Craftsman replacement parts Use of any other parts may create a hazard or cause product damage It has been found that electric tools are subject to accelerated wear and possible premature failure when they are used on fiberglass boats sports cars wal...

Page 13: ...g the damaged area could cause electrical shock resulting in serious injury Extension cords suitable for use with your sander are available at your nearest Sears Retail Store LUBRICATION All of the bearings in this tool are lubricated with a sufficient amount of high grade lubricant for the life of the unit under normal operating conditions Therefore no further lubrication is required MAINTENANCE ...

Page 14: ...14 CRAFTSMAN SANDER MODEL NOS 315 279570 AND 315 279870 SEE NOTE A 1 2 3 4 9 11 12 13 14 10 1 18 16 1 15 17 20 5 5 6 7 8 21 8 19 ...

Page 15: ...54605 Bearing Cap Assembly Includes Key No 12 1 12 969655 001 Ball Bearing NTN 6002LLUC3 1E STD315525 1 13 931744 828 Washer 1 14 622183 026 Screw 8 32 x 1 2 in Flat Hd 1 15 3052701 Backing Pad 1 16 998586 001 Screw 10 32 x 1 4 in Pan Hd 4 17 Sanding Disc 1 18 974484 002 Conversion Pad 1 19 9047801 Dust Bag w Retainer 1 20 5525101 Frame 1 21 3002705 Dust Bag Assembly Includes Key Nos 19 and 20 1 9...

Page 16: ...arts accessories and owner s manuals that you need to do it yourself call Sears PartsDirectSM 1 800 366 PART 6 a m 11 p m CST 1 800 366 7278 7 days a week www sears com partsdirect To purchase or inquire about a Sears Service Agreement 1 800 827 6655 7 a m 5 p m CST Mon Sat Para pedir servicio de reparación a domicilio y para ordenar piezas con entrega a domicilio 1 888 SU HOGAR SM 1 888 784 6427 ...

Reviews: