background image

Summary of Contents for 316.792520

Page 1: ...ON Before using this product read this manual and follow all its Safety Rules and Operating instructions o SAFETY o ASSEMBLY o OPERATION o PARTS LIST o ESPANOL R 15 Sears Brands Management Corporation Hoffman Estates IL 60179 U S A Visit our website www craftsrnan corn 769 07353 P00 01 12 ...

Page 2: ... donotbythemselves eliminate anydanger The instructions orwarnings they give arenotsubstitutes forproper accident prevention measures SYMBOL MEANING DANGER Signals an EXTREME hazard Failure to obey a safety DANGER signal WILL result in serious injury or death to yourself or to others WARNING Signals a SERIOUS hazard Failure to obey a safety WARNING signal CAN result in serious injury to yourself o...

Page 3: ...e the unit at least 30 ft 9 1 m from the fueling source and site before starting the engine DO NOT smoke Never start or run the unit inside a closed room or building Breathing exhaust fumes can kill Operate this unit only in a well ventilated outdoor area SAFETY WARNINGS FOR ELECTRIC UNITS WARNING To reduce the risk of electrical shock use only extension cords approved for outdoor use such as an e...

Page 4: ... Allow the unit to cool 4 For gas powered units disconnect the spark plug wire For electric powered units disconnect the unit from the power source Never store the unit with fuel in the tank inside a building where fumes may reach an open flame pilot lights etc or sparks switches electrical motors etc Be sure to secure the unit while transporting Store the unit in a dry place secured or at a heigh...

Page 5: ...e web site www craftsman com This warranty does not cover the cutting line which is an expendable part that can wear out from normal use within the warranty period This warranty is void if this product is ever used while providing commercial services or if rented to another person This warranty gives you specific legal rights and you may also have other rights which vary from state to state Sears ...

Page 6: ... Cutting Blade Cutting Head Shield Approximate Unit Weight attachment only 2 Ibs 0 9 kg Trimmer Mechanism Bump Head Trimming Line Diameter 0 095 inches 2 41 mm Cutting Path Diameter 17 in 43 18 cm All specifications are based on the latest product information available at the time of printing We reserve the right to make changes at any time without notice ...

Page 7: ...a hole on the mount bracket into the slot on the cutting head shield Fig 1 3 Rotate the cutting head shield counterclockwise to align the hole on the cutting head shield with the hole on the mount bracket Fig 1 4 Insert the square bolt into the hole underneath the cutting head shield Fig 2 Push the square bolt through the cutting head shield and mount bracket 5 Put the washer onto the square bolt ...

Page 8: ...ly tightened For decorative edging with the line head trimmer attachment lock the release button of the attachment into the 90 hole Fig 3 Removing the Attachment 1 Turn the knob counterclockwise to loosen Fig 3 2 Press and hold the release button Fig 4 3 While firmly holding the upper shaft housing pull the attachment straight out of the Convertible TM coupler Fig 5 The Convertible TM Coupler Syst...

Page 9: ... the unit is running Each time the bump knob is tapped about 1 inch 25 4 mm of trimming line is released NOTE Always keep the trimming line fully extended Line release becomes more difficult when the cutting line gets shorter A blade in the cutting head shield will cut the line to the proper length if any excess line is released CAUTION Do not remove or alter the line cutting blade assembly Excess...

Page 10: ...ctiles J NOTE Always use the correct line length when installing trimming line The line may not release properly if the line is too long Part 1 Removing the inner Reel 1 Hold the outer spool with one hand and unscrew the bump knob counterclockwise Fig 9 NOTE The outer spool will remain attached to the unit 2 Inspect the bolt inside the bump knob to make sure it moves freely Replace the bump knob i...

Page 11: ... line Split each end about 6 inches 150 mm 2 Using one split end insert one line into the top hole and the other line into the bottom hole in the inner reel Fig 14A 3 Wind the line tightly in the direction shown on the bottom of the inner reel The split wall will automatically divide the line Wind the line until it is completely divided and about 6 inches 150 mm of line remains NOTE Failure to win...

Page 12: ...f this is not possible store the unit vertically with the engine at the top Long term Storage 1 Thoroughly clean the unit and inspect it for any loose or damaged parts Repair or replace damaged parts and tighten loose screws nuts or bolts Long term Storage for Gas Powered Units 1 Remove the fuel cap tip the unit and drain the fuel into an approved container 2 Start the engine and allow it to run u...

Page 13: ...e isoil cleaner orlubricant inthecutting head iiiiiiiiiiii_i i liiii_iiiiil_iiiiiiiiiiiiiiiiiiiiiiiiiiiiiiiiiiiiiiiii _ _iiiiiiiiiiii_ii iiiiiii_ Stop the unit push the bump knob and pull the line until 4 inches 102 mm is outside of the cutting head Clean and thoroughly dry the cutting head HELP _ _ t _ _ J s Lt L s I Find this and al your other product manuals online Get answers from our team of ...

Page 14: ...tion phone support from a Sears representative Think of us as a talking owner s manual Once you purchase the Repair Protection Agreement a simple phone call is all that it takes for you to schedule service You can call anytime day or night or schedule a service appointment online The Repair Protection Agreement is a risk free purchase If you cancel for any reason during the product warranty period...

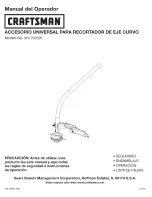
Page 15: ...N Antes de utilizar este producto lea este manual y siga todas las reglas de seguridad e instrucciones de operaci6n o SEGURIDAD o ENSAMBLAJE o OPERACION o LISTA DE PIEZAS Sears Brands Management Corporation Hoffman Estates IL 60179 U S A Visite nuestro sitio web www craftsrnan corn 769 07353 P00 01 12 ...

Page 16: ...ad no eliminan de por si ningQn peligro Las instrucciones o advertencias que dan no sustituyen las medidas adecuadas de prevenci6n de accidentes SJMBOLO SlGNIFICADO PEUGRO Indica un peligro EXTREMO El no obedecer una sehal de seguridad de PEUGRO TRAERA COMO CONSECUENClA que usted u otras personas puedan sufrir lesiones graves o la muerte ADVERTENCIA Indica un peligro GRAVE El no obedecer una sehal...

Page 17: ...61o cables de extensi6n de camisa cilindrica aprobados para su uso al exterior JUEGOS DE CABLES Verifique que su juego de cable este en buenas condiciones Cuando use un juego de cables verifique que el cable que usa es Io suficientemente grueso para conducir la corriente que consumira la unidad Un juego de cables de menor calibre puede causar una caida de voltaje en la linea y ocasionar la perdida...

Page 18: ...o de servicio autorizado Antes de inspeccionar dar mantenimiento limpiar guardar transportar o reemplazar cualquier pieza de la unidad 1 Detenga la unidad 2 AsegQrese de que todas las piezas m6viles esten detenidas 3 Espere a que la unidad se enfrie 4 Para las unidades que funcionan con gasolina desconecte el cable de la bujia Para las unidades que funcionan con electricidad desconecte la unidad d...

Page 19: ...site el sitio web www craftsman com Esta garantia no cubre la I nea de corte que es una pieza consumible que se desgasta debido al uso normal dentro del per odo de garant a Esta garantia se anula si el producto en alg_n momento se utiliza para prestar servicios comerciales o se alquila a otra persona Esta garantia le confiere a usted derechos legales especificos y usted puede tener ademas otros de...

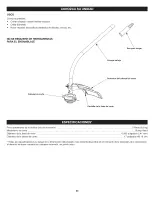
Page 20: ...a Ifnea de corte Protector deJ cabezaJ de corte Peso aproximado de la unidad s61o el accesorio 2 libras 0 9 kg Mecanismo de corte Bump Head Diametro de la linea de corte 0 095 pulgadas 2 41 mm Diametro de la senda de corte 17 pulgadas 43 18 cm Todas las especificaciones se basan en la informaci6n del producto mas reciente disponible en el momento de la impresi6n Nos reservamos el derecho de hacer ...

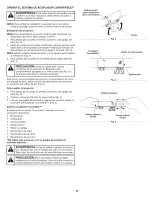
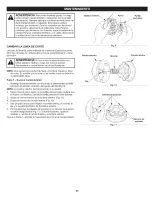
Page 21: ...otector del cabezal de corte Fig 1 3 Rote el protector del cabezal de corte en sentido contrario alas agujas del reloj para alinear el orificio del protector del cabezal de corte con el orificio en el soporte de montaje Fig 1 4 Inserte el perno cuadrado en el orificio bajo el protector del cabezal de corte Fig 2 Presione el perno cuadrado a traves del protector del cabezal de corte y el soporte de...

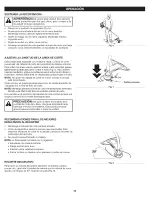
Page 22: ...etada Para hacer cortes orillados decorativos con el accesorio de corte del cabezal de linea trabe el bot6n de desconexi6n del accesorio en el interior del orificio de 90 Fig 3 C6mo quitar el accesorio 1 Para aflojar gire la perilla en sentido contrario alas agujas del reloj Fig 3 2 Oprima y sostenga el bot6n de desconexi6n Fig 4 3 A la vez que sujeta firmemente la caja del eje superior saque el a...

Page 23: ...ncionando Cada vez que se golpea la perilla percusiva se suelta alrededor de 1 pulgada 25 4 mm de linea de corte NOTA Mantenga siempre la linea de corte completamente extendida Resulta mas dificil soltar linea al acortarse la linea de corte Una cuchilla en el protector del cabezal de corte cortara la linea a la Iongitud correcta si se suelta demasiada linea PRECAUCION No quite ni altere el conjunt...

Page 24: ...de linea correcta al instalar la linea de corte Es posible que la linea no se suelte como es debido si es demasiado larga Parte 1 Sacar el carrete interior 1 Sostenga la bobina exterior con una mano y desenrosque la perilla percusiva en sentido contrario a las agujas del reloj Fig 9 NOTA La bobina exterior permanecera fija a la unidad 2 Inspeccione el perno dentro de la perilla percusiva para veri...

Page 25: ...imadamente 6 pulgadas 150 mm 2 Usando uno de los extremos separados inserte una de las lineas en el agujero superior y la otra en el agujero inferior del carrete interior Fig 14A 3 Enrolle la linea firmemente en la direcci6n que se muestra en el fondo del carrete interior La pared separadora dividira la linea automaticamente Enrolle la linea hasta que este completamente dividida y queden aproximad...

Page 26: ... horizontal Si no es posible guarde la unidad en posici6n vertical con el motor para arriba AImacenamiento a largo plazo 1 Limpie bien la unidad y compruebe que no haya piezas sueltas o dadadas Repare o reemplace las piezas dadadas y apriete los tornillos tuercas o pernos flojos AImacenamiento a largo plazo para las unidades que funcionan con gasolina 1 Quitele la tapa al tanque de combustible inc...

Page 27: ... de corte Limpie el cabezal de corte Rebobine la linea Abra el cabezal de corte y quite la secci6n soldada Detenga la unidad empuje la perilla percusiva y hale la linea hasta que 4 pulgadas 102 mm esten fuera del cabezar de corte Limpie y seque bien el cabezal de corte SITA AYUDA _Busque enInternet ste y todos bs demosmanua_es desus productos _Preg_nteLe anuestro equipo deexpertos deL hogar i l 27...

Page 28: ... telefono de un representante de Sears Considerenos un manual de usuario que habla Una vez que adquiera el Convenio de Protecci6n de Reparaci6n todo Io que necesita es hacer una simple Ilamada para programar el servicio Puede Ilamar a cualquier hora del dia o de la noche o programar el servicio por Internet El Convenio de Protecci6n de Reparaci6n es una compra libre de riesgo Si usted Io cancela p...

Page 29: ...29 ...

Page 30: ...30 ...

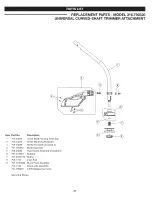
Page 31: ...sembly 2 753 04282 Shield Mounting Hardware 3 753 04283 Shield Assembly includes 4 4 791 180553 Blade Assembly 5 753 04284 Outer Spool Assembly includes 6 6 791 610660 Retainer 7 791 610317B Spring 8 753 1155 inner Reel 9 791 153066B Bump Knob Assembly 753 1156 Reel Line Assembly 791 180920 0 095 Replacement Line Items Not Shown I I 31 ...

Page 32: ...y in items like vacuums lawn equipment and electronics call anytime for the location of your nearest Sears Parts Repair Service Center 1 800 488 1222 U S A 1 800 469 4663 Canada www sears corn www sears ca To purchase a protection agreement on a product serviced by Sears 1 800 827 6655 U S A 1 800 361 6665 Canada Para pedir servicio de reparaci6n a domicilio y para ordenar piezas 1 888 SU HOGAR 1 ...

Reviews: