background image

Summary of Contents for 320.2767

Page 1: ... To reduce the risk of injury the user must read and understand the Operator s manual before using this product WARRANTY SAFETY UNPACKING DESCRIPTION OPERATION MAINTENANCE TROUBLESHOOTING ESPANOL Sears Brands Management Corporation Hoffman Estates IL 60179 U S A www craftsman com ...

Page 2: ...raftsman com This warranty is void if this product is ever used while providing commercial services or if rented to another person This warranty gives you specific legal rights and you may also have other rights which vary from state to state Sears Brands Management Corporation Hoffman Estates IL 60179 A AlL WARNING Some dust created by using power tools contains chemicals known to the state of Ca...

Page 3: ... serious injury A_ WARNING Indicates a potentially hazardous situation which if not avoided could result in death or serious injury _L CAUTION Indicates an imminently hazardous situation which if not avoided may result in death or serious injury DAMAGE PREVENTION AND INFORMATION MESSAGES These inform the user of important information and or instructions that could lead to equipment or other proper...

Page 4: ...ot expose to rain or use in damp Wet Conditions Alert locations To reduce the risk of injury user must Read The Operator s Manual read and understand operator s manual before using this product O Always wear safety goggles or safety Eye Protection glasses with side shields and a full face shield when operating this product _lb Alert Precautions that involve Safety your safety No Hands Symbol Failu...

Page 5: ...h as in the presence of flammable liquids gases or dust Power tools create sparks which may ignite the dust or fumes Keep children and bystanders away while operating a power tool Distractions can cause you to lose control ELECTRICAL SAFETY Power tool plugs must match the outlet Never modify the plug in any way Do not use any adapter plugs with grounded power tools Unmodified plugs and matching ou...

Page 6: ...ration is dusty Protect your hearing Wear appropriate personal hearing protection during use Under some conditions noise from this product may contribute to hearing loss All visitors and bystanders must wear the same safety equipment that the operator of the router wears Prevent unintentional starting Ensure that the switch is in the OFF position before connecting to a power source and or battery ...

Page 7: ...tool or these instructions to operate the power tool Power tools are dangerous in the hands of untrained users Maintain power tools Check for misalignment or binding of moving parts breakage of parts and any other condition that may affect the power tool operation If damaged have the power tool repaired before use Many accidents are caused by poorly maintained power tools Keep cutting tools sharp ...

Page 8: ...d shock the operator Use clamps or another practical way to secure and support the workpiece to a stable platform Holding the work by hand or against your body leaves it unstable and may lead to loss of control Maintain a firm grip of the router with both hands to resist starting torque Never attempt to use the router motor without first installing it in an approved fixed base Failure to heed this...

Page 9: ...se cutter bits which are larger in diameter than the opening in the router sub base Cutter bits that have cutter diameters larger than the opening could cause possible loss of control or create other hazardous condition that could cause serious personal injury The sub base on this fixed base router has an opening of 1 1 4 inch To use cutter bits with a larger diameter install and use a sub base wi...

Page 10: ...ildup from cutting could cause severe burns Always use the wrench provided Avoid climb cutting see OPERATION section in this manual Climb cutting increases the chance for loss of control resulting in possible serious injury _I WARNING Bits sockets and tools get hot during operation Wear gloves when touching them _ WARNING Wear ear protection Exposure to noise can cause hearing loss _I WARNING To a...

Page 11: ...ed on router 1 4 in collet nut already installed on router Collet nut wrench Manual 3 Inspect the items carefully to make sure that no breakage or damage has occurred during shipping If any of the items mentioned is missing refer to PARTS LIST illustration return the router to your nearest Sears store to have the router replaced a WARNING If any part is broken or missing do not attempt to assemble...

Page 12: ...pply normal household current Do not operate on direct current DC This large voltage drop will cause a loss of power and the motor will overheat If the router does not operate when plugged into a correct 120 volt 60 Hz AC only outlet check the power supply This router has an 6 ft 2 wire power cord no adapter needed Motor Hoesin Moi o_Housing Handles Nor_ Matdn g Sub Base OrJOff Adjustmen_ Oie_ _wi...

Page 13: ...jobs 2 Single speed 25000 RPM no load speed helps provide a quality finish in most materials 3 Fixed Base features Coarse and Fine Depth Adjustments for accurate set ups Ideal for use with a router table sold separately 4 Spindle Lock for easy 1 wrench bit changes Includes 1 4 in self releasing collet nut for use with a wide variety of 1 4 in router bits sold separately 5 100 Ball Bearings for smo...

Page 14: ...OFF toggle switch slide mounted for added visibility and easy access 12 Vac Adapter allows base to hook up to 1 1 4 inch vac hose attachment sold separately 13 Replaceable brushes sold separately for dependable service 2767 Manual_Revised_lO 1213 Page 14 ...

Page 15: ...nstalling accessories Failure to unplug the router could result in accidental starting which can cause serious personal injury INSTALLING AND REMOVING THE CUTTER BIT available separately Fig 3 and 4a INSTALLING THE CUTTER BIT 1 Turn the motor off and unplug the router from the power source 2 Remove the motor housing from the fixed base NOTE See the instructions for installing and removing the moto...

Page 16: ...et nut Fig 3 5 Place the wrench on the collet nut and turn it counterclockwise to loosen the collet nut slightly and remove the cutter bit shank COLLET NUT CARE Before each use inspect the collet nut to make sure that it is clean and that it is gripping the cutter bit properly With the router cutter bit removed turn the collet nut counterclockwise with the spindle lock engaged until it is free fro...

Page 17: ...ccessories Failure to turn the motor off and unplug the router could result in accidental starting which can cause serious personal injury NOTE Install the collet nut and router cutter bit you are going to use before installing the motor housing in the fixed base 1 Turn the motor off and unplug the router from the power source 2 Place the fixed base on a flat surface 3 4 5 6 7 With the back of the...

Page 18: ...hen it is not in use Disconnecting the router will prevent accidental starting which could cause serious personal injury NOTE All depth adjustments on the fixed base must be made with the motor clamp open NOTE For all fixed base touters the cutter bit depth equals the amount of the cutter that is exposed below the surface of the sub base The fixed base is designed with a micrometer fine adjustment...

Page 19: ...rface on which the base is sitting Lock the motor clamp A While continuing to press the coarse adjustment knob B turn the fine adjustment dial C until the zero 0 is aligned with the 1 mark on the base Release the coarse adjustment knob making sure that the 0 remains aligned with the mark Place the router on two level scrap workpieces and position it so that the cutter bit can be lowered below the ...

Page 20: ... router motors by limiting the speed at which the motor starts This increases the motor s life PLACING THE ROUTER ONTO THE WORKPIECE AND STARTING THE CUT A_ WARNING Before operating the router follow all safety instructions in this manual Failure to do so could result in serious personal injury NOTE Making test cuts is essential with most routing applications Even with careful set ups you won t kn...

Page 21: ...se you to lose of control of the router causing a serious accident To be certain that your depth settings are correct always make test cuts in scrap material similar to your workpiece before beginning the final cutting operation Remember knowing the right depth for each cut comes with routing experience EDGE ROUTING Fig 8 1 2 3 4 5 6 With the depth of cut set place the router on the edge of workpi...

Page 22: ...OUTING Figs 9 9a 9b and 10 1 With the depth of cut set tilt the router and place it on the workpiece with with the leading edge of the sub base contacting the workpiece first Fig 9 2 3 4 5 Turn the motor On and allow motor build up to its full speed being careful not to let the cutter bit contact workpiece To begin your cut gradually lower the cutter bit into the workpiece until the sub base is le...

Page 23: ... rout signs relief sculptures etc When freehand routing 1 Draw or lay out the pattern on the workpiece 2 Choose the appropriate bit 3 Follow the instructions for INTERNAL ROUTING and rout the pattern in two or more passes Do not exceed 1 8 in depth of cut in a single pass This will help provide better control as well as serve as a guide on the next passes NOTE A core box bit or V groove bit is oft...

Page 24: ...st be placed under the workpiece to act as a guide Fig 12a This guide board must have exactly the same contour straight or curved as the workpiece edge If it is positioned so that its edge is flush with the workpiece edge the bit will make a full cut in as far as the bit radius On the other hand if the guide is positioned as shown in Fig 12a Fig 12 TOP E_E S_AP_NG W_OLE EDGE _HAP_NG out from the w...

Page 25: ...n to maintain control of the router Because of the high speed of the cutter bit during a proper feeding operation left to right there is very little kickback under normal conditions However if the cutter bit strikes a knot an area of hard grain in the workpiece or a foreign object the normal cutting action could be affected and cause Kickback This Kickback may cause damage to your workpiece and co...

Page 26: ...ion to maintain control of the router when making this type of cut around curves When the guide is positioned as shown in Fig 14a the router travel should be from left to right and clockwise around curves ROUTER F_EO GL_tDE _R_T_ON Fig 14a GUIDE INBIBE If there is a choice the set up in Fig 14 is easier to use but there is the possibility of Climb Cutting around curves In either case Fig 14 or Fig...

Page 27: ... the bites become so large that chips become partially cut off causing splintering and gouging of the workpiece The router will make clean smooth cuts if it is allowed to run freely without the overload of forced feeding You can detect forced feeding by the sound of the motor Its usual high pitched whine will sound lower and stronger as it loses speed Holding the router against the workpiece will ...

Page 28: ...own from the bit CAUTION Always have the chip Fig 16 S ili iii i ii ii i iiiii iii i i i i i J Fig 17 2 screws includ_ shield in place on the base when operating the router A_ WARNING Always turn the motor off and unplug the router from the power source before making any adjustments or installing accessories Failure to turn the motor off and unplug router could result in accidental starting which ...

Page 29: ......

Page 30: ...he need for a break in period 4 Insert new brush assemblies into the guide channels with the carbon part going in first being certain to fit the two metal ears into their slots in the channel Fig 18 5 Remember to replace both end caps after inspecting or servicing brushes Tighten the caps snugly but do not over tighten The router should be allowed to run in run at no load without a cutter bit for ...

Page 31: ...ith have worn out suitable new brushes completely The surface of The bit is dull Change to a sharp bit the workpiece Routing at an Select an appropriate bit speed is not smooth inappropriate bit after cutting speed Bit can not be Bit size is Use only 1 4 in diameter bits installed inappropriate for the collet nut 2767 Manual_Revised_lO 1213 Page 31 ...

Page 32: ... Amp Router Model No 320 2767 The Model Number will be found on the Nameplate attached to the motor unit Always mention the Model Number when ordering parts for this tool 2767 ManuaLRevised_10 1213 Page 32 ...

Page 33: ...5 ARouter Model No 320 2767 The Model Number will be found on the Nameplate attached to the motor unit Always mention the Model Number when ordering parts for this tool 2767 Manual_Revised_lO 1213 Page 33 ...

Page 34: ...ter Model No 320 2767 The Model Number will be found on the Nameplate attached to the motor unit Always mention the Model Number when ordering parts for this tool I I I I I I 2767 Manual_Revised_lO 1213 Page 34 ...

Page 35: ... Brush Assembly 2 13 3122851000 Seal Ring 1 14 4870073000 Switch 1 15 3121494000 Middle Housing 1 16 3121050000 Cord Guard 1 17 4810002000 Power Cord Plug 1 18 3123926000 Bearing Holder 1 19 3121049000 Rubber Spring 1 20 3700249000 Washer 1 21 5700008000 Ball Bearing 1 22 2740116000 Stator 1 23 5610048000 Tapping Screw 2 24 2822039000 Internal Wire Assembly 2 25 2822038000 Internal Wire Assembly 2...

Page 36: ...w 2 41 3121635000 Handle 2 42 3420396000 Mounting Set 1 43 3121648000 Button 1 44 3550579000 Gear Shaft 1 45 3520141000 Gear 1 46 3520147000 Lock Gear 1 47 3550615000 Worm 1 48 5620033000 Screw 1 49 3660167000 Spring 1 50 5630015000 Prevailing Torque Hexagon Nut 1 51 3700848000 Plate 1 52 5660003000 E Ring 1 53 3420395000 Clamping Lever 1 54 5620332000 Screw 1 55 3550596000 Lock Pin 1 56 562004100...

Page 37: ...te 1 60 5620049000 Screw 1 61 3402471000 Wrench 1 62 3122784000 Vacuum Adapter 1 63 5620040000 Screw 2 64 5650172000 Wave Washer 1 65 3550613000 Shaft 1 66 3700798000 Craftsman Decorate Band 1 2767 Manual_Revised_lO 1213 Page 37 ...

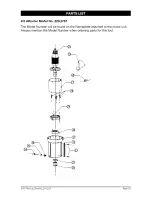
Page 38: ...I_ e li_l 2767 Manual_Revised_lO 1213 Page 38 ...

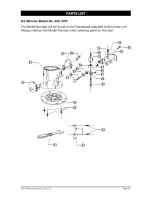
Page 39: ...I_ e li_l 2767 Manual_Revised_lO 1213 Page 39 ...

Page 40: ... items like vacuums lawn equipment and electronics call anytime for the location of the nearest Sears Parts Repair Service Center 1 800 488 1222 U S A 1 800 469 4663 Canada www sears corn www sears ca TOpurchase a protection agreement on a product serviced by Sears 1 800 827 6655 U S A 1 800 361 6665 Canada Parapedir serviciode reparacbn Au Canada pour service enfrangais a domicilio y paraordenar ...

Reviews: