background image

Summary of Contents for 351.217240

Page 1: ...N 41 8 Bench Top JOINTER PLANER Model No 351 217240 CAUTION Read and follow all Safety Rules and Operating Instructions before First Use of this Product Sears Roebuck and Co Hoffman Estates IL 60179 U S A 3741 01 Draft 03 05 99 ...

Page 2: ...in dangerous environments tools in damp or wet locations Do tools to rain Work area should be properly lighted Proper electrical receptacle should be available for tool Three prong plug should be plugged directly into properly grounded three prong receptacle Extension cords should have a grounding prong and the three wires of the extension cord should be of the correct gauge Keep visitors at a saf...

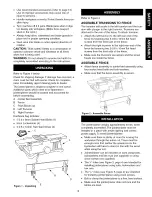
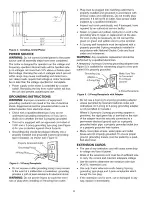
Page 3: ...d bolts and lock washers Make sure that the fence assembly is secure Figure 2 Assemble Fence The jointer planer weighs approximately 40 Ibs when completely assembled The jointer planer must be installed in a place with ample lighting and correct power supply To install jointer planter Make sure there is plenty of room for moving the workpiece through the entire cut There must be enough room that n...

Page 4: ... ordinances Do not modify plug provided If it will not fit in outlet have proper outlet installed by a qualified electrician Inspect tool cords periodically and if damaged have repaired by an authorized service facility Green or green and yellow conductor in cord is the grounding wire If repair or replacement of the elec tric cord or plug is necessary do not connect the green or green and yellow w...

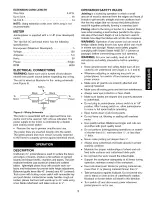
Page 5: ...efers to the sizing of lumber to a desired thick ness while creating a level surface parallel to the oppo site size of the board Depth of cut is the term used to indicate how deep the blades will cut into the workpiece WARNING Operation of any power tool can result in foreign objects being thrown into eyes which can result in severe eye damage Always wear safety goggles complying with United State...

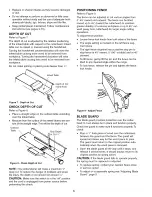
Page 6: ... before performing this check POSITIONING FENCE Refer to Figure 9 The fence can be adjusted to cut various angles from 0o 45 inward and outward The fence can be tilted inward up to 45 toward the cutterhead to maintain greater stability of a narrow workpiece or up to 45 out ward away from cutterhead for larger angle cutting operations To adjust fence position Loosen fence lock knobs from both sides...

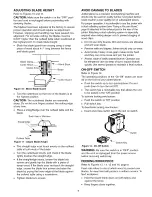
Page 7: ...oodworking machine and should only be used on quality lumber Using bad lumber could result in a poor quality cut on subsequent pieces For proper operation it is preferable to use the jointer with a dust collecting system see Using a Vacuum Hose page 8 attached to the exhaust port in the rear of the jointer Attaching a dust collecting system is especially required when taking deeper cuts to prevent...

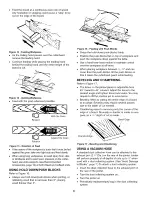
Page 8: ...ge of a board at an angle Bevelling may require several passes due to the depth of cut needed Chamfering refers to removing only the corner of the edge of a board Normally a chamfer is made on one pass so a _ _6 depth of cut is made Bevel Edge _n Rotation Figure 15 Direction of Feed If the nature of the workpiece is such that it must be fed against the grain take very light cuts and feed slowly Wh...

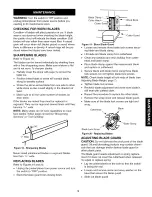
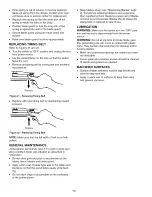
Page 9: ...ades less than 13 16 wide REPLACING BLADES Refer to Figures 19 and 20 Unplug the jointer planer from power source and turn the switch to OFF position Block the blade guard from closing down Blade Clam Cutter Clamp _Cutter Guard Figure 19 Block Blade Guard Loosen and remove three blade lock screws secur ing blade and blade clamp Lift blade and blade clamp from cutterhead Clean any sawdust and resin...

Page 10: ...ating condition Keep unit adjusted as described in Operation Do not allow gum and pitch to accumulate on the tables fence blades and blade guard Apply a thin coat of paste type wax to the tables and the fence so that the wood slides easily while feed ing Do not allow chips to accumulate on the underside of the jointer planer Keep blades sharp see Sharpening Blades page 9 Sometimes replacing blades...

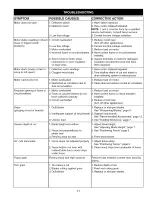
Page 11: ... circuit breakers installed 5 Inspect terminals in motor for damaged insulation and shorted wires and have them replaced 1 Have motor replaced repaired 2 Take shallow depth of cut and attach a dust collecting system to exhaust port 1 Reduce load on motor 2 Clean dust and restore normal air circulation 1 Dull blades 2 Inadequate support of long boards 3 Uneven feed 1 Blade height not uniform 2 Fenc...

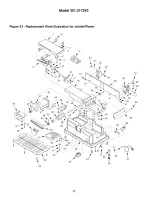
Page 12: ...Model 351 217240 Figure 23 Replacement Parts Illustration for Jointer Planer 50 J 49 48 36_ 42 54 48 3 53 55 56 20 38 67 22 23 35 6 58 27 26 _ 58 70 12 ...

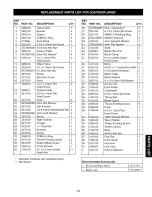
Page 13: ...1 Head Bolt Standard hardware item available locally A Not Shown KEY NO PART NO 36 STD852006 37 0351 00 38 0221 00 39 STD315205 40 5156 00 41 STD852004 42 4123 00 43 9_22993 44 4124 00 45 5225 00 46 4131 00 47 5226 00 48 0964 00 49 4130 00 50 4129 00 51 2657 00 52 4128 00 53 4126 00 54 4125 00 55 2803 00 56 4127 00 57 4133 00 58 2895 00 59 6398 00 60 1784 00 61 9723 00 62 3499 00 63 0358 00 64 413...

Page 14: ...ntos que producen somnolencia PREPARE EL AREA DE TRABAJO PARA LA TAREA Mantenga el _trea de trabajo limpia Las _ reas de trabajo de sordenadas atraen accidentes No use herramientas mec_ nicas en entornos peligrosos No use herramientas mec_ nicas en lugares hQmedos o moja dos No las exponga a la Iluvia El Area de trabajo tiene que contar con una iluminaci6n correcta Tiene que haber un recept_ culo ...

Page 15: ...artes adicionales que se tienen que adjuntar al cepillo mec_ nico de banco cepilladora A Conjunto de la base del cepillo mec_ nico de banco B Reborde C Bloques de empuje 2 D Soporte giratorio izquierdo E Soporte giratorio derecho La bolsa con los accesorios incluye Pernos de cabeza hueca 5 0 8 x 8 mm 4 Arandela de seguridad 5 mm 4 Tornillo de cabeza plan 5 0 8 x 10 mm 4 V6ase la Figura 2 MONTAJE D...

Page 16: ...idn a tierra de 3 puntas vea la Figura 4 para su protec cidn contra los peligros de choque El enchufe de conexidn a tierra tiene que enchufarse directa mente en un receptAculo del tipo de conexidn a tierra de tres puntas conectado a tierra e instalado correctamente tal como se muestra vea la Figura 4 Tomacorriente conectado a tierra correctamente Punta de conexi6n a tierra Enchufe de 3 puntas_ Fig...

Page 17: ...o fundido una caja de pl_ stico liviano con superficies de trabajo lisas y tornillos de avance para ajustar la altura de la mesa con precisidn El reborde guia equilibrado se inclina 45 hacia adentro y 45 hacia afuera La herramienta viene con un interruptor oscilante de seguridad una Ilave amovible y bloques de empuje El cepillo mec_ nico de banco cepilladora permite trabajar f_ cilmente las madera...

Page 18: ...entido de las manillas del reloj se eleva la mesa de alimentaci6n hacien do que se remueva menos madera de la pieza de trabajo No haga cortes de empalme o de cepillado a una profundidad mayor de 3 2 mm Mesa de entrada Manilla de profundidad de corte Figura 7 Profundidad del corte VERIFICACION DE LA PROFUNDIDAD DEL CORTE Refierase a la Figura 8 Coloque un borde recto en la mesa de saW el cual se ex...

Page 19: ... salida y la cuchilla El borde recto debe hacer un contacto uniforme con la mesa de salida en ambos extremos de la cuchilla Gire el portacuchillas lentamente y verifique que la cuchilla est6 tocando el borde recto ligeramente Lado posterior de la herramienta Borde recto_ I I lln Mesa de salida Figura 11 Ajuste la altura de la cuchilla Si el borde recto se eleva afloje los tornillos de fijaci6n de ...

Page 20: ...mano de salida hasta que se corte toda la Iongitud de la tabla Figura 14 Guiamiento de la pieza de trabajo Rotaci6n Figura 15 Direccibn de la alimentacibn Si la naturaleza de la pieza de trabajo es tal que se tiene que alimentar en contra de la vet haga cortes leves y alimente la pieza de trabajo lentamente Cuando se usan piezas de trabajo largas para evitar las lesiones debido al resbalamiento o ...

Page 21: ...ife rencia de densidad Se producir_ un Iomo elevado en los puntos donde las cuchillas est6n desportilladas AFILADO DE LAS CUCHILLAS Refierase a la Figura 18 Las cuchillas se pueden rectificar individualmente afil_ ndolas con una piedra afiladora AsegQrese de que la piedra est6 plana y no se halle desgastada Para afilar las cuchillas Cubra la piedra parcialmente con un papel para proteger la superf...

Page 22: ... y desconecte la herramienta de la fuente de energfa electrica Ponga de lado el cepillo mec_ nico de banco cepilladora de manera que el interruptor est6 orientado hacia el techo Extraiga la correa vieja de sincronizacidn gir_ ndola a la vez que ejerce presidn Figura 21 Extraccibn de la correa de sincronizacibn Coloque la nueva correa de sincronizacidn ejerciendo presidn hacia adentro Para cambiar ...

Page 23: ... AVISO Un t6cnico de servicio calificado tiene que hacer 1 y 2 consulte al centro de servicios de Sears 3 Corrija la condicidn del voltaje de linea bajo 1 Reduzca la carga del circuito apague otros artefactos 2 Corrija la condicidn del voltaje de linea bajo 3 Reduzca la carga del motor 4 Instale fusibles o interruptores de circuito correctos 5 Inspeccione los terminales en el motor para verificar ...

Page 24: ...vice Call 24 hours a day 7 days a week 1 800 4 REPAIR 1 800 473 7247 Para pedir servicio de reparacion a domicillo 1 800 659 7084 For the location of a Sears Parts and Repair Center in your area Call 24 hours a day 7 days a week 1 800 488 1222 mmmmmm mmmmmm When requesting service or ordering parts always provide the following information Product Type Part Number Model Number Part Description SEAR...

Reviews: