background image

Summary of Contents for 358.794732

Page 1: ...ntenance Parts List Espa_ol p 21 WARNING Read and follow all Safety Rules and Operating Instructions before first use of this product For answers to your questions about this product Call 7 am 7 pm Mon Sat or 10 am 7 pm Sun 1 800 235 5878 Hours listed are Central Time Sears Roebuck and Co Hoffman Estates IL 60179 U S A 545218613 Rev 6 5 31 09 BRW ...

Page 2: ... normal use within the warranty period such as the vacuum bag filter or spark plug Repairs necessary because of accident or failure to operate or maintain the product according to all supplied instructions Preventive maintenance or repairs necessary due to improper fuel mixture contaminated or stale fuel This warranty gives you specific legal rights and you may also have other rights which vary fr...

Page 3: ...r blades no longer turning to avoid serious injury from the rotating blades Gently tilt the handle of the screwdriver toward the back of the unit to release the latch while pulling up on the vacuum inlet cover with your other hand I When using the vacuum attachment the unit is designed to pick up dry material such as leaves grass small twigs and bits of paper Do not vacuum stones gravel metal brok...

Page 4: ...ove jewelry loose clothing orclothing with loosely hanging straps ties tassels etc They can becaught inmoving parts Do not operate unit when you are tired ill upset orifyou areunder the influence ofalcohol drugs ormedi cation Keep children bystanders and ani mals away from work area amini mum of30feet 10 meters when starting oroperating unit Donot point blower nozzle inthedirection of people orpet...

Page 5: ...ribed in the operator s manual performed by a Sears Service Center Use only recommended Craftsman replacement parts use of any other parts may void your warranty and cause damage to your unit Empty fuel tank before storing the unit Use up fuel left in carburetor by starting engine and letting it run until it stops Do not use any accessory or attach ment other than those recommended by manufacturer...

Page 6: ...tube to be inserted in blow er outlet Loosen knob by turning coun terclockwise Upper Blower Tube Tab Lower Blower Tube Slot 4 Slide the lower blower tube onto the upper blower tube 5 Turn the lower blower tube clock wise until a click is felt to secure the lower blower tube to the upper blower tube NOTE When the upper and lower blower tubes are assembled together properly the arrows on both tubes ...

Page 7: ...the impeller blades have stopped turning before opening the vacuum inlet door or attempting to insert or remove the vacuum or blower tubes The rotat ing blades can cause serious injury 1 Insert the tip of a screwdriver into the latch area of the vacuum inlet Latch Area 2 Vacuum Inlet Cover Gently tilt the handle of the screw driver toward the front of the unit to release the latch while pulling up...

Page 8: ...cing away fTom your body and clothes 2 Pass the shoulder strap over your head and onto your right shoulder 3 Extend your left arm toward the rear of the vacuum bag 4 Adjust shoulder strap until the vac uum bag shoulder strap seam lies between your thumb and index fin ger 5 Make sure air flows freely from the elbow tube into bag If bag is kinked the unit will not operate properly _ ili b SHOULDER S...

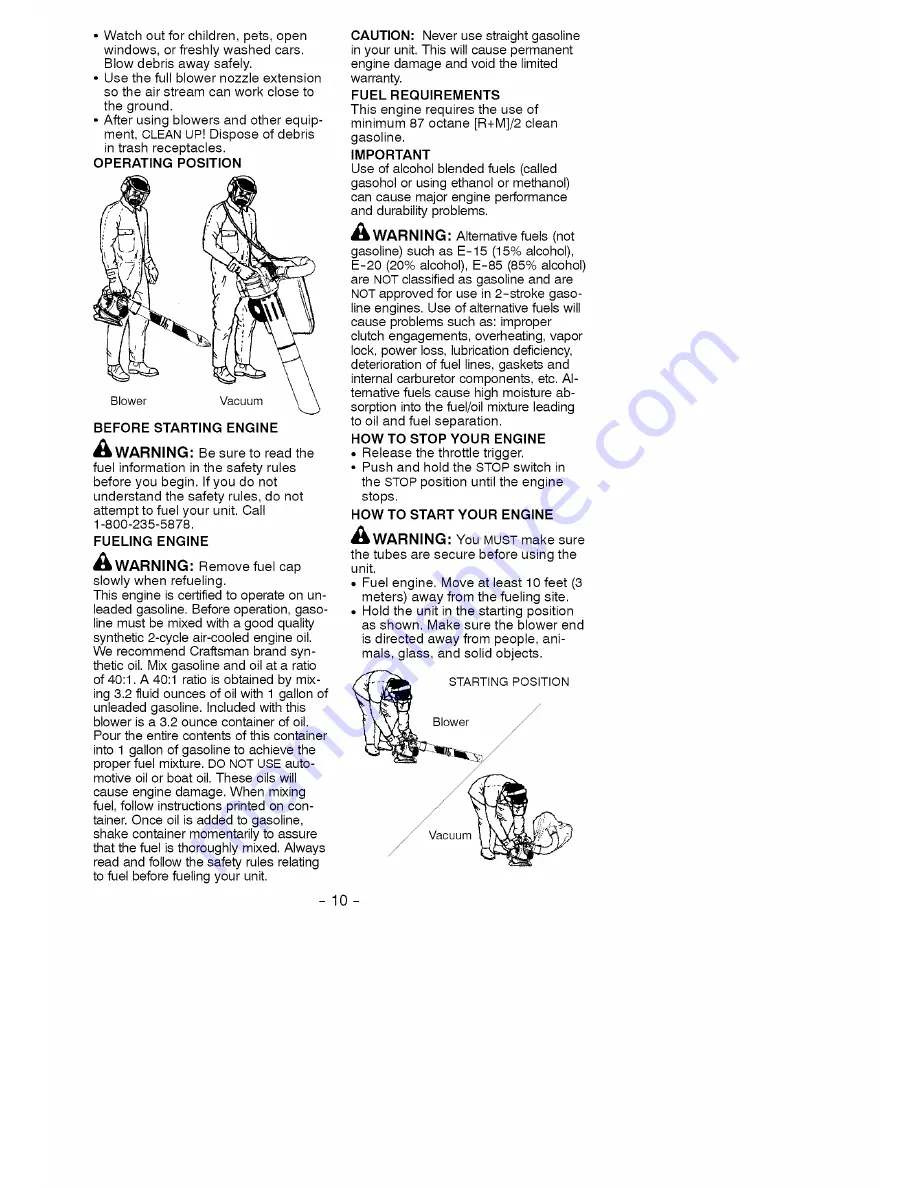
Page 9: ...on After engine attempts to start move the choke lever to the HALF CHOKE position Once en gine starts move choke lever to the RUN position OPERATING TIPS While vacuuming or blowing debris hold the unit with the muffler side fac ing away from your body and clothes see OPERATING POSITION below To reduce the risk of hearing loss associated with sound level s hear ing protection is required To reduce ...

Page 10: ...arily to assure that the fuel is thoroughly mixed Always read and follow the safety rules relating to fuel before fueling your unit CAUTION Never use straight gasoline in your unit This will cause permanent engine damage and void the limited warranty FUEL REQUIREMENTS This engine requires the use of minimum 87 octane R M 2 clean gasoline IMPORTANT Use of alcohol blended fuels called gasohol or usi...

Page 11: ...eeze and hold the throttle trigger and pull the starter rope 2 more times Move the choke lever to the HALF CHOKE position and pull the starter rope until the engine runs but no more than 6 pulls If the engine still doesn t start it is probably flooded Proceed to STARTING A FLOODED ENGINE 7 Once the engine starts allow it to run 10 seconds then move the choke lever to the RUN position Al low the un...

Page 12: ...dically to properly maintain your unit CHECK FOR LOOSE FASTENERS AND PARTS Muffler Spark Plug Boot Air Filter Housing Screws CHECK FOR DAMAGED OR WORN PARTS Contact Sears Service Center for re placement of damaged or worn parts Fuel Tank Do not use unit if fuel tank shows signs of damage or leaks Vacuum Bag Do not use vacuum bag if it is torn or damaged INSPECT AND CLEAN UNIT AND LABELS After each...

Page 13: ...ark ar resting screen and must be removed to avoid creating a fire hazard or af fecting engine performance Muffler Cover Spark Arresting Hood Screws Replace the spark arresting screen ev ery 50 hours of operation or if any damage or breaks in the screen are noted NOTE Do not attempt to clean the spark arresting screen 1 Remove 3 screws from muffler cov er Remove muffler cover 2 Loosen and remove 4...

Page 14: ...d let it run until the fuel lines and carburetor are empty Use fresh fuel next season Under FUELING ENGINE in the OPERATION section of this manual see message labeled IMPORTANT regarding the use of gaso hol in your engine Fuel stabilizer is an acceptable alterna tive in minimizing the formation of fuel gum deposits during storage Add stabi lizer to gasoline in fuel tank or fuel stor age container ...

Page 15: ...t 4 Carbon build up i 1 See Starting a Flooded Engine in Operation section 2 Fill tank with correct fuel mixture 3 Install new spark plug 4 Check for dirty fuel filter replace Check for kinked or split fuel line repair or replace i 5 Contact Sears Service see back cover i 1 Check for dirty fuel filter replace Check for kinked or split fuel line repair or replace i 2 See Carburetor Idle Speed Adjus...

Page 16: ...Warranty re pairs should be completed in a reason able amount of time not to exceed 30 days If you have any questions regard ing your warranty rights and responsibili ties you should contact your nearest authorized service center call Sears at 1 800 469 4663 or send e mail corre spondence to emission warranty HCOP emission com WARRANTY COMMENCEMENT DATE The warran ty period begins on the date the ...

Page 17: ...charge to the owner if the part is under warranty EMISSION CONTROL WARRANTY PARTS LIST Carburetor air filter covered up to main tenance schedule ignition system spark plug covered up to maintenance schedule ignition module muffler in cluding catalyst if equipped fuel tank MAINTENANCE STATEMENT The owner is responsible for the perfor mance of all required maintenance as defined in the operator s ma...

Reviews: