background image

11

•  When using the detergent tank, fill it with a properly formulated

detergent or cleaner with water ratio according to instructions
on the container. Close detergent tank when done filling.

•  When using the detergent tank

,

 you need to use the black

“SOAP” nozzle.  The low pressure of this nozzle activates the
detergent suction.  The suction WILL NOT WORK with any other
of the included nozzles.

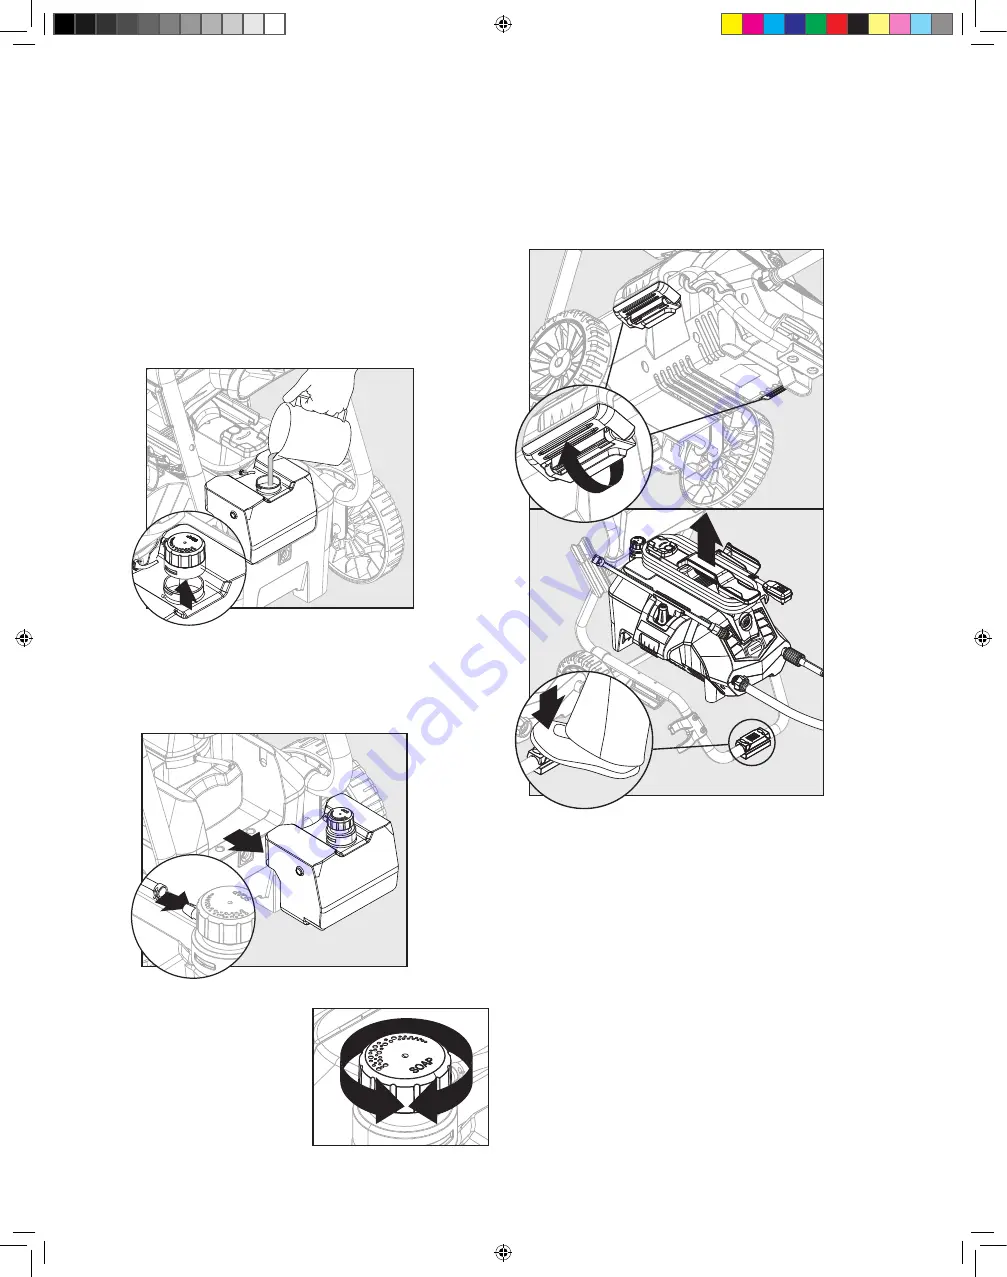
• To remove detergent tank cap, first rotate the cord hook above

it out of the way. Grasp the tank cap by the lower black collar
portion and turn counterclockwise to release and raise it from
tank spout. Do not rotate cap by the upper red portion; it will not
release. To replace cap, position it onto spout, grasp cap by
black collar and turn clockwise to secure.

•  To remove the detergent tank, squeeze the clamp on the tank

cap small hose to remove the hose from the cap. Pull the deter-
gent tank straight out. To replace tank push straight in and then
reattach hose with clamp.

•  The power washer will pull

a ratio of water to detergent
of 10:1 (10 parts water to 1
part detergent). The detergent
concentration can be adjusted
by turning the detergent knob
on the top of the machine.
Turn it left for more concen-
tration or turn it right for less
concentration.

Removing Power Washer Unit from Frame for Handheld 
Operation

Locate latches on the lower side of frame. Unlock latches by 
pulling downward on the latches. To lift unit, place a foot on the 
pad at the front of the lower frame. Grasp the handgrip on the top 
of the unit and lift the unit up and off the frame.

Operation Tips


•  If you hear the motor run intermittently when the trigger is not

being squeezed, that is normal. The pump is priming itself so 
it is ready to operate when the trigger is squeezed. Turn off the 
power washer if not being used after five minutes.

•  The o-rings on the bayonet end of the nozzle should be cleaned

regularly and lubricated with non-water soluble grease such as 
petroleum jelly. 

•  Keep the nozzle cleaning wire for use in unclogging the nozzle.

If you lose the cleaning wire, a straightened paper clip also 
works.

1

2

3

2

1

93988 Craftsman 2-n-1 Pressure Washer119.indb   11

17/11/13   下午4:05

Summary of Contents for 480.991170

Page 1: ...her Manufacturers Association PWMA Sears Brands Management Corporation Hoffman Estates IL 60179 U S A Visit our Craftsman website www craftsman com Part No 71 99117 Rev 19 12 2016 Safety Assembly Operation Maintenance Parts Español p 17 WARNING Before using this product read this manual and follow all Safety Rules and Operating Instructions Antes de utilizar el producto lea este manual y siga toda...

Page 2: ...warranty period This warranty is void if this product is ever used while providing commercial services or if rented to another person This warranty gives you specific legal rights and you may also have other rights which vary from state to state Sears Brands Management Corporation Hoffman Estates IL 60179 SPECIFICATIONS Pressure Washer Specifications Max Outlet Pressure 2050 PSI Max Flow Rate 1 4 ...

Page 3: ...c shock or burn resulting in death or serious injury Inspect cord before each use DO NOT use if cord is damaged The product is equipped with a ground fault circuit interrupter GFCI built into the power cord plug If replacement of the plug or cord is required use only identical replacement parts Keep all connections dry and off the ground DO NOT touch plug with wet hands DO NOT run cord through doo...

Page 4: ... cut through skin and its underlying tissues resulting in serious injury and possible amputation Spray gun traps high water pressure even when motor is stopped and water is disconnected which could result in serious injury NEVER aim spray gun at people animals or plants ALWAYS point spray gun in safe direction squeeze spray gun trigger to release high pressure every time you turn off pressure wash...

Page 5: ...D K J PW909383SS C I L H G Soap Black 0 Red 15 Yellow 25 Green Q E AA DD CC BB F P HARDWARE CONTENTS AA BB CC DD Screws Qty 2 Axle Pins Qty 2 Screws Qty 2 Cotter Pins Qty 2 A Hose Holder B Handle C Turbo Nozzle D O Ring Replacement Kit E Quick Connect Nozzles F Power Washer Unit G Lower Frame H Nozzle Holder I Extension Lance J Wheels K Spray Gun L Spray Gun Trigger Lock M Spray Gun Holster N Soft...

Page 6: ...AA BB CC DD Tornillo Qty 2 Perno de eje Qty 2 Tornillo Qty 2 Pasador de chaveta Qty 2 Hardware Used Secure nozzle holder H to lower frame G Secure with two screws BB Remove Power Washer from Frame Place a foot on the pad at the front of the lower frame G and then lift the power washer unit F off the frame Set pressure washer F to the side Install axle pins AA and wheels J to lower frame G Secure w...

Page 7: ...pper handle B Secure with two screws CC 4 3 2 2 1 G B 1 5 2 A CC B Screws x 2 CC AA BB CC DD Tornillo Qty 2 Perno de eje Qty 2 Tornillo Qty 2 Pasador de chaveta Qty 2 Hardware Used 6 B M 7 F G Place power washer unit F into position on the lower frame G Slide spray gun holster M into place on the upper handle B 93988 Craftsman 2 n 1 Pressure Washer119 indb 7 17 11 13 下午4 05 ...

Page 8: ...llation To lock trigger of spray gun K point gun away from you and turn dial to lock either 3 or 9 o clock position Squeeze or pull trigger to make sure it is locked ALWAYS leave in locked position when not in use This ensures the gun is in safe mode until it is ready for use Turn dial to unlock either 12 or 6 o clock position to release spray gun trigger NOTE The trigger lock prevents trigger fro...

Page 9: ...ollar at the other end of soft PVC hose N Push firmly to connect hose Twist collar to secure Confirm hose is locked into power washer unit by slightly pulling on hose The hose is now securely attached Insert extension lance I into nozzle holder H and press spray gun K with extension lance I into spray gun holster M Attach a garden hose to built in garden hose adapter The water is now connected to ...

Page 10: ...ked While pointing the spray gun in a safe direction squeeze the trigger on the spray gun until there is a steady stream of water flowing from the nozzle tip To pressurize the flow of water push the power button to turn the unit on red power light will turn on The unit will turn on for 1 2 seconds and shut off This is a normal function of the auto start feature Begin power washing by squeezing the...

Page 11: ...er will pull a ratio of water to detergent of 10 1 10 parts water to 1 part detergent The detergent concentration can be adjusted by turning the detergent knob on the top of the machine Turn it left for more concen tration or turn it right for less concentration Removing Power Washer Unit from Frame for Handheld Operation Locate latches on the lower side of frame Unlock latches by pulling downward...

Page 12: ...plied with low pressure and enough time is given to break down dirt and grime Detergent can only be applied and siphoned in low pressure mode using the soap nozzle The combination of low pressure and chemical action is very effective and can be better than scrubbing if applied properly Always spray detergent on a dry surface Do not pre soak area Wetting the surface first dilutes the deter gent and...

Page 13: ...tore the power washer where it is exposed to freezing temperatures unless you use an antifreeze designed for pumps It is recommended that you use this antifreeze for storing in freezing temperatures Freezing will damage the pump unless this is added to the power washer If not using or if storing your power washer for more than one month it is also recommended that an antifreeze is used to protect ...

Page 14: ...r leaking where the high pressure hose connects to the spray gun 1 Make sure there is an o ring at the end of the metal tip of the unit s soft PVC hose If no o ring is present the connection between the hose and spray gun will leak I can t remove the lance from the spray gun What should I do 1 All lances and the detergent bottle are attached and removed from the spray gun in the same manner Insert...

Page 15: ...RING REPLACEMENT KIT C PW3400960 EXTENSION LANCE D PW4620580 WHEEL E PW4620440 SPRAY GUN F PW4221550 SOFT PVC HOSE G PW4221470 SOAP QC NOZZLE H PW4221430 0 QC NOZZLE I PW4221440 15 QC NOZZLE J PW4221450 25 QC NOZZLE K PW4620370 AXLE PIN L PW4620380 COTTER PIN M PW4221580 GARDEN HOSE ADAPTER Soap Black 0 Red 15 Yellow 25 Green F K G B PW909383SS A E C M D L H I J 93988 Craftsman 2 n 1 Pressure Wash...

Page 16: ...o problemas y ordenar piezas o pedir servicio para la reparación de su equipo To help us help you register your product at www craftsman com registration Para poderte ayudar mejor registra tu producto en www craftsman com registration Receive exclusive member benefits including special pricing and offers project sharing expert advice and SHOP YOUR WAY REWARDS Como miembro exclusivo recibe diversos...

Page 17: ... Washers Esta limpiadora a presión está clasificada conforme a la norma PW101 2010 comprobación y clasificación de rendimiento de limpiadoras a presión de la Asociación de fabricantes de bombas a presión Pressure Washer Manufacturers Association PWMA Sears Brands Management Corporation Hoffman Estates IL 60179 EE UU Visite el sitio web de nuestro Craftsman www craftsman com Pieza N 71 99117 Rev 19...

Page 18: ...sta garantía se anulará si el producto se utiliza mientras se prestan servicios comerciales o si se alquila a un tercero Esta garantía le concede derechos legales específicos y posiblemente tenga además otros derechos que varíen entre un estado y otro Sears Brands Management Corporation Hoffman Estates IL 60179 ESPECIFICACIONES Especificaciones de la limpiadora a presión Presión de salida máxima 2...

Page 19: ...r de circuito con fuga a tierra ICFT integrado en el conector del cable de alimentación En caso de requerirse sustitución del conector o del cable use únicamente piezas de sustitución idénticas Mantenga todas las conexiones secas y conectadas a tierra NO toque el conector con las manos mojadas NO pase el cable por puertas ventanas orificios en el techo paredes o pisos NO pise el cable NO conduzca ...

Page 20: ...do en lesión grave y posible amputación La pistola aspersora retiene alta presión de agua incluso cuan do el motor está parado y el agua está desconectada lo que podría resultar en lesiones graves NUNCA apunte la pistola aspersora a personas animales o plantas SIEMPRE dirija la pistola aspersora hacia una dirección segu ra apriete el gatillo de la pistola aspersora para liberar alta presión cada v...

Page 21: ...structura inferior H Soporte de boquilla I Lanza de extensión J Ruedas K Pistola aspersora L Seguro del gatillo de la pistola aspersora M Funda para pistola aspersora N Manguera de PVC blanda O Alambre limpiador de boquilla P Tanque de detergente Q Gancho AA Pasadores de eje BB Tornillos CC Tornillos DD Pasadores de chaveta Envasado en la unidad limpiadora eléctrica 2050 MAX P S I 1 4 M A X G P M ...

Page 22: ...o Qty 2 Pasador de chaveta Qty 2 Aditamentos que se utilizan Quitar la máquina de lavar del bastidor Coloque un pie sobre la almohadilla en la parte frontal de la estructura inferior G y luego eleve la unidad limpiadora eléctrica F para sacarla de la estructura Configure la limpiadora a presión F a un lado Instale los pasadores de eje AA y las ruedas J en la estructura inferior G Asegure con pasad...

Page 23: ... la manija superior B Fije con dos tornillos CC 4 3 2 2 1 G B 1 5 2 A CC B 6 B M 7 F G Coloque la unidad limpiadora eléctrica F en su posición sobre la estructura inferior G Deslice la funda de la pistola aspersora M hasta su lugar en la manija superior B Tornillos x 2 CC AA BB CC DD Tornillo Qty 2 Perno de eje Qty 2 Tornillo Qty 2 Pasador de chaveta Qty 2 Aditamentos que se utilizan 93988 Craftsm...

Page 24: ...instalación de la lanza Para trabar el gatillo de la pistola aspersora K dirija la pistola lejos de usted y gire el dial hasta la traba posición del reloj 3 y 9 Apriete o jale del gatillo para asegurarse de que esté trabado Siempre deje la posición trabada cuando no use la pistola Esto garantiza que la pistola está en modo seguro hasta que esté lista para uso Gire el dial para destrabarla posición...

Page 25: ...Presione firmemente para conectar la manguera hasta la unidad limpiadora eléctrica Tuerza el collar para asegurarlo Confirme que la manguera está trabada en la unidad limpiadora eléctrica jalando ligeramente de la manguera La manguera queda unida firmemente Inserte la lanza de extensión I en porta tobera H y la prensa pistola K con lanza de extensión I en funda de pistola M Fije una manguera de ja...

Page 26: ... una dirección segura accione el gatillo de la pistola aspersora hasta que salga flujo constante de agua con lo que se purga el aire de la manguera Para presurizar el flujo de agua presione el botón de encendido para encender la unidad se enciende la luz roja de activado La unidad se enciende durante 1 2 segundos y se apaga Este es el funcionamiento normal de la característica de encendido automát...

Page 27: ... La limpiadora eléctrica entrega una relación de agua a detergente de 10 1 o 10 partes de agua por parte de detergente La concentración de detergente puede ajustarse girando la perilla de detergente en la parte superior de la máquina Gírela a la izquierda para obtener más concentración o a la derecha para disminuirla Remoción de la unidad limpiadora eléctrica de la estructura para la operación man...

Page 28: ...sión La capacidad de limpieza de los detergentes mejora cuando se aplica con baja presión y se le da el tiempo suficiente para romper la suciedad y la mugre La combinación de baja presión y la acción química es muy eficaz y puede ser mejor que restregar si se aplica correctamente Siempre rocíe detergente sobre una superficie seca No remoje previamente Al mojar la superficie primero se diluye el de...

Page 29: ...e trasera del mango NO guarde la limpiadora eléctrica donde se exponga a temperaturas de congelamiento a menos que utilice un anticongelante diseñado para bombas Se recomienda que utilice este anticongelante para almacenamiento a temperaturas de congelamiento El congelamiento daña la bomba a menos que este se le agregue a la limpiadora eléctrica Si no se utiliza la limpiadora eléctrica o se almace...

Page 30: ...agua donde la manguera de alta presión se conecta con la pistola aspersora 1 Asegúrese de que haya un aro tórico incluido con los contenidos del paquete en el extremo de la punta metálica de la manguera de alta presión De no haber la conexión entre la manguera y la pistola aspersora tendrá una fuga No puedo sacar la lanza de la pistola asper sora Qué debo hacer 1 Todas las lanzas se conectan y ret...

Page 31: ...3400960 LANZA DE EXTENSIÓN D PW4620580 RUEDAS E PW4620440 PISTOLA ASPERSORA F PW4221550 MANGUERA DE PVC BLANDA G PW4221470 BOQUILLA DE CONEXIÓN RÁPIDA QC PARA JABÓN H PW4221430 BOQUILLA QC 0 I PW4221440 BOQUILLA QC 15 J PW4221450 BOQUILLA QC 25 K PW4620370 PASADOR DE EJE L PW4620380 PASADOR DE CHAVETA M PW4221570 ADAPTADOR PARA MANGUERA DE JARDÍN Jabón Negra 0 Roja 15 Amarillo 25 Verde F K G B PW9...

Page 32: ...o problemas y ordenar piezas o pedir servicio para la reparación de su equipo To help us help you register your product at www craftsman com registration Para poderte ayudar mejor registra tu producto en www craftsman com registration Receive exclusive member benefits including special pricing and offers project sharing expert advice and SHOP YOUR WAY REWARDS Como miembro exclusivo recibe diversos...

Reviews: