background image

Summary of Contents for 53479

Page 1: ...use of this product Fasten the manual near the garage door after installation Complies with UL 325 11 _ regulations effective L 2 January 1993 I RRFTSMRN 1 2 HP GARAGE DOOR OPENER Safety Precautions Assembly Installation Adjustment Care and Maintenance Operation Troubleshooting Parts List Sears Roebuck and Co Hoffman Estates IL 60179 U S A ...

Page 2: ...bracket sectional door 24 Fasten the door bracket one piece door 25 Comaect door arm to trolley sectional door 26 Comaect door arm to trolley one piece door 27 Adjustment section pages 28 30 Travel limit adjustments 28 Force adjustlnents 29 Test the safety reversing sensor 30 Test the safety reverse system 30 Operation safety instructions 31 Care of your opener 31 Maintenance schedule 31 Operation...

Page 3: ...a woodscrewor nailto holdlocksinthe open unlocked position Operation at other than 120V 60 Hz will cause opener malfunction anddamage Identify the type and height of your door any special conditions that exist and any additional materials that lnay be required Refer to pages 6 and 7 Test Your Door for Balance Before you begin complete the following test to make sure your door is balanced and is no...

Page 4: ... Light Lens Three Function Remote Control with Visor Ctip 1 Rail Support araces_ O Sprocket Coupling Rail Assembly Hanging Brackets 2 Conductor Belt Wire White White Red Header Rail Brackets Header Bracket Door Bracket Plate Safety Ldbels I Door Bracket Straight Door Arm Section Curved Door Arm Section 2 Safety Reversing Sensors 1 Sending Eye and 1 Receiving Eye with attached 2 Conductor White Whi...

Page 5: ...e Installation Hardware Lag Screw 5 16 18xl 7 8 4 Hex Screw 5 16 18x7 8 4 Nut 5 16 18 6 Carriage Bolt Screw 5 16 18x2 1 2 2 6ABxl 2 o _ oH Clevis Pin CIevis Pill 5 16 X2 3 4 1 5 16 xl 2 Handle Lock Washer 5 16 6 Dry Wall Anchors 2 Rope Ring Insulated Fastener 3 Staples 10 Safety Reversing Sensor Installation Hardware 1 4x1 1 2 4 Carriage Bolt Lock Nut Wing Nut 2 1 4 20xl 2 4 1 4 20 x 7 16 4 Screw ...

Page 6: ...ed ceiling in your garage If so a support bracket and additional fastening hardware may be required Step 12 page 24 Do you have a steel aluminum fiberglass or glass panel door If so horizontal and vertical reinforcelnent is required Look at the garage door where it meets the floor It must close on the floor all the way across Otherwise the safeD reverse system may not work properly See page 30 Flo...

Page 7: ...urely fastened to mounting locations before sensors are installed Step 14 page 17 Alternate floor mounting of the safety reversing sensor will require hardware that is not provided Step 12 page 25 Generally a one piece door does not require reinforcement If your door is lightweight you can refer to the inforlnation relating to sectional doors on page 24 Step 12 page 25 Depending on your door s con...

Page 8: ...y Hardware Bag Hardware Bag 1 Trim the opened rail carton upside down emptying its contents onto a level work surface 2 Unfold the rails taking care to avoid kinldng the screw rod joints 3 Rotate the rail sections so that the fiat side is down and Sprocket EndRail the screw side is up for all three lengths Keep it clean I _Jl and free of debris while you are working _ Rlail Sprocket _ov otd pttlli...

Page 9: ...e holes as shown Position another brace on the opposite side of the rail over the bolts add 1 4 20 lock nuts and hand tighten Insert two additional bolts and hand tighten Lock Nuts 7 Keeping the rail straight and on a level surface grasp the screw rods on each side of the relnaining joint and pivot into a straight line Repeat steps 5 and 6 8 With a 7 16 wrench tighten bolts til snug working froln ...

Page 10: ...r the power unit sprocket Align the two screw holes in the rail with those in the power unit bracket Insert two 1 4 20x5 8 hex screws and lock nuts Tighten securely with a 7 16 socket wrench Foam Packaging Rail Power Unit Power Unit Bracket Sprocket Hex Screws 1 4 20x5 8 Trolley Rail Assembly Hardware Shown Actual Size 1 4 20 1 4 20 x 5 8 Lock Nut As illustrated above slide the trolley onto and al...

Page 11: ...ing opener 3 Disable all locks and remove all ropes connected to the garage door before installing the opener Ropes connected to a garage door can cause entanglement and death 4 If possible install door opener 7 feet or more above floor with the emergency release handle mounted 6 feet above the floor 5 Do not connect the opener to power source until instructed to do so 6 Locate the Wall Control wi...

Page 12: ...I Header Wall i 3 i Track Highest Point of Travet V One piece door with horizontal track Close the door and mark the inside vertical centerline of the garage door Extend the line onto the header wall above the door Remember you can fasten the header bracket within 2 feet of the left or right of the door center only if a torsion spring or center bearing plate is in the way or you can attach it to t...

Page 13: ...t of travel as shown Measure the distance froln the top of the door to the floor Subtract the actual height of the door Add 8 to the remainder See Example Close the door and draw an intersecting horizontal line on the header wall at the deterlnined height If the total number of inches exceeds the height available in your garage use the maximum height possible or refer to page 14 for ceiling instal...

Page 14: ...ket to the Ceiling Extend the vertical guideline onto the ceiling as shown Center the bracket on the vertical lnark no more than 6 from the wall Make sure the arrow is pointing toward the wall The bracket can be mounted flush against the ceiling when clearance is minimal Mark holes designated for ceiling mount only Drill 3 16 pilot holes and t asten bracket securely to a structural support with th...

Page 15: ...door spring is in the way you ll need help Have someone hold the opener securely on a temporary support to allow the rail to clear the spring Position the rail bracket against the header bracket Align the bracket holes and join with a clevis pin as shown Insert a ring fastener to secure Ring Fastener Header Bracket Rail Opener Carton or Temporary Support Hardware Shown Actual Size 1 Clevis Pin 5 1...

Page 16: ... the door will stop and reverse to full open position and the opener lights will flash for 5 seconds The brackets must be secnrely fastened to a solid surt ace snch as the studs on either side of the door or add a piece of wood at each location if installing in masonry construction Without a properly working safety reversing sensor persons particularlychildren couldbe injuredor killed by a closing...

Page 17: ...rage door 4 6 above the floor but not exceeding 6 See warning on page 16 5 Attach bracket assemblies with 1 4 x1 1 2 lag screws as shown in Figure 2 6 Adjust right and left side bracket assemblies to the same distance out from the lnounting surface Make sure all door hardware obstructions are cleared Tighten the nuts securely Figure 1 10 32 Lock Nuts Mounting Bracket With Square Holes C Wrap 10 32...

Page 18: ... at this time and run the wall control wire along the rail with the sensor wires Use one rail channel for the wall control wire and the other channel for both sensor wires If you choose this option follow instructions 1 3 on page 21 now 3 Thread the wires through the tabs on top of the drive shaft cover 4 With your screwdriver tip rock the wires snugly into the rail channels You will complete the ...

Page 19: ...rail If the top panel hits the trolley when you raise the door pull down on the trolley release arm to disconnect the inner and outer sections The trolley can remain disconnected until Step 13 is completed Rail 2x4 I Foam Door Packaging _L _ _ _ Trolley Release Arm ONE PIECE Door without Track With the door fully open and parallel to the floor lneasure the distance froln the floor to the top of th...

Page 20: ...with 5 16 xl 7 8 lag screws 5 Fasten the opener to the hanging brackets with 5 16 18x7 8 screws lock washers and nuts 6 Check to make sure the rail is centered over the door or in line with the header bracket if the bracket is not centered above the door 7 Remove the 2x4 Operate the door manually If the door hits the rail raise the header bracket Figure_ Supports Measure Distance Lag Screws 5 16 x...

Page 21: ... white black to 3 9 Attach the User Safety Instruction label m the wall near the wall control and the Maintenance Instruction label in a prolninent location on the inside of the garage door Page 32 explains how to operate the opener using the wall control I Outside Keylock Connections see Accessories I To opener terminal screws white to 2 white red to 1 I Childrenoperatingor playingwitha garagedoo...

Page 22: ...re to the green ground screw The opener mnst be gronnded Reinstall the cover Ground Tab Green Ground Screw Black White Wire BlackWire Installation Step 9 Complete Safety Reversing Sensor Installation Plug in the opener If your wall control has a Lock feature be sure it is of Green indicator lights in both the sending and receiving eyes will glow steadily if wiring connections and alignment are cor...

Page 23: ...nd Handle Trolley I o i i i i Trolley Release Arm _o Overhand Knot O verhand Knot Rope Emergency Release HandIe Do not use the red handle to pull the door open or closed The rope knot could become untied and you couldfail Use the emergencyreleaseonlyto disengage thetrolleyand if possible onlywhenthe dooris closed Garagedoors are heavy If the door is open when the handleis pulled the doorcouldclose...

Page 24: ... Vertical Carriage Bolt 5 16 18x2 1 2 Lock Washer 5 16 inside Edge Figure 2 of Door or Reinforcement Board Door Bracket Cemer the door bracket on the previously marked vertical guideline used for the header bracket installation Position the bracket on the face of the door within the following limits A The top edge of the bracket 2 4 below the top edge of the door B The top edge of the bracket dire...

Page 25: ...lation use 5 16 x1 1 2 tag screws not supplied to fasten door bracket Placement _ _ Carriage BoIt 5 16 18x2 1 2 Center the bracket on the top of the door in line with the header bracket as shown Mark holes Drill 5 16 pilot holes and t asten the door bracket with hardware supplied If the door has no exposed fralning drill 3 16 pilot holes and fasten the bracket with 5 16 xt 1 2 lag screws not suppl...

Page 26: ... and join sections Select holes as tar apart as possible to increase door arm rigidity Figure 1 Clevis Inner Outer Trolley Trotley Straight Curved Door Arm Clevis Pin Figure 2 Washers Iol II Nuts 5 16 131 II _ _ Emergency _ _ _ _2 e Screwe I Door 5 16 18x7 8 Bracket Hole Alignment Alternative Figure 3 If holes in curved arm are above holes in straight arm discomaect straight arm Cm abom 6 froln th...

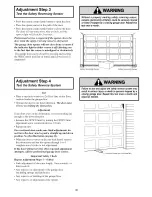
Page 27: ...The arm should touch the trolley just in back of the door arm connector hole Refer to the fully open trolley door arm positions in the illustration If the arm does not extend far enough adjust the limit further One full turn equals 2 of trolley travel Door Arm Closed Door Adjustment Decrease DOWN Travel Limit Turn the DOWN limit adjustlnent screw clockwise 5 complete turns Press the Wall Control p...

Page 28: ...tment procedures may cause the motor to overheat and shut off Simply wait 15 minutes and try again Read the procedures carefully before proceeding to Adjustlnent Step 2 Use a screwdriver to lnake limit adjustments LIMIT ADJUSTMENT LABEL UP Travel _ Adjust DOWN Travel How and When to Adjust the Limits If the door does not open completely but opens at least five feet Increase up travel Turn the UP l...

Page 29: ...t Controls How and When to Adjust the Forces Test the DOWN close force Grasp the door bottoln when the door is about halfway tl_ ough DOWN close travel The door should reverse Reversal halfway through down travel does not gaarantee reversal on a one inch obstruction See page 30 If the door is hard to hold or doesn t reverse decrease the DOWN close force by turning the control counterclockwise Make...

Page 30: ...n the floor centered under the garage door Operate the door in the down direction Tke door mnst reverse on striking tke obstruction Adjustment If the door stops on the obstruction it is not traveling far enough in the down direction Increase the DOWN limit by turning the DOWN limit adjustlnent screw counterclockwise 1 4 turn Repeat the test On a sectional door make sure limit adjustments do not fo...

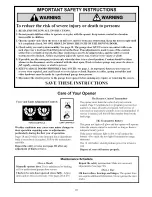
Page 31: ...ing any repairs or removing the covers SAVE THESE INSTRUCTIONS Care of Your Opener Force and Limit Adjustment Controls FORCE CONTROLS LIMIT CONTROLS Weather conditions may cause some minor changes in door operation requiring some re adjustments particularly during the first year of operation Pages 28 and 29 refer to the limit and force adjusttnents Only a screwdriver is required Follow the instruc...

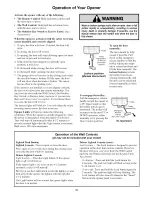
Page 32: ...and handle onlywhen the door is fullyclosed H_I Trolley _ _ Position Lockout position Manual disconnect To open the door manually The door should be fully closed if possible Pull down on the emergency release handle so that the trolley release arm snaps into a vertical position and lift tile door lnanually Tile lockout feature prevents tile trolley from recon necting autolnatically and the door ca...

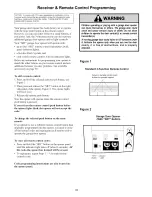
Page 33: ... remote push breton Now the opener will operate when the remote control push button is pressed If you release the remote control push button before the opener lights flash the opener will not accept the code To change the selected push button on the same remote If you decide to use a different remote control button than originally programmed into the opener you need to erase all the learned codes ...

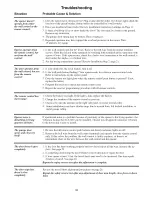
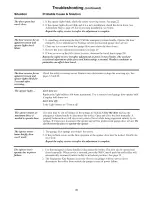
Page 34: ...the remote control code 5 Repeat the receiver progralraning procedure with all remote controls The remote control has short range 1 Check the battery test light If the light is dim replace the battery 2 Change the location of the remote control in your car 3 Check to be sure the antenna on the right side panel of opener extends fully 4 Some installations may have shorter range due to a metal door ...

Page 35: ...the receiving eye See pages 12 and 22 The opener lights don t tnrn on Replace the light bulb s 100 watts lnaximuln Use a standard neck garage door opener bulb if regular bulb burns out don t tnrn off Is the Light feature on Turn it off The opener strains or maximum force is needed to operate door The door may be om of balance or the springs are broken Close the door and use the emergency release h...

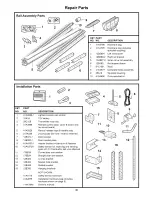
Page 36: ... 41A4373A 11 178B35 12 178B34 13 12B483 14 12B484 15 12B485 16 12B350 41A4116 41A4675 114A1846 3 DESCRIPTION Lighted console wall control 12V battery Transmitter visor clip Remote control case cover screw only no circuit board Manual release rope handle assy 2 Conductor bell wire white white red Door bracket Door bracket plate Header bracket w clevis pin fastener Safety sensor kit receiving and se...

Page 37: ...Capacitor bracket 5 41A3150 Terminal block w screws 6 41D4671 Limit switch assembly 7 12D554 Limit switch bracket 8 41 D4759 Complete Motor Drive Assy with 8a 144B41 22T Pulley 8b 144B42 28T Pulley 8c 20C14 Drive Belt 8d 158A69 Retainer Ring 9 41A4843 Interrupter cup 10 41A4837 Worm gear and retainer 11 41C4669 Wire harness assembly 12 41C4672 RPM sensor assembly 13 41 D4674 3C Receiver logic boar...

Page 38: ...shed ceilings or where additional suuport is required based on garage construction Includes bracket and fastenint hardware 53779 53759 53774 53773 3 Function Standard Size Remote Control Includes visor clip 3 Function Compact Remote Control With key ring Velcro fastening strip Plug In Light Control Controls interior lights Plugs into a wall receptacle Wire In Light Control Controls interior or ext...

Page 39: ...arnings 28 31 Emergency Release Rope Handle Lockout featnre 32 Mamml disconnect 32 35 Safety warnings t 1 23 31 32 Opener Terminals Wall control connections 2 t Safety reversing sensor connections 2 t 22 Outdoor Key Switch accessory comaections 21 Receiver Remote Controls Programming the receiver 33 Erasing all codes 33 Safety warning 33 Problems with remote control transmitter operation 34 Safety...

Page 40: ...sh replacement parts for any defective parts free of charge You pay for labor LIMITED WARRANTY ON 1 2 HP MOTORS FOR CRAFTSMAN OPENERS After 1 year and through 5 years Sears will furnish replacement parts for any defective parts in motor free of charge You pay for labor LIMITATION ON LIABILITY Sears will not be liable for loss or damage to property or any incidental or consequential loss or expense...

Reviews: