background image

Summary of Contents for 536.773520

Page 1: ...EY START HIGHWHEEL WEEDTRIMMER MODEL NO 536 773520 Caution Read and follow all Safety Rules and Operating Instructions before first use of this product SEARS ROEBUCK AND CO Hoffman Estates IL 60179 U S 712344 02 10 99 ...

Page 2: ...nthe equipmentaccordingto the instructionscontainedinthe owner s manual WARRANTY SERVICE IS AVAILABLE BY RETURNING THE CRAFTSMAN WEED TRIMMER TO THE NEAREST CRAFTSMAN SERVICE CENTER DEPARTMENT IN THE UNITED STATES THIS WARRANTY APPLIES ONLYWHILE THIS PRODUCT IS IN USE IN THE UNITED STATES This warranty gives you specific legal rights and you may also have other rights which may vary from state to ...

Page 3: ...without proper guards or other safety protective devices in place 13 Use this equipment for its intended pur pose only 14 See manufacturer s instructions for proper operation and installation of accessories 712344 3 Only use accessories approved by the manufacturer 15 Operate only in daylight or good artificial light 16 Do not operate the trimmer while under the influence of alcohol drugs orother ...

Page 4: ...fueling Do not smoke c Never refuelthe machine indoors d Never store the machine or fuel con tainer inside where there is an open flame such as a water heater 2 Never run an engine indoors or inside a closed area 3 Never make adjustments or repairs with the engine motor running Disconnect the spark plug wire and keep the wire away from the plug to prevent accidental starting remove the ignition ke...

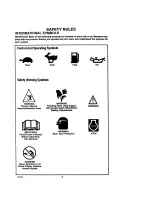
Page 5: ...he purpose for each symbol ControlAndOperating Symbols Slow Fast Fuel OII SafetyWarningSymbols A WARNING Thrown Objects Keep Bystanders Away WARNING Rotating Parts Stop Engine Disconnect Spark Wire Before Making Adjustments WARNING IMPORTANT Read Owner s Manual Before Operating This Machine WARNING Wear Eye Protection STOP WARNING Never Operate Up Or Down Slopes Operate Across Slopes 712344 5 ...

Page 6: ...ship ment References to the right or left hand side of the trimmer are from the viewpoint of the opera tor s position behind the unit TO REMOVE THE TRIMMER FROM CARTON 1 Remove the parts bag and all loose parts from carton 2 Remove the packing material positioned aroundthe unit 3 Cut down allfour cornersof the cartonand lay the side panelsflat 4 Pull the trimmer out of the carton and off the base ...

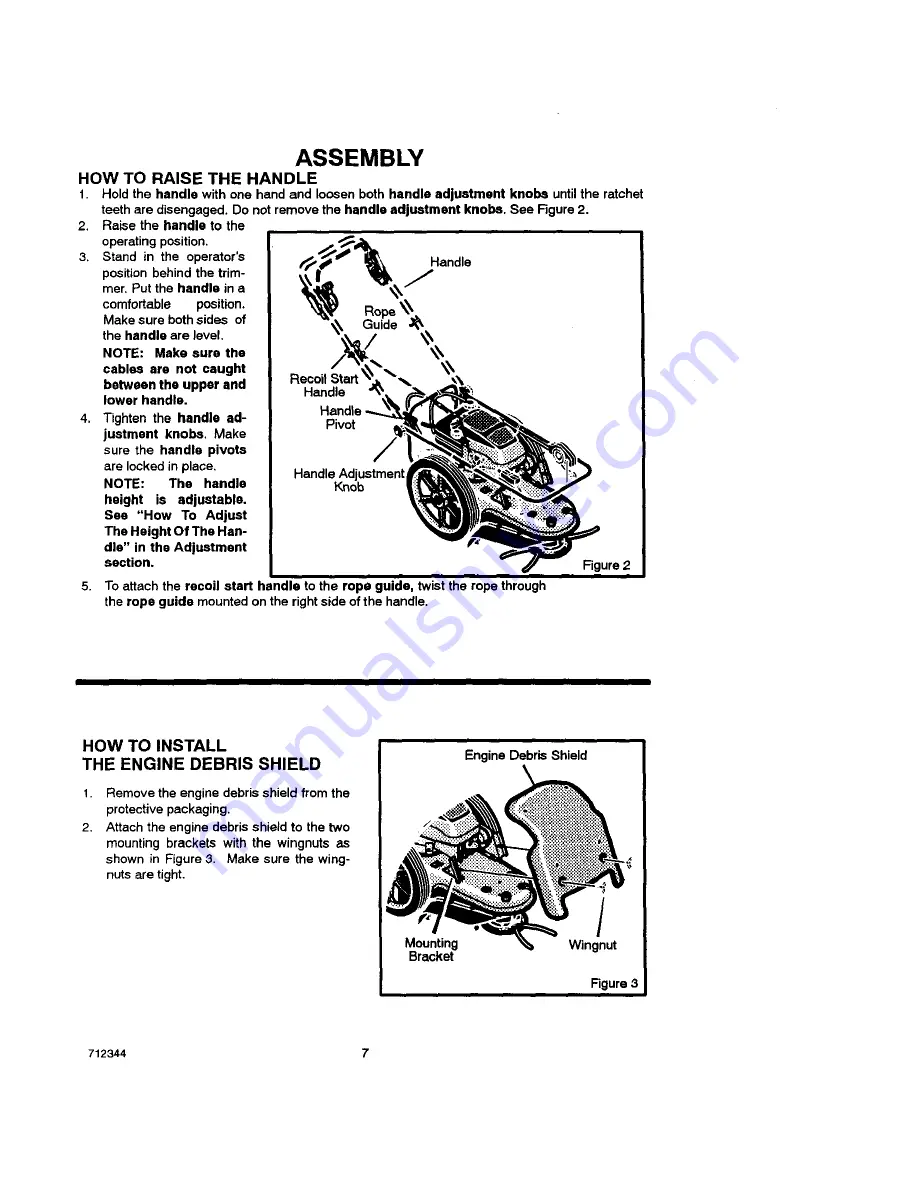
Page 7: ...dle ad justment knobs Make sure the handle pivots are locked in place NOTE The handle height is adjustable Sea How To Adjust The Height Of The Han dle in the Adjustment section Handle Recoil Start Handle Handle Pivot Handle Adjustment Knob Rgure 2 5 Toattach the recoil start handle to the rope guide twist the rope through the rope guide mountedon the rightside of the handle HOW TO INSTALL THE ENGI...

Page 8: ...hipped from the facto ry the battery was not fully charged Before the first use the battery must be charged for 16 24 hours See How To Charge The Bat tery in the Service And Adjustment section _ CHECKLIST For the best performance and satisfaction from this quality product please review the fol lowing checklist before you operate the trim mer P All assembly instructions have been completed _ Check ...

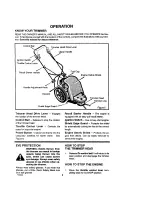
Page 9: ...buretor manifold for fester starts See Figure 8 Recoil Starter Handle The engine is equippedwithan easy pullrecoilstarter Ignition Switch Use on key start engine Shield Edge Guard Protects the shield by automaticallycuttingthe line to the correct length Engine Debris Shield Protectsthe en gine from debris Can be easily removed to servicethe engine EYE PROTECTION WARNING Debris thrown from the trim...

Page 10: ... normal use set the throttle con trol lever in the FAST position to run the engine at full speed 2 Pull the throttle control lever back to de crease engine speed Push the throttle control lever forward to increase engine speed 3 To stop the engine pullthe throttle con trol lever completely back to the STOP position Throttle Control Lever Figure 7 HOW TO USE THE PRIMER BUTTON 1 Push the primer butt...

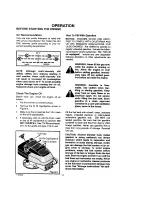
Page 11: ...l system s EM TWC if so equipped Include any user adjustable features therefore no other adjustments are needed WARNING Never fill the gas tank while the engine Is running or hot Allow the engine to cool before adding gasoline Immedi ately wipe off any spilled gaso line before you start the engine WARNING Gasoline Is flam mable Usa caution when han A llng or storing gasoline Keep away from an open...

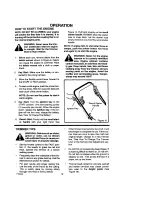
Page 12: ...the primer button two times and again try to start the engine _k WARNING Never run the engine indoors or in a poorly ventilated area Engine exhaust contains carbon monoxide an odorless and dead ly gas Keep hands feet hair and loose clothing away from the trimmer and any moving parts on the engine Avoid the muffler and surrounding areas Temper atures may exceed 150 1 Ignition Key Figure 10 TRIMMER ...

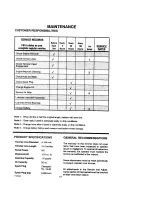
Page 13: ...used in extremaly dusty or dirty conditions Note 4 Charge battery before each season and before winter storage PRODUCT SPECIFICATIONS Trimmer Line Diameter 0 155 inch Trimmer Line Length 21 5 inches Horse Power 6 5 Displacement 12 0 cu in Gasoline Capaoity 1 5 quarts Oil Capacity 20 oz Spark Plug Champion RJ 19LM Spark Plug Gap 0 0 30 inch 712344 GENERAL RECOMMENDATIONS The warranty on this trimme...

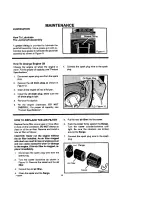
Page 14: ...plugwire to the spark plug HOW TO REPLACE THE AIR FILTER Replace the air filter once a year or more often in dusty or dirty conditions DO NOT attempt to clean or oil the air filter Remove and install a new air filter as follows CAUTION Never run the engine without the air filter installed An air filter clogged with dust can result in loss of engine power and can cause excessive wear or damage to t...

Page 15: ... plug if the electrodes are pitted or burned or if the porcelain is cracked 1 Make sure the spark plug is clean Clean the spark plug by carefullyscraping the electrodes donotsand blastor use a wire brush 2 Check the spark plug gap with a feeler gauge See Product Specifications for the correct spark plug gap and replace ment spark plug 3 Before installingthe spark plug coat the threads lightlywith ...

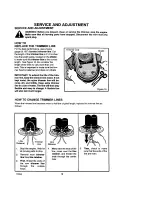
Page 16: ...vibrate IMPORTANT To extend the life of the trim mer line keep the trimmer line moist if not kept moist the nylon trimmer line will be come dry and brittle Keep extra trimmer line In a can of water The line will then stay flexible and easy to change A flexible line will also last much longer HOW TO CHANGE TRIMMER LINES When the trimmer line becomes worn to half the original length replace the trim...

Page 17: ...sides of the handle are level Ratchet Teeth 3 Tighten the knobs I HOW TO SET THE HEIGHT OF CUT CAUTION Before you set the height of cut stop the engine Wait for all moving parts to stop Allow the engine to cool and dis connect the spark plug wire The height of cut can be set from 1 1 2 inches to 3 inches Recommended cutting height for the average yard is 2 1 Use the T wrench found in the parts bag...

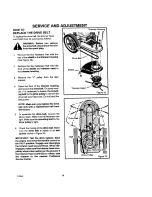
Page 18: ...drive pulley to removethe drive belt see Figure20 Do notbend the belt guides NOTE Make sure you replace the drive belt only with a replacement belt from the factory To assemble the drive belt reverse the above steps Make sure all fasteners are tight Make sure the mounting bolt for the drive pulley Is tight 6 Check the routing of the drive belt Make sure the drive belt is inside of all belt guides ...

Page 19: ...ANT Make sure to use the battery charger supplied with the mower The use of any other battery charger will damage the battery 1 Disconnect the wiring harness from the battery Figure 21 2 Attach the battery charger wire to the battery Connect the battery charger to an electrical outlet HOW TO REMOVE THE BATTERY If the engine will not turn over or turns over slowly when the key is turned on charge t...

Page 20: ...e while in storage To prevent engine damage when the trimmer is in storage for 30 days or more follow the steps below Let the engine run until it is out of gasoline o Drain the oil from the warm engine Fill the engine crankcase with new oil Remove the spark plug from the cylinder Pour one ounce of oil into the cylinder Slowly pull the recoil starter handle so that the oilwill protect the cylinder ...

Page 21: ...ery Badspark plug Dirty air filter Carburetoroutof adjustment Prime engine Inspect or replace spark lug Add fuel Clean carburetororfuel line Replace air filter For carburetoradjustment take the unitto a Craftsman Service Center Waitseveral minutasbefore starting Aove throttlelever to FAST or START position Drain old gasolineand add fresh gasoline Inspectlever and wire Replace if damaged or dafec _...

Page 22: ...ly attached Broken line retainer Trimmer line notcorrectsize Clean debris screen and engine cooling fins Adjust carburetor Take the unit to a Craftsman Service Center Add oil Inspect and replace damaged parts Move throttle to the full OFF position Correct line length is 21 5 inches When less than 1 2 this length replace the line Move engine throttle lever to FAST position Tighten set screw with T ...

Page 23: ...im on a slope greater than 15 degrees A 10 degree slope is a hill that increases in height at approximately 1 7 feet in 10 feet A 15 degree slope is a hill that increases in height at approximately 2 5 feet in 10 feet Use extreme care at all times and avoid sudden turns or maneuvers Follow other instructions in this _ anual for safety in trimming on slopes Operate a trimmer across the face of slop...

Page 24: ...CRAFTSMAN 536 773520 REPAIR PARTS 1 14 10 11 12 27 18 12 20 27 21 24 30 33 34 31 36 37 39 712344 24 ...

Page 25: ...2 See Engine Pages 26 Harness Clamp 27 Nut 28 Wheel and Tire 29 Washer 30 Spacer 31 Bracket Assembly Axle and 32 Bolt Carriage 33 Bolt 34 Nut 35 Nut 36 Shield Trailing 37 Bolt 38 Frame 39 Glasses Safety 40 Decal 41 Spacer PM 26x 5x 2 42 Washer Formed REPAIR PARTS Part No 740198 846 740198 848 323035 712267 17x38 Z 672510 740193 740228 740225 323034 710269 740218 740221 740220 740222 740219 740223 ...

Page 26: ...CRAFTSMAN 536 773520 REPAIR PARTS 1 2 3 27 31 25 26 15 2O 8 31 38 23 712344 26 ...

Page 27: ...y 23 Screw 24 Jackshaft Housing Assembly 25 Shaft Cutting Head 26 Wrap Upper Head 27 Screw 29 Cutting Disc Assembly 30 Screw Set 31 Une Cutting Pack of 24 32 Flatwasher 33 Guide Height 36 Lockwasher 37 Bolt 38 T Wrench REPAIR PARTS Pa_ No 710140 711978 740216 848 710272 740232 710200 712403 740292 712148 710083 740171 740173 711933 740244 740179 740183 712147 712146 712145 740167 770070 710269 092...

Page 28: ...Key No Description 1 Engine Debris Support 2 Screw 3 Bracket Right Shield 4 Bracket Left Shield 5 Ratchet Fastener 6 Shield Engine Debris 7 Knob Debris Shield 8 Housing Trimmer 28 Part No 740234 846 710273 740238 740245 311087 740229 740227 740216 848 ...

Page 29: ...CRAFTSMAN 143 996512 REPAIR PARTS goo 400 130 135 370E 126 416 120 119 125 46 _310 3O5 _ _ _ 306 245 238 250 712344 29 ...

Page 30: ...d Ass y Incl 46 46 32610A Connecting Rod Bolt 48 27241 Valve Lifter 50 36778 Camshaft MCR KEY NO 52 69 70 72 75 80 81 82 83 86 89 90 92 93 lOO lOl lO3 11o 110A tlOC 119 120 125 126 130 135 150 151 151A REPAIR PARTS PART NO 29914 35261 34311E 36083 27897 30574A 30590A 30591 30588A 650488 610961 611179 850815 650816 34443B 610118 651007 36230 34970 35020 36787 36825 37288 37289 6021A 35395 31672 316...

Page 31: ...over 400 36792B 260 36980 Blower Housing 261 30200 Screw 10 24 x 9 16 262 650831 Screw 1 4 20 x 1 2 263A 37198 Starter Grill 275 36790A Muffler 416 36085 277 650988 Screw 1 4 20 x2 9 32 285 35000A Starter Cup 417 650821 287 650926 Screw 8 32 x 21 64 290 29774 Fuel Line 900 0 292 26460 Fuel Une Clamp 900 0 298 28763 Screw 10 32 x 35 64 300 36916 Fuel Tank Incl 292 301 REPAIR PARTS Fuel Cap Oil Fill...

Page 32: ...CRAFTSMAN 143 996512 REPAIR PARTS 27 _m37 _36 _37 4O 712344 32 ...

Page 33: ...f Engine Parts ist ThrottleShaft LeverAssembly Throttle ReturnSpring Dust Seal Washer Dust Seal Throttle ThrottleShutter Shutter Screw Fuel Fitting Throttle Crack Screw Idle Speed TensionSpring Idle RestrictorScrew Idle RestrictorScrew Cap Float Bowl Float Shaft Float Float Bowl O Ring Inlet Needle Seat Clip Incl 31 Spring Clip Primer Bulb RetainerRing Main Nozzle Tube O Ring Main Nozzle Tube High...

Page 34: ...CRAFTSMAN 143 996512 REPAIR PARTS 11c 6 8 712344 34 ...

Page 35: ...942 12 34947 13 34946 14 34951 15 34952 16 34948 17 34953 18 590608 DESCRIPTION Electric Starter 12 Volt Retainer Ring Spring Retainer Spring Gear Drive End Cap Ass y Lock Nut Armature Housing Ass y Thrust Washer Commutator End Cap Ass y Incl brushes Bolt 10 32 x 3 3 15 Pinion Driver Cup Washer Retainer Ring Washer Drive Nut Washer 712344 85 ...

Page 36: ... 8 11 12 13 14 PART NO 590739 590740 590616 590517 590618A 590638 590535 59070 t 59O760 DESCRIPTION Rewind Starter Retainer Starter Dog Dog Spring Pulley Rewind Spring As y Starter Housing Ass y 40 degree grommet Starter Rope Length 98 x 9 64 dia Starter Handle Spring Clip 36 ...

Page 37: ...NOTES 712344 37 ...

Page 38: ... servicio de reparacibn a domicilio 1 800 676 5811 For the location of a Sears Parts and Repair Center in your area Call 24 hours a day 7days a week 1 800 488 1222 g ggg For information on purchasing a Sears Maintenance agreement or to inquire about an existing Agreement Call 9am 5pm Monday Saturday 1 800 827 6655 When requesting service or ordering parts always provide the following infor mation ...

Reviews: