background image

Summary of Contents for 6073290

Page 1: ...re using this product _IL ADVERTENCIA Pare reducir el riesgo de lesiones el usuerio debe leer y comprender el manual clef operador antes de user este producto Customer Help Line 1 888 266 7096 Tel6fonode atoncibnal consumidor 1 888 266 7096 Sears Brands Management Corporation Hoffman Estates IL 60179 USA Visit the Craftsman web page www craftsman eom Visite el sitio web de Craftsman www craftsman ...

Page 2: ...t Corporation Hoffman Estates IL 60179 GARANTIA COMPLETA DE DOS ANOS CRAFTSMAN _ Este producto tiene garantia per cualquier defec_o en material o mano de obra DURANTE DOS AltOS desde la fecha de compra Los productos defectuosos se remplazar_n sin cargo Para conocer los detalles sebre la cobertura de la garantfa para obtener un remplazo gratuito visite el silio web www craftsmen com La garantla pie...

Page 3: ...L Always wear safety glasses with side shields Everyday glasses have only impact resistant lenses They are NOT safety gtasses Following this rule will reduce the risk of eye injury Use face mask if operation is dusty V_ar safety glasses or goggles that are marked to comply with ANSI Z87 1 standard when operating this product Use the right appliance DO not uSe the lawn mower for any job except that...

Page 4: ... the risk of electric shock fire or sedous personal injury Do not servicemower w_ _witch key orcharger ins_led Do not use the charger when the ambient temperature is above 40 C or below 0 C Do not operate charger with a damaged cord or plug wh ch could cause sho_ng and electric shock If damaged have the charger replaced by an authorized serviceman DO not operate charger if it has received a sharp ...

Page 5: ...e Revolutions strokes surface speed orbits etc per minute Wet Conditions Alert Do not expose to rain or use in damp locations Read The Operator s Manual To reduce the risk of injury user must read and understand operator s manual before using this product Eye Protection Wear eye protection when operating this equipment _ Ricochet Thrown objects can ricochet and result in personal _ injury or prope...

Page 6: ...d in this operator s manual as well as a knowledge of the project you are attempting Before use of this product familiarize yourself with all operating features and safety ruIes BATTERY METER The battery meter measures the amount of charge remaining in the battery GRASS CATCHER The grass catcher prevents grass clippings from being strewn across your lawn as you mow HEIGHT ADJUSTMENT LEVER The heig...

Page 7: ...es Insert the bolts 4 and tighten them with the wing nuts 5 provided Secure the lower handle to the bracket with the handle knob 6 in each side INSTALLING SIDE DISCHARGE DEFLECTOR See Figure 3 Lift the side discharge door 1 Align the grooves on the deflector 2 with the pins on the underside of the door Lower the deflector 2 until the hooks on the mower deck are secured inthe openings in the deflec...

Page 8: ... 24 volt storage battery Remove the switch key Charge the battery pack only with the charger provided Allow at least 15 hours of charge time before initial use of the mower Make sure the power supply is normal household voltage 120 volts 60 Hz AC 0nly The battery should be charged in a cool dry piace To improve battery life store battery indoors in a controlled climate Fully charge battery pack ev...

Page 9: ...er cut Clean the underside of the mower deck after each use to remove grass clippings leaves dirt and any other accumulated debris SLOPE OPERATION Slopes are a major factor related to slip and fail accidents that can result in severe injury Operation on slopes requires extra caution If you feeI uneasy on a slope do not mow it For your safety do not attempt to mow slopes greater than 15 degrees Mow...

Page 10: ...e blade with rags and other material when performing blade maintenance Failure to heed this warning so could result in serious personal injury _ WARNING Before performing any maintenance make sure the mower is unplugged from the power supply and the switch key is removed Failure to heed this warning could result in serious personal injury REPLACING THE CUTTING BLADE See Figures 12 13 Since the mow...

Page 11: ...end of the blade drops downward sharpen the heavy side until the blade is balanced STORING THE MOWER See Figures I6 Remove the switch key and store in a secure location out of the reach of children Turn mower on its side and clean grass clippings that have accumulated on the underside of the mower deck Wipe the mower clean with a dry cloth Check all nuts bolts knobs screws fasteners etc for tightn...

Page 12: ...R w MODEL NUMBER 6073290 _ The model number will be found on a labeI attached to the motor housing Always mention the model 1 number when calling to order repair parts TO PURCHASE REPLACEMENT PARTS CALL 1 800 469 4663 12 English i i ...

Page 13: ...L NUMBER 6073290 _ _ The model number wit be found on a labet attached to the motor housing Nways mention the rood I number when calling to order repair pa_ts TO PURCHASE REPLACEMENT PARTS CALL 1 800 469 4663 t 4 13 English ii i i i i i ...

Page 14: ...rbon brush I Lock Nut M6 5 Bolt 3 Side discharge cover Assy 1 Side discharge cover 1 Bolt 2 Side discharge chute 1 I t t 2 2 8 12 1 8 4 4 1 2 3330637 Side discharge bracket 3340237 Spring 3320339 Side discharge pin 34203229 4 Front wheel 3320237 Wheel spacer 3220575 Screw 3220439 Lock nut 31 I0139 1 Front axle Assy 3220898 Washer 3290135 C clip 342032 _9 9 YW wheel cap 33304235 Rear cover spdng le...

Page 15: ...ut 1 34 3340137 2 Extension spring 1 35 33303227 6 Link bar 1 36 3110392 5EE Charger 1 39 31101464 Rear wheel 2 40 3110239 2 Rear wheel axle 1 41 3320639 Wheel spacer 2 43 38801229 2 Owner s manual Noshown 1 44 31101237 4 Upper handle and Bale switch assembly I 45 3410835 4 Knolo black 4 46 3220436 1 Bolt 2 47 34 35469 Cord retainer 2 48 3330191 2 Lower handle 1 49 3330437 I Spring board for heigh...

Page 16: ...rew 12 battery Housing 1 screw 2 rubber cover for connector 1 2 X 12 V 20Ah SLA BATTERY 2 connector terminal 2 wire blue 1 wire yel ow 1 connecting piece 4 flag bushing 6 3 2 flag terminal 6 3X0 8 2 60A fuse I 6 13 34t1445 5 BC I check huron I 16 14 36201237 Battery check indicators 16 15 3650139 charging port 16 16 34t04226 1 charge port cap 16 17 3690292 port cap line 1 6 18 34105229 for battery...

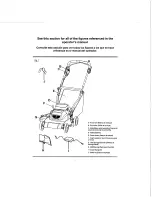
Page 17: ...E D F H A Powerlever Palancade arranque B Start button Bot6ode arranque C Motor Bladecontrolassembly Conjuntode oniuntode control del motor cuchiIia D Battery Bateria E Grasscatcher Receptorde c_sped F Heightadjustmentlever Patancade aiuste de altura G Side discharge dellector Deflectorde descargarateral H Mulching plug Tap6npara trituraci6n l Charger Cargador 5 Switchkey Uave de seguridad ...

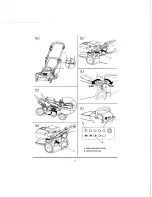
Page 18: ...Fig 2 Fig 3 Fig 5 Fig 6 HIGH i __ i A Baflenj meter Medidorde pila B Light meter Fol6metro ii ...

Page 19: ... t Fig 8 A A Charger Cargador Fig 9 C A A Powerlever Palanea de arranque B Start button Bot6nde arranque C Switch key Llavede seguddad Fig 10 Fig 11 ...

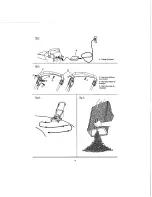
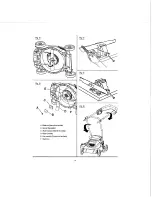
Page 20: ...Fig 12 Fig 13 A C B A Bradsnut Toercade lacuchilla B Spacer Espaciador C Bladeinsulator Aislantoctecuch lla D Btado Cuchilla E Fanassembly Conjuntode ventilador F Shaft Eie Fig 14 Fig 15 ...

Page 21: ...one el equipo cuando est6 desca zo o al Ilevar puestas sandalias o calzado iviano similar Use calzado de seguridad que le proteja sus pies y majors su posture en superficies resbaladizas No deje desatendida Ia podadora de pasto mientras la tonga encendida Mantenga las manos y los pies alejados del _rea de corte Mantengase alejado de Ia abertura de descarga en todo momento Utilice la podadora de pa...

Page 22: ...paste y suelte la palanca de control del interrupter Desconecte el cordon electrico inspeccione minuc osamente la podadora para ver si tiene daOos Repare todo daOo antes de velvet a arrancar la podadota y continuer utiliz ndola Apague el motor retire la Ilave de seguridad y espere basra que la cuchilla se detenga per complete antes de retirar el receptor de c_sped o desobstruir el vertedero La cuc...

Page 23: ...ctrica Aseg_rese de que el cordbn el_ctdco est_ ubicado de tal manera que nadie Io pise o se tropiece con 61 no toque bordes afilados o piezas en movimiento ni quede sujeto a daSos ni tensiones De esta manera se reduce el riesgo de ca_das accidentaies que pudieran causar Iesiones personates y daSos al cord6n Io cua podr a ocasionar una descarga el_ctdca Mantenga el cordSn y el cargador alejados do...

Page 24: ...uvia ni la use en lugares h_medos sobre aviso Lea el manual del operador Para reducir el riesgo de lesiones el usuario debe leer y comp ender el manual del operador antes de usar este producto O Protecci6n ocular AI uBizar este producto p6ngase siempre galas de seguridad con protecciOn lateral yen la medida en que sea necesado utilice un protector para toda la cara Z_ Rebote Cualquier objeto lanza...

Page 25: ...ender tambi_n el trabajo qua intenta realizar Antes de usar este producto familiar case con todas las caracter sticas de funcionamiento y normas de seguridad del mismo MEDIDOR DE PILA El medidor de pila mide la cantidad de carga que queda en la pila RECEPTOR DE CESPED El receptor de c6sped impide que los recortes de c_sped se dispersen por el pasto mientras Io poda PALANCA DE AJUSTE DE ALTURA La p...

Page 26: ...arriba y atr_s la manija superior para levantar la manija hasta la posiciSn de funcionamiento Aseg 3rese de que a manija inferior este asentada flrmemente en el soporte de montaje de la manija Alinee los odflcios 3 entre la manija superior 1 y la inferior 2 Introduzca los pemos 4 y aj_stelos con las tuercas rnariposas 5 provistas Asegure la manija inferior a soporte con la peri la de la manija 6 e...

Page 27: ... de 50 80 mientras que 1 luz verde equivale a una carga de 30 50 Si se itumina Ia luz AMBAR se debcr_ cargar Ia pila pronto Se recomienda cargar la pile en este memento La pile tiene una carga de 5 30 cuando se ilumina la luz amarilla Si la luz ROJA se ilumina cuando Ia podadora est en funcionamiento se debe cargar la pile NMEDIATAMENTE antes de usada La carga de la piia es menor a 5 cuando se enc...

Page 28: ... un paste saludable siempre corte un tercio 0 menos de Ia Iongitud total del cesped AI cortar c_sped frondoso reduzca la velocidad mientras camina para poder obtener un corte m_s eficaz y una descarga adecuada de los recortes mm No corte el c_sped cuando est_ mojado Se pegar_ a la parte inferior del piso e impedir que se trituren correctamente los recortes de cesped El c6sped nuevo o grUeso puede ...

Page 29: ... y lubdque el eje de motor con aceite de baja viscosidad o aceite para motor ConsuIte la secci6n Reemplazo d e la cuchilla para obtener instrucciones sobre c6mo retirar la cuchilla _ADVERTENCIA Siempre prot6jase las manes usando guantes gruesos y o envolviendo los bordes de corte de la cuchiila con paSos y otto material al rea izar el mantenimiento de la cuchilla La inobservancia de esta adverLenc...

Page 30: ...o impulsado en el costado de un banco de trabajo tambi_n se puede utifizar Coloque el orificio central de la cuchilla en el fuste de1 destomillador o c avo Sila cuchil a est equilibrada permanecer_ en posiei6n horizontal Si alg_n extremo de Ia cuchilla se cae afile el ado m s pesado hasta que la cuchilIa est6 equilibrada GUARDADO DE LA PODADORA Vea ta figura 16 Retire la Ilave de seguridad y guard...

Page 31: ...RR ...

Reviews: