background image

Summary of Contents for 917.377811

Page 1: ...Y LAWN MOWER Model No 917 377811 Safety Assembly Operation Maintenance Espa_ol Repair Parts CAUTION Read and follow all Safety Rules and Instructions before operating this equipment Sears Roebuck and Co Hoffman Estates IL 60179 Visit our Craftsman website www sears com craftsman ...

Page 2: ...his Warranty gives you specific legal rights and you may also have other rights which vary from state to state SEARS ROEBUCKAND CO 817 WA HOFFMAN ESTATES ILLINOIS 60179 IMPORTANT This cutting machine is capable of amputating hands and feet and throwing objects Failure to observe the following safety instructions could result in serious injury or death I GENERAL OPERATION Read understand and follow...

Page 3: ...ing III CHILDREN Tragic accidents can occur if the operator is not alert to the presence of children Children are often attracted to the machine and the mowing activity Never assume that children will remain where you last saw them Keep children out of the trimming area and under the watchful care of another responsible adult Be alert and turn machine off if children enter the area Before and whil...

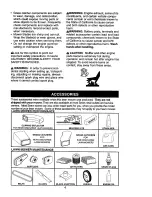
Page 4: ...cts or other reproductive harm _ WARNING Battery posts terminals and related accessories contain lead and lead compounds chemicals known to the State of California to cause cancer and birth defects or other reproductive harm Wash hands after handling A CAUTION Muffler and other engine parts become extremely hot during operation and remain hot after engine has stopped To avoid severe burns on conta...

Page 5: ...and padding holding operator presence control bar to upper handle 4 Roll lawn mower out of carton and check carton thorougly for additional loose parts HOW TO SET UP YOUR LAWN MOWER TO UNFOLD HANDLE IMPORTANT Unfold handle carefully so as not to pinch or damage control cables 1 Raise lower handle section to operating position and squeeze the bottom ends of lower handle towards each other until the...

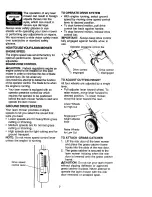
Page 6: ...ithout oil or gasoline in the engine ousing MEETS CPSC SAFETY REQUIREMENTS Sears rotary walk behind power lawn mowers conform to the safety standards of the Amedcan National Standards Institute and the U S Consumer Product Safety Commis sion The blade turns when the engine is running Operator presence control bar must be held down to the handle to start the engine Release to stop the engine Primer...

Page 7: ...s are for normal grass cutting or trimming High speeds are for light cutting and for ground transport NOTE Do not move speed control lever unless the engine is running Drive speed control lever_ TO OPERATE DRIVE SYSTEM With engine running select ground speed by moving drive speed control lever to desired position To start forward motion pull drive control bar back against handle To stop forward mo...

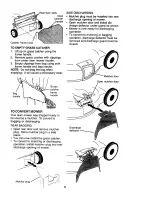
Page 8: ...vert to bagging or discharging REAR BAGGING Open rear door and remove mulcher plug Store mulcher plug in a safe place You can now install the grass catcher To convert to mulching or discharging operation install mulcher plug into rear discharge opening of mower Mulcher plug SIDE DISCHARGING Mulcher plug must be installed into rear discharge opening of mower Open mulcher door and install dis charge...

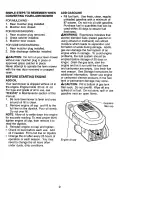
Page 9: ...ck oil level before each use Add oil if needed Fill to full line on dipstick Change the oil after every 25 hours of operation or each season You may need to change the oil more often under dusty dirty conditions ADD GASOLINE Fill fuel tank Use fresh clean regular unleaded gasoline with a minimum of 87 octane Do not mix oil with gasoline Purchase fuel in quantities that can be used within 30 days t...

Page 10: ...ng Keep top of engine around starter clear and clean of grass clippings and chaff This will help engine air flow and extend engine life MULCHING MOW1NG TIPS IMPORTANT Forbestperformance keep mower housingfree of built upgrass and trash See CLEANING in the Maintenance sectionof this manual The special mulching blade will recut the grass clippings many times and reduce them in size so that as they f...

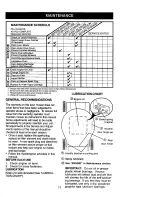
Page 11: ...negligence To receive full value from the warranty operator must maintain mower as instructed in this manual Some adjustments will need to be made periodically to properly maintain your unit All adjustments in the Service and Adjust ments se_on of this manual should be checked at least once each season Once a year replace the spark plug replace air filter element and check blade for wear A new spa...

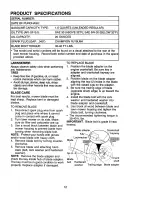
Page 12: ...re up 3 Use a wood block between blade and mower housing to prevent blade from turning when removing blade bolt NOTE Protect your hands with gloves and or wrap blade with heavy cloth 4 Remove blade bolt by turning counter clockwise 5 Remove blade and attaching hard ware bolt lock washer and hardened washer NOTE Remove the blade adapter and check the key inside hub of blade adapter The key must be ...

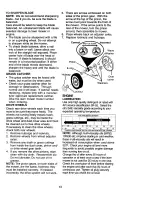
Page 13: ...ings from inside the dust cover pinion and or drive wheel gear teeth 4 If you remove the drive pinions wipe clean with dry cloth Reassemble dry Do not lubricate Do not use oil or grease NOTE The pinion gears on both sides of the mower are the same however they must be installed correctly If installed incorrectly the drive system will not work 5 There are arrows embossed on both sides of the pinion...

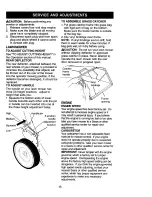
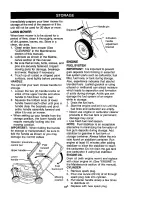
Page 14: ...new filter into cover 5 Put air filter cover and filter into collar aligning the tab with the slot 6 Push in on cover and turn counter clockwise to tighten Collar Clip rum clockwise to remove Slot Air filter Tab Turn counter Air filter cover clockwise to tighten MUFFLER Inspect and replace corroded muffler as it could create a fire hazard and or damage SPARK PLUG Replace spark plugs at the beginni...

Page 15: ... 2 Slip vinyl bindings over frame NOTE If vinyl bindings are too stiff hold them in warm water for a few minutes If bag gets wet let it dry before using ACAUTION Do not run your lawn mower without clipping deflector or approved grass catcher in place Never attempt to operate the lawn mower with the rear door removed or propped open Catcher frame handle Frame ENGINE opening ENGINE SPEED Your engine...

Page 16: ... Lower han_ Fold backward Mowing position sq pin J 3 Position handle adjustment bracket ENGINE FUELSYSTEM IMPORTANT It is important to prevent gum deposits from forming in essential fuel system parts such as carburetor fuel filter fuel hose or tank during storage Also experience indicates that alcohol blended fuels called gasohol or using ethanol or methanol can attract moisture which leads to sep...

Page 17: ...k plug wire is disconnected 6 Bad spark plug 7 Loose blade or broken blade adapter 8 Control bar in released position 9 Control bar defective 1 Rear of lawn mower housing or cutting blade dragging in heavy grass 2 Cutting too much grass 3 Dirty air filter 4 Buildup of grass leaves and trash under mower 5 Too much oil in engine 6 Walking speed too fast 1 Worn bent or loose blade 2 Wheel heights une...

Page 18: ...cut grass or to hard surface Grass catcher 1 Cutting height too low 1 Raise cutting height notfilling 2 Lift on blade worn off 2 Replace blade Ifsoequipped 3 Catcher not venting air 3 Clean grass catcher Hard to push 1 Raise cutting height 1 Grass is too high or wheel height is too low 2 Rear of lawn mower housing or cutting blade dragging in grass 3 Grass catcher too full 4 Handle height position...

Page 19: ...adaora es capaz de amputar las manos y los manos y los pies y de lanzar objetos Si no se observan las instrucciones de seguridad siguientes se pueden producir lesiones graves o la muerte I OPERACION Antes de empezar debe familiarizarse completamente con los controles y el uso correcto de la maquina Para esto debe leer y comprender todas las instrucciones que aparecen en la maquina yen los manuales...

Page 20: ...ugar donde los vio por 01tima vez Mantenga a los nii_osalejados del area de la siega y bajo el cuidado estricto de otra persona adulta responsable Est6 alerta y apague la mdquina si hay nii_os que entran al drea Antes y cuando este retrocediendo mire hacia atr_ s y hacia abajo para verificar si hay nihos pequeSos 20 Tenga cuidado extra al manejar la gasolina y los dem_ s combustibles Son inflamabl...

Page 21: ... algunos componentes del vehiculo contienen o desprenden productos quimicos conocidos en el Estado de California como causa de cdncer y defectos al nacimiento u otros daSos reproductivos Estos accesoriosestaban disponiblescuando se produjo la segadera No son facilitados junto al cortaceesped Estdndisponiblesen la mayoda de las tiendes de Sears yen loscentrosde servicio La mayoria de las tiendasSea...

Page 22: ... con el mango superior 4 Haga rodar la segadora hacia afuera de la caja de cart6n y revisela cuidadosamente para verificar si todavia quedan partes sueltas adicionales COMO PREPARAR SU SEGADORA PARA DESDOBLAR EL MANGO IMPORTANTE Despliegue el mango con mucho cuidado para no pellizcar o dafiar los cables de control 1 Levante la secci6n del mango inferior a la posici6n de operaci6n y presione las ex...

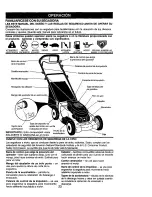
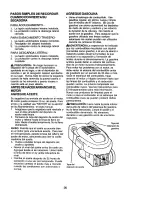
Page 23: ...el motor caja CUMPLE CON LOS REQUISITOS DE SEGURIDAD DE LA CPSC Las segaderas a motor que se conducen desde la parte de atr4s rotatorias Sears cumplen con los estdndares de seguridad del American National Standards Institute y de la U S Consumer Product Safety Commission La cuchilla giracuando el motor est_ funcionande Barra de control que exige la presencia del operador tiene que sujetarse abajo ...

Page 24: ...da para cortar hierba no demasiado tupida o para transportar tierra AMISO Mover la palanca para selicoionar la velocidad s61o si el motor estd en marcha ELIMPULSlON La velocidad de recorddo purde ser seleccionada moviendo la palanca de conteol de la impulsibn a la posici6n deceada Para habilitar la maroha adelante tirar la barra do mando hacia el mango Para parar el movimiento hacia adelante alivi...

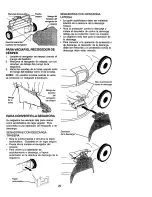
Page 25: ...a operaci6n de ensacado o de descarga SEGADORAS CON DESCARGA TRASERA Abra la puerta trasera y remueva la tap6n acolchadora Gudrdela en un lugar seguro Puede ahora instalar el recogedor del cesped Para volver a la operaci6n de acolchamiento o descarga el tap6n acolchador en la abertura de descarga de la segadora Tap6n acolchadora SEGADORAS CON DESCARGA LATERAL La tap6n acolchadora debe ser instalad...

Page 26: ...io Llene hasta la llnea de Ileno en la varilla indicadora de nivel Cambie el aceite despu_s de 25 horas de operaci6n o una vez por temporada Puede necesitar cambiar el aceite m s a menudo cuando las condiciones son polvorosas o sucias AGREGUEGASOLINA Uene el eslanque de combustible Use gasolina regular sin plomo nueva y limpia con el mfnimo de 87 octanos El uso de gasolina con plomo aumentar los d...

Page 27: ... y dejelo secarse antes de usarlo Mantenga la parte superior del motor alrededor del arrancador despejada y sin recortes de cesped y paja Esto ayudara el flujo del aire del motor y extendera su duraci6n CONSEJOS PARA SEGAR Y ACOLCHAR IMPORTANTE Para obtenerel mejor rendimianto mantenga la caja de la segadora sin acumulan6n de crisped y basura Vea LIMPIEZA en la secci6n de Mantenimento do este manu...

Page 28: ...or de la garantia el operador tiene que mantener la segadora seg0n las instrucciones descritas en este manual Hay algunos ajustes que se tienen que hacer en forma peribdica para poder mantener su unidad adecuadamente Todos los ajustes en la secci6n de Servicio y Ajustes de este manual tienen que ser revisados por Io menos un vez por cada temporada Una vez al aRo cambie la bujia limpie o cambie el ...

Page 29: ...vitar que la cuchilla gire cuando se le quite el perno AVISO Proteja sus manos con guantes y o envuelva la cuchilla con una tela gruesa 4 Remueva el perno de la cuchilla gir ndelo en el sentido contrario en que giran las manillas del reloj 5 Remueva la cuchilla y los articulos de ferreterfa adjuntadores el perno la arandela de seguridad y la arandela endurecida AMISO Remueva el adaptador de la cuc...

Page 30: ... recortes de cesped de dentro de la cubieda contra el polvo pifibn y o de los dientes de los engranajes de las ruedas de impulsi6n 4 Si remueve los pifiones de impulsi6n y los trinquetes aseg6rese de no dafiar el sello del pifi6n cuando vuelva a instalar los pifiones Limpielos y lubrfquelos con grasa antes de volverlos a instalar No utilizar aceite o grasa AVISO Los pifiones en las dos bandas de l...

Page 31: ...rta del filtro de aire dentro del collar alineando la oreja con la ranura 6 Empuje la cubierta hacia adentro y girela en el sentido contrario de las manillas del reloj para apretarla Cctlar Gireen el sentido alas manillas del relojpara Abrazadera remover Ranura jJ Filtrode aire _ _ Gireen Oreja el sentido contrariolas manillas Cubiertadelfiltro deaire delreloj paraapreiar SILENCIADOR Inspeccione y...

Page 32: ...SO Si los sujetadores de vinilo estdn muy duros mdtalos en agua caliente por algunos minutes Si se moja la bolsa d_jela que se seque antes de usarla _I PRECAUCI6N No haga funcionar su segadora sin el desviador de recortes o sin el recogedor de c6sped aprobados en su lugar Nunca trate de operar la segadora cuando se ha removido la puerta trasera o cuando estd un poco abierta Mango del bastidor Aber...

Page 33: ...r operador hacia Mango DobL_r hacia atr s Posici6n para segar _ Pinza del mango J Soportede ajuste Mangode 3 posiciones MOTOR SISTEMA DE COMBUSTIBLE IMPORTANTE Es importanteevitarque se formen depositos de goma en partes fundamentalesdel sisterna de combustibletales como el carburador el fitiro del combustible la manguera del combustible o en el estanque durante el almacenamiento La experiencia ta...

Page 34: ...enfde el motor antes de almacenarla en alg0n recinto cerrado PROBLEMA No arranca IDENTIFICACION DE PROBLEMAS CAUSA 1 Filtro de aire sucio 2 Sin combustible Falta de fuerza 3 Combustible rancio 4 Agua en el combustible 5 Alambre de la buj a desconectado 6 Bujia mala 7 Cuchilla suelta o adaptador de la cuchilla quebrado 8 Barra de control en la posici6n suelta 9 Barra de control defectuosa 1 2 3 4 5...

Page 35: ...era de la polea 3 Cable de la impulsi6n usado o roto 4 Suciedad en pifiones del mecanismo impulsor CORRECCION 1 Cambie la cuchilla Apriete el perno de la cuchilla 2 Ajuste todas las ruedas a la misma altura 3 Limpie la parte inferior de la caja de la segadora 1 2 Cambie la cuchilla Apriete el perno de la cuchilla P6ngase en contaoto con su centro de servicio Sears o con un otro centro de servicio ...

Page 36: ...10 CRAFTSMAN ROTARY LAWN MOWER MODEL N UMBER 917 377811 24 28 38 56 30 31 ...

Page 37: ...asher Ins 5 16 18 UNC 51 169980 Spacer Cotter Hairpin 52 170047 WaveWasher Engine Zone control 53 166037 Belt Cover Bottom Bracket Upstop 54 750097 Screw Screw Hex Washer Head Tapping 10 2 55 166383X479 Cable Support Bracket Kit Door Rear 56 63601 Nut Seal Door 57 166391X004 Bracket Assy Plug Mulcher 58 57808 Screw Kit Housing 59 166042 V Greove Pulley Handle Bracket Asm Left 60 166050 ldlerArm Sp...

Page 38: ...CRAFTSMAN ROTARY LAWN MOWER MODEL NUMBER 917 377811 31 3O 33 32 34 23 24 14 15 19 29 3O 2O ...

Page 39: ...Bracket 34 150182 Screw Hex Wash Head 10 24 X 668 35 160785X004 Pivot Rod Cover 36 160786X004 TransmissionAsm 37 161463 Pin Spring Thrust 38 163409 Washer Hardened 39 700279 Rod Connecting 40 172323 Spring Extension 41 150182 Spring Selector 42 83923 Knob Selector Spring 43 19572216 E Ring7 8 44 144929 Bearing Support 45 751152 Bearing Ball Retainer Drive Asm Stmp NOTE Screw Hex Head Tapping 1 4 2...

Page 40: ...CRAFTSMAN 4 CYCLE ENGINE MODEL NUMBER 143 016722 11o 400 _ 135 130 120 119 182 185 370C 126151A 1 125 174172 2O7 265 12A _ 46 30gA 311A 306 _ 245 238 250 4O ...

Page 41: ...wheel Nut 347 651038 100 34443C Solid State Ignition 355 590701 101 610118 Spark Plug Cover 370A 36261 103 651007 Screw TorxT 15 10 24x15 16 37 73 37318 104 37480 CarnBushing 370R 37317 110 37047 GroundWire 380 640271 119 36787 Cylinder Head Gasket 390 590739 120 36825 CylinderHead 400 37613 125 36780 Exhaust Valve 1 32 OS 416 36085 Includes Key Number 151 125 37288 Exhaust Valve Std IncL 151 417 ...

Page 42: ... of Engine Parts List Throttle Shaft Lever Assembly Throttle Return Spring Dust SealWasher Dust Seal Throttle Throttle Shutter Shutter Screw Fuel Fitting Throttle Crack Screw Idle Speed Screw Tension Spring Idle Restdctor Screw Idle Restdctor Scrwe Cap Black Float Bowl Float Shaft Float Float Bowl O Ring Inlet Needle Seat Clip Incl 31 Spring Clip Pdmer Bulb Retainer Ring Main Nozzle Tu be Carburet...

Page 43: ...her Brake Spring Starter Dog DogSpring Pulley Rewind Spring Assembly Starter HousingAssembly 40 degree grommet Starter Rope 98 x 9 64 dia Starter Handle 13 III i 7 I_ Y PART NO NO 590739 3 590740 6 590616 7 590617 8 590618A 11 590638 0 12 590535 13 590701 14 590760 43 DESCRIPTION Rewind Starter Retainer Starter Dog DogSpring Pulley Rewind Spring Assembly Starter Housing Assembly 40degree grommet S...

Page 44: ...e or inquire about a Sears Service Agreement or Sears Maintenance Agreement 1 800 827 6655 u s _ 1 800 361 6665 Canada 7 m 5 p m CST Mon Sat 9 a m 8 p m EST M F 4 p m Sat Para pedirservido de reparacidna domicilio y paraordenar piezas 1 888 SU HOGARsM 1 888 784 6427 Au Canada pour se_ice en franqaJs 1 800 LE FOYERMc 1 800 533 6937 wreN sears ca Seats Roebud_and Co Registered Trademark TMTrademark ...

Reviews: