background image

18

IMPORTANT:

  Never tamper with the 

engine governor, which is factory set 

for proper engine speed.  Over speed-

 ing the engine above the factory high 

speed setting can be dangerous.  If you 

think the engine-governed high speed 

needs adjusting, contact a Sears or other 

qualified service center, which has proper 

equip ment and ex pe ri ence to make any 

nec es sary adjustments.

ENGINE

ENGINE SPEED

Your engine speed has been factory set.  

CARBURETOR

Your carburetor is not adjustable.

STORAGE

Immediately prepare your lawn mower for 

storage at the end of the season or if the 

unit will not be used for 30 days or more.

LAWN MOWER

When lawn mower is to be stored for a 

period of time, clean it thor oughly, remove 

all dirt, grease, leaves, etc.  Store in a 

clean, dry area.

1.  Clean entire lawn mower (See 

“CLEANING” in the Maintenance sec-

tion of this manual).

2.  Lubricate as shown in the Main te-

 nance section of this manual.

3.  Be sure that all nuts, bolts, screws, 

and pins are securely fas tened.  In-

spect moving parts for damage, break-

age and wear.  Replace if necessary.

4.  Touch up all rusted or chipped paint 

surfaces; sand lightly before painting.

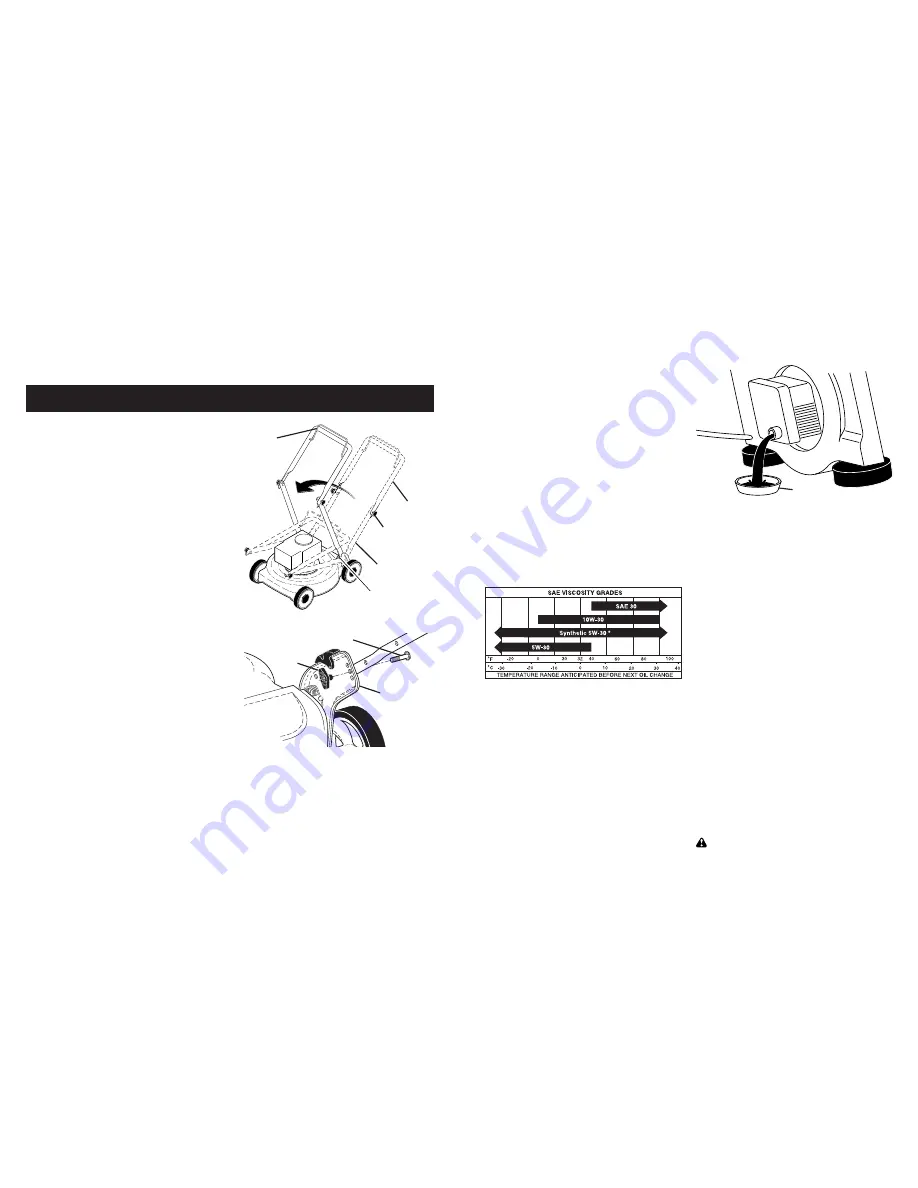
HANDLE 

You can fold your lawn mower han dle for 

storage.

1.  Loosen the two “star” handle knobs 

on sides of the upper handle and allow 

handle to fold down to the rear.

2.  Remove the two “standard” handle 

knobs and carriage bolts on sides 

of the lower handle and pivot entire 

handle as sem bly forward and allow it 

to rest on mower.

3.  Reinstall “standard” knobs and car-

riage bolts to lower handle for safe 

keeping.

•  When setting up your handle from the 

storage position, the lower han dle will 

require manually locking into the mow-

ing position.

IMPORTANT:

  When folding the handle 

for storage or transportation, be sure to 

fold the handle as shown or you may 

damage the control cables.

FOLD

FORWARD

FOR

STORAGE

MOWING 

POSITION

Lower handle

Operator 

presence 

control bar

Upper 

handle

Upper handle 

knob (“star”)

Lower handle knob 

(“standard”)

Handle

bracket 

Knob

Bolt

ENGINE

FUEL SYS TEM

IMPORTANT

:  It is important to prevent 

gum deposits from forming in essential 

fuel system parts such as carburetor, fuel 

filter, fuel hose, or tank during storage. 

Alcohol blended fuels (called gasohol or 

using ethanol or methanol) can attract 

moisture which leads to separation and 

formation of acids during storage. Acidic 

gas can damage the fuel system of an 

engine while in storage.

15

4.  Wipe off any spilled oil from lawn 

mower or side of engine.

5.  Slowly pour oil down the oil fill spout, 

stopping every few ounces to check 

the oil level with the dipstick.

6.  Stop adding oil when you reach the 

FULL mark on the dipstick.  Wait a 

minute to allow oil to settle.

7.  Continue adding small amounts of oil, 

rechecking the dipstick until oil level 

settles at FULL.  DO NOT overfill, or 

engine will smoke heavily from the 

muffler on startup.

8.  Always be sure to retighten oil dipstick 

before starting engine.

9. Re 

con nect spark plug wire to spark 

plug.

AIR FILTER 

Your engine will not run properly and may 

be damaged by using a dirty air filter. 

Replace the air filter every 100 hours of 

operation or every season, whichever oc-

curs first.  Service air cleaner more often 

under dusty conditions.

TO CLEAN AIR FILTER

1. Remove cover.

2.  Carefully remove cartridge.

3.  Clean by gently tapping on a flat sur-

face. If very dirty, replace cartridge.

 CAUTION: 

 Petroleum solvents, such 

as ker o sene, are not to be used to clean 

car tridge. They may cause de te ri o ra tion 

of the cartridge. Do not oil car tridge. Do 

not use pres sur ized air to clean or dry 

car tridge.

4.  Install cartridge, then replace cover.

GRASS CATCHER

•  The grass catcher may be hosed with 

water, but must be dry when used.

•  Check your grass catcher often for 

damage or de te ri o ra tion.  Through 

normal use it will wear.  If catcher needs 

replacing, replace only with ap proved 

replacement catcher shown in the Re-

pair Parts section of this manual.  Give 

the lawn mower model number when 

ordering.

GEAR CASE 

•  To keep your drive system work-

ing properly, the gear case and area 

around the drive should be kept clean 

and free of trash build-up.  Clean under 

the drive cover twice a season.

•  The gear case is filled with lubricant to the 

proper level at the factory.  The only time 

the lubricant needs attention is if service 

has been performed on the gear case.

ENGINE

LUBRICATION

Use only high quality detergent oil rated with 

API service classification SJ–SN.  Select the 

oil's SAE viscosity grade according to your 

expected operating temperature.

1.  Disconnect spark plug wire from spark 

plug and place wire where it cannot 

come in contact with plug.

2.  Remove engine oil cap; lay aside on a 

clean surface.

3.  Tip lawn mower on its side as shown 

and drain oil into a suitable container. 

Rock lawn mower back and forth to re-

move any oil trapped inside of engine.

NOTE:

  Although multi-viscosity oils 

(5W30, 10W30 etc.) improve starting in 

cold weather, these multi-viscosity oils will 

result in in creased oil consumption when 

used above 32°F.  Check your engine oil 

level more frequently to avoid possible 

engine damage from running low on oil.

* NOTE: 

An oil change is not required but 

if you desire to change the oil follow the 

procedure below.

Check the crankcase oil level before 

starting the engine and after each five (5) 

hours of continuous use. Tighten oil plug 

securely each time you check the oil level.

TO CHANGE ENGINE OIL

NOTE

:  Before tipping lawn mower to 

drain oil, empty fuel tank by running en-

gine until fuel tank is empty.

Container

Summary of Contents for 944.101781

Page 1: ...o 944 101781 CAUTION Read and follow all Safety Rules and Instructions before operating this equipment Owner s Manual ROTARY LAWN MOWER 725 Series Briggs Stratton Engine Power Propelled Electric Start 22 Multi Cut Sears Canada Inc Toronto Ontario M5B 2B8 ...

Page 2: ... down and behind before and while moving backwards Never direct discharged material toward anyone Avoid discharging material againstawallorobstruction Materialmay richochet back toward the operator Stop blade when crossing gravel surfaces Do not operate the mower without proper guards plates grass catcher or other safety protective devices in place See manufacturer s instructions for proper operat...

Page 3: ...ringprotection Do not mow in shorts or open toed footwear Always let someone know you are outside mowing III SLOPE OPERATION Slopes are a major factor related to slip fall accidents which can result in severe injury All slopes require extra caution If you feel uneasy on a slope do not mow it DO Mow across the face of slopes never up and down Exercise extreme caution when changing direction on slop...

Page 4: ...RS BE LIABLE FOR ANY INCIDENTAL SPECIAL INDIRECT OR CONSEQUENTIAL DAMAGES WHETHER RESULTING FROM THE USE MISUSE OR INABILITY TO USE THE PRODUCT OR FROM DEFECTS IN THE PRODUCT THE EXCLUSIONS IN THIS PARAGRAPH SHALL NOT APPLY IN JURISDICATIONS WHERE APPLICABLE LAW DOES NOT ALLOW FOR THE EXCLUSION OF INCIDENTAL OR CONSEQUENTIAL DAMAGES IN SUCH JURISDICTIONS THIS PARAGRAPH SHALL NOT APPLY BUT THE REMA...

Page 5: ... products used for commercial institutional professional or income producing purposes Wear items include but are not limited to belts blades tires spark plugs air filters chains shear bolts skid plates scraper bars drift cutters ropes tines collection bags and pulleys As the Warranty Period runs from the date of purchase and NOT from the date that a product is delivered opened assembled or first u...

Page 6: ...ndle carefully so as not to pinch or damage control cables 1 Raise lower handle section to operat ing position and align holes in lower handle with holes in handle brackets 2 Insert handle bolts through lower handles and handle brackets secure with lower standard knobs 3 Remove protective padding raise up per handle section into place on lower handle and tighten both upper star knobs 4 Remove any ...

Page 7: ...port on electric start housing 2 Connect battery charger connector male to battery connector female 3 Plug battery charger into 110 volt A C outlet Leave battery charger connected for 24 hours before starting your engine for the first time Connect your battery charger to charge battery as required IMPORTANT The engine will not re charge your battery At the end of the mowing season the battery shou...

Page 8: ...rious controls and adjustments Save this manual for future reference These symbols may appear on your lawn mower or in literature supplied with the product Learn and understand their meaning Spark plug Muffler 25 CRAFTSMAN ROTARY LAWN MOWER MODEL NUMBER 944 101781 NOTE All component dimensions given in U S inches 1 inch 25 4 mm IMPORTANT Use only Original Equipment Manufacturer O E M replacement p...

Page 9: ...e handle a lever is pulled the faster the unit will travel Forward motion will stop when either the operator presence control bar or a drive control lever are released To stop forward motion without stopping engine release a drive control lever only Hold operator presence control bar down against handle to continue mowing without self propelling NOTE If after releasing the drive control the mower ...

Page 10: ... Handle Bracket LH 40 585900802 Handle Bracket RH 41 150406 Bolt Engine 3 8 16 42 193000 Spring Torsion 43 191730 Nut Hex Nylock 44 431558 Kit Lawn Mower Housing 45 175650 Rod Hinge 46 581473301 Blade Adapter Pulley 47 421825 Blade 22 48 851074 Washer Hardened 49 850263 Washer Helical 50 851084 Screw Machine Hex Head 3 8 24 x 1 3 8 Grade 8 51 430599 Front Baffle 52 404763 Decal Danger 53 17000510 ...

Page 11: ... NOT overfill engine with oil or it will smoke heavily from the muffler on startup 1 Be sure lawnmower is level 2 Remove oil dipstick from oil fill spout 3 You receive a container of oil with the unit Slowly pour the entire container down the oil fill spout into the engine NOTE Initial oil fill requires only 18 oz due to residual oil in engine from the manufacturers 100 quality testing When changi...

Page 12: ...ut by overlapping previously cut path and mow slowly For side discharge operation cut in a counterclockwise direction starting at the outside of the area to be cut in order to spread grass clippings more evenly and to put less load on the engine To keep clippings off of walk ways flower beds etc make the first cuts in a clockwise direction If a trail of grass clipping is left on the right side of ...

Page 13: ... be made periodically to properly maintain your unit At least once a season check to see if you should make any of the adjustments described in the Service and Adjustments section of this manual At least once a year replace the spark plug clean or replace air filter element and check blade for wear A new spark plug and clean new air filter element assure proper air fuel mixture and help your engin...

Page 14: ...p ening blade but if you do be sure the blade is balanced An unbalanced blade will cause eventual damage to lawn mower or engine The blade can be sharpened with a file or on a grinding wheel Do not attempt to sharpen while on the mower To check blade balance you will need a 5 8 diameter steel bolt pin or a cone balancer When using a cone balanc er follow the instructions supplied with balancer NOT...

Page 15: ... a minute to allow oil to settle 7 Continue adding small amounts of oil rechecking the dipstick until oil level settles at FULL DO NOT overfill or engine will smoke heavily from the muffler on startup 8 Always be sure to retighten oil dipstick before starting engine 9 Reconnect spark plug wire to spark plug AIR FILTER Your engine will not run properly and may be damaged by using a dirty air filter...

Page 16: ...ation section of this manual and let engine run for a full minute to remove excess water from mower Hose Fitting CLEAN UNDER DRIVE COVER Clean under drive cover at least twice a season Scrape underside of cover with putty knife or similar tool to remove any build up of trash or grass on underside of drive cover Tab Cartridge Filter cover Slot 17 SERVICE AND ADJUSTMENTS WARNING To avoid serious inj...

Reviews: