background image

12

MULCHING MOWING TIPS

IMPORTANT

:  For best performance, 

keep mower housing free of built-up 
grass and trash. See “CLEANING” in the 
Maintenance section of this manual.
•   The special mulching blade will recut 

the grass clip pings many times and 
reduce them in size so that as they fall 
onto the lawn they will disperse into 
the grass and not be noticed.  Also, the 
mulched grass will bio de grade quick ly to 
provide nu tri ents for the lawn.  Always 
mulch with your highest engine (blade) 
speed as this will provide the best recut-
ting action of the blades.

•   Avoid cutting your lawn when it is wet.  

Wet grass tends to form clumps and 
in ter feres with the mulch ing action.  The 
best time to mow your lawn is the early 
afternoon.  At this time the grass has 
dried, yet the newly cut area will not be 
exposed to direct sunlight.

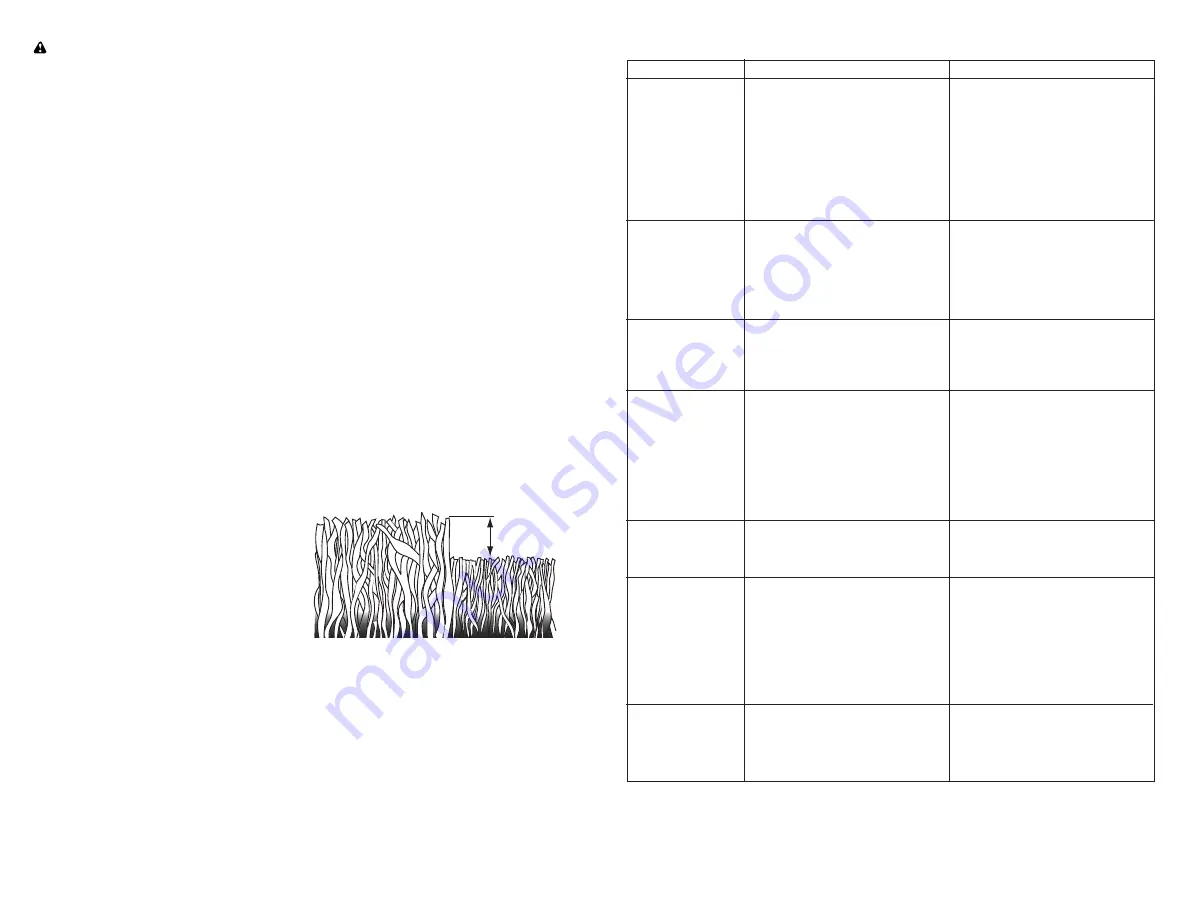
•   For best results, adjust the lawn mower 

cutting height so that the lawn mower 
cuts off only the top one-third of the 
grass blades.  If the lawn is over grown 
it will be nec es sary to raise the height of 
cut to reduce pushing effort and to keep 
from over load ing the engine and leaving 
clumps of mulched grass. For ex tremely 
heavy grass, reduce your width of cut 
by overlapping previously cut path and 
mow slowly.

•   Certain types of grass and grass 

con di tions may re quire that an area be 
mulched a second time to com pletely 
hide the clip pings.  When doing a sec-
 ond cut, mow across (perpendicular) to 
the fi rst cut path.

•   Change your cutting pattern from week 

to week.  Mow north to south one week 
then change to east to west the next 
week.  This will help prevent matting 
and graining of the lawn.

MAX 1/3

MOWING TIPS

  CAUTION:

  Do not use de-thatcher 

blade attachments on your mower. Such 
attachments are hazardous, will damage 
your mower and could void your warranty.
•  Under certain conditions, such as very 

tall grass, it may be nec es sary to raise 
the height of cut to reduce pushing effort 
and to keep from overloading the engine 
and leaving clumps of grass clippings. 
It may also be necessary to re duce 
ground speed and/or run the lawn 
mower over the area a sec ond time.

•  For extremely heavy cutting, re duce the 

width of cut by over lap ping previously 
cut path and mow slowly.

•  For better grass bagging and most cut-

ting conditions, the engine speed should 
be set in the FAST po si tion.

•  Pores in cloth grass catchers can 

become fi lled with dirt and dust with use 
and catchers will collect less grass. To 
prevent this, reg u lar ly hose catcher off 
with water and let dry before using.

•  Keep top of engine around starter clear 

and clean of grass clippings and chaff. 
This will help engine air fl ow and extend 
engine life. 

21

Loss of power 

1.  Rear of lawn mower  

1.  Raise cutting height.    


housing or cutting blade 


dragging in heavy grass.


2.  Cutting too much grass. 

2.  Raise cutting height.


3.  Dirty air fi lter. 

3.  Clean/replace air fi lter.


4.  Buildup of grass, leaves, 

4.  Clean underside of mower 


and trash under mower. 


housing. 


5.  Too much oil in engine. 

5.  Check oil level.


6.  Walking speed too fast. 

6.  Cut at slower walking speed.

Poor cut –  

1.  Worn, bent or loose blade. 

1.  Replace blade. Tighten  

uneven  


blade bolt.


2.  Wheel heights uneven.  

2.  Set all wheels at same  


 height.


3.  Buildup of grass, leaves 

3.  Clean underside of


and trash under mower. 


mower housing.

Excessive


1.  Worn, bent or loose blade. 

1.  Replace blade. Tighten  

vibration  


blade bolt.


2.  Bent engine crankshaft. 

2.  Contact a Sears or other


 qualifi 

ed 

service 

centre.

Starter rope


1.  Engine fl ywheel brake is on 

1.  Depress control bar to 

hard to pull 


when control bar is released.    

upper handle before      


 pulling 

starter 

rope.


2.  Bent engine crankshaft. 

2.  Contact a Sears or other


 qualifi 

ed 

service 

centre.


3.  Blade adapter broken. 

3.  Replace blade adapter.


4.  Blade dragging in grass. 

4.  Move lawn mower to cut  


grass or to hard surface.

Grass catcher


1.   Cutting height too low. 

1.  Raise cutting height.

not fi lling


2.  Lift on blade worn off. 

2.  Replace blade.

(If so equipped)


3.  Catcher not venting air. 

3.  Clean grass catcher.

Hard to push


1.  Grass is too high or wheel  

1.  Raise cutting height.


height is too low.


2.  Rear of lawn mower  

2.  Raise rear of lawn mower


housing or cutting blade 


housing one (1) setting


dragging in grass. 


higher.


3.  Grass catcher too full. 

3.  Empty grass catcher.


4.  Handle height position not  

4.  Adjust handle height to suit.


right for you.

Loss of drive 

1.  Belt wear. 

1.  Check/replace drive belt.

or slowing of


2.  Belt off of pulley. 

2.  Check/reinstall drive belt.

drive speed


3.  Drive cable worn or broken. 

3.  Replace drive cable.


4.  “Loose” drive control system.   4.  Adjust drive control.

PROBLEM CAUSE 

CORRECTION 

TROUBLESHOOTING - See appropriate section in manual unless directed 
to a Sears Parts & Repair Centre.

Summary of Contents for 944.364720

Page 1: ...Model No 944 364720 CAUTION Read and follow all Safety Rules and Instructions before operating this equipment Owner s Manual ROTARY LAWN MOWER 675 Series Briggs Stratton Engine Power Propelled 22 Multi Cut Sears Canada Inc Toronto Ontario M5B 2B8 ...

Page 2: ...or Stop blade when crossing gravel surfaces Do not operate the mower without proper guards plates grass catcher or other safety protective devices in place See manufacturer s instructions for prop er operation and installation of accesso ries Only use accessories approved by the manufacturer Stop the blade s when crossing gravel drives walks or roads Neverleavearunningmachineunattended Stop the en...

Page 3: ...quip ment PPE while operating this ma chine including at a minimum sturdy footwear eye protection and hearing protection Do not mow in shorts or open toed footwear Always let someone know you are outside mowing III SLOPE OPERATION Slopes are a major factor related to slip fall accidents which can result in severe injury All slopes require extra caution If you feel uneasy on a slope do not mow it D...

Page 4: ...L RIGHTS WHICH MAY VARY FROM PROVINCE TO PROVINCE IN NO EVENT SHALL SEARS BE LIABLE FOR ANY INCIDENTAL SPECIAL INDIRECT OR CONSEQUENTIAL DAMAGES WHETHER RESULTING FROM THE USE MISUSE OR INABILITY TO USE THE PRODUCT OR FROM DEFECTS IN THE PRODUCT THE EXCLUSIONS IN THIS PARAGRAPH SHALL NOTAPPLY IN JURISDICATIONS WHERE APPLICABLE LAW DOES NOT ALLOW FOR THE EXCLUSION OF INCIDENTAL OR CONSEQUENTIAL DAM...

Page 5: ...rofessional or income producing purposes Wear items include but are not limited to belts blades tires spark plugs air filters chains shear bolts skid plates scraper bars drift cutters ropes tines collection bags and pulleys As the Warranty Period runs from the date of purchase and NOT from the date that a product is delivered opened assembled or first used plea se ensure during this time period th...

Page 6: ...erator presence control bar to upper handle 4 Roll lawn mower out of carton and check carton thoroughly for additional loose parts ASSEMBLY PRE OPERATION Handle bracket Knob Bolt MOWING POSITION Lower handle LIFT UP Operator presence control bar Upper handle LIFT UP Handle knob HOW TO SET UP YOUR MOWER TO UNFOLD HANDLE IMPORTANT Unfold handle carefully so as not to pinch or damage control cables 1...

Page 7: ...a few minutes If bag gets wet let it dry before using Frame opening Vinyl bindings Frame handle INSTALL STARTER ROPE 1 Loosen T knob 2 Hold control bar against upper handle 3 Slowly pull engine starter rope out until rope will slip into loop of rope guide 4 Tighten T knob Upper handle Control bar Engine starter rope Rope guide T Knob TO INSTALL ATTACHMENTS Your lawn mower was shipped ready to be u...

Page 8: ...ining up to 10 ethanol E10 is acceptable for use in this machine The use of any gasoline exceeding 10 ethanol E10 will void the product warranty Muffler Air filter Gasoline filler cap 25 CRAFTSMAN ROTARY LAWN MOWER MODEL NUMBER 944 364720 NOTE All component dimensions given in U S inches 1 inch 25 4 mm IMPORTANT Use only Original Equipment Manufacturer O E M replacement parts Failure to do so coul...

Page 9: ...ightly to disengage drive wheels TO ADJUST CUTTING HEIGHT Raise wheels for low cut and lower wheels for high cut adjust cutting height to suit your requirements Medium position is best for most lawns Tochangecuttingheight squeezeadjuster lever toward wheel Move wheel up or down to suit your requirements Be sure all wheels are in the same setting NOTE Adjuster is properly positioned when plate tab ...

Page 10: ...nches 1 inch 25 4 mm IMPORTANT Use only Original Equipment Manufacturer O E M replacement parts Failure to do so could be hazardous damage your lawn mower and void your warranty 30 580947303 Grassbag 31 585054703 Frame Grass Catcher 32 419944X007 Latch Mulcher Door 33 420019 Mulcher Door 34 419946X615 Bracket Grassbag 36 175735 Hinge Bracket Assembly 38 419942X428 Discharge Defl ector 39 585900702...

Page 11: ...uires only 18 oz due to residual oil in engine from the manufacturers 100 quality testing When changing oil you may need 20 oz 4 Insert and tighten dipstick IMPORTANT Check oil level before each use Add oil if needed Fill to full line on dipstick Change the oil after every 25 hours of operation or each season You may need to change the oil more often under dusty dirty conditions See TO CHANGE ENGI...

Page 12: ... most cut ting conditions the engine speed should be set in the FAST position Pores in cloth grass catchers can become filled with dirt and dust with use and catchers will collect less grass To prevent this regularly hose catcher off with water and let dry before using Keep top of engine around starter clear and clean of grass clippings and chaff This will help engine air flow and extend engine li...

Page 13: ...operating under a heavy load or in high outdoor temperatures 2 Service more often if operating in dirty or dusty conditions 3 Replace blades more often when mowing in sandy soil 4 Charge 48 hours at end of season 5 And after each 5 hours of use if so equipped Electric Start mowers Power Propelled mowers Use a scraper to clean under deck MAINTENANCE GENERAL RECOMMENDATIONS The warranty on this lawn...

Page 14: ... or on a grinding wheel Do not attempt to sharpen while on the mower To check blade balance you will need a 5 8 diameter steel bolt pin or a cone balancer When using a cone balancer follow the instructions supplied with balancer NOTE Do not use a nail for balancing blade The lobes of the center hole may appear to be centered but are not Slide blade on to an unthreaded portion of the steel bolt or ...

Page 15: ...e ment catcher shown in the Repair Parts section of this manual Give the lawn mower model number when ordering GEAR CASE To keep your drive system working properly the gear case and area around the drive should be kept clean and free of trash build up Clean under the drive cover twice a season The gear case is filled with lubricant to the proper level at the factory The only time the lubricant nee...

Page 16: ...NING To avoid serious injury before performing any service and adjustments 1 Release control bar and stop engine 2 Make sure the blade and all moving parts have completely stopped 3 Disconnect spark plug wire from spark plug and place wire where it cannot come in contact with plug LAWN MOWER TO ADJUST CUTTING HEIGHT See TO ADJUST CUTTING HEIGHT in the Operation section of this manual REAR DEFLECTO...

Reviews: