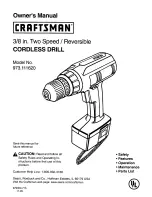
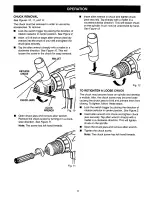
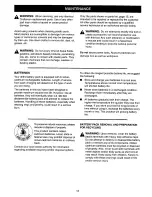
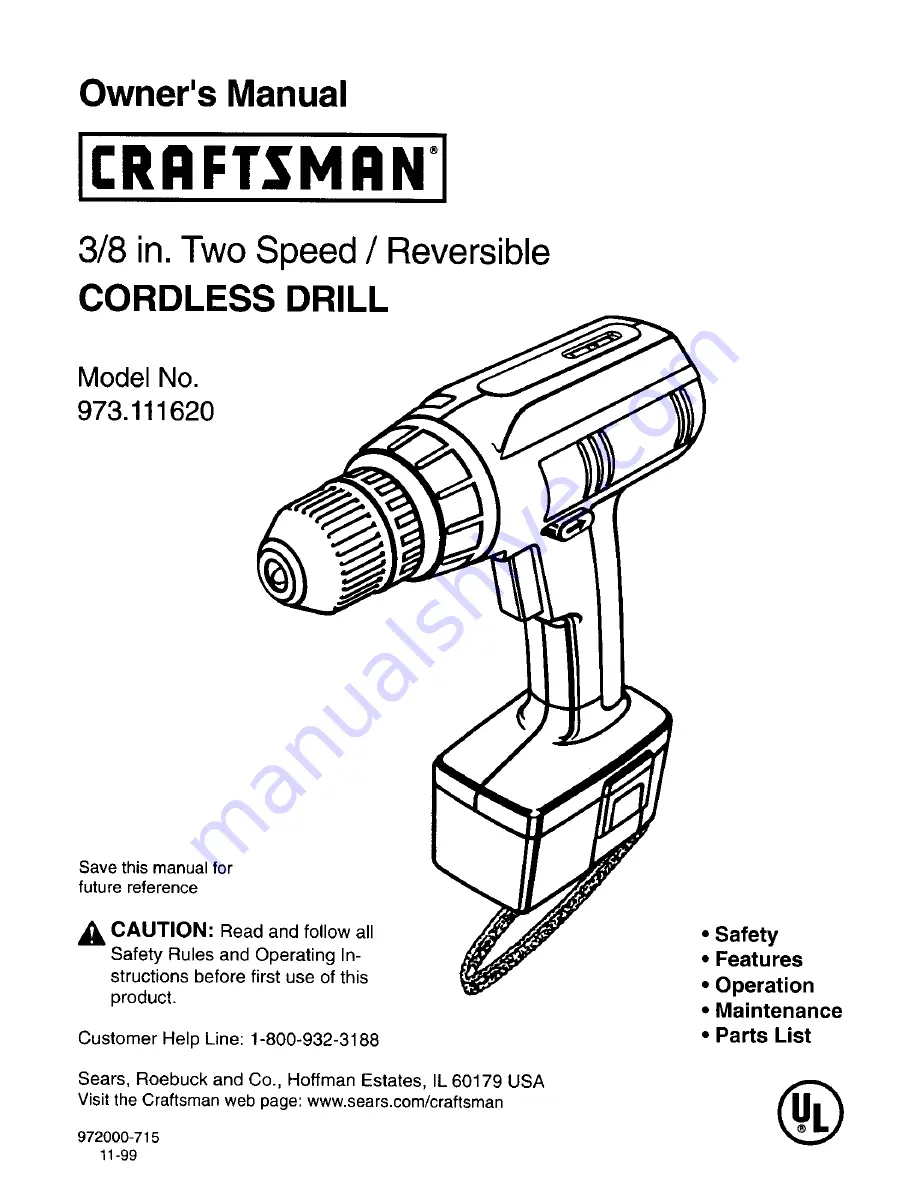
background image

Summary of Contents for 973.111620

Page 1: ...e reference A CAUTION Read and follow all Safety Rules and Operating In structions before first use of this product Customer Help Line 1 800 932 3188 Sears Roebuck and Co Hoffman Estates IL 60179 USA Visit the Craftsman web page www sears com craftsman 972000 715 11 99 Safety Features Operation Maintenance Parts List ...

Page 2: ... or rental purposes this warranty applies for only 90 days from the date of purchase This warranty gives you specific legal rights and you may also have other rights which vary from state to state Sears Roebuck and Co Dept 817WA Hoffman Estates IL 60179 Your drill has many features for making drilling operations more pleasant and enjoyable Safety performance and dependability have been given top p...

Page 3: ...r enclosures KEEP WORK AREA CLEAN Cluttered areas and benches invite accidents AVOID DANGEROUS ENVIRONMENT Don t use power tool in damp or wet locations or expose to rain Keep work area well lit KEEP CHILDREN AND VISITORS AWAY All visitors should wear safety glasses and be kept a safe distance from work area Do not let visitors contact tool or extension cord STORE IDLE TOOLS When not in use tools ...

Page 4: ...f possible hazards when not using your battery tool or when changing accessories USE ONLY THE CHARGER PROVIDED WITH YOUR BATTERY TOOL Do not substitute any other charger Use of another charger could cause batteries to explode causing possible serious injury M DO NOT PLACE BATrERY TOOLS OR THEIR BATrERIES NEAR FIRE OR HEAT They may explode DO NOT CHARGE BATTERY TOOL IN A DAMP OR WET LOCATION Your b...

Page 5: ...ect charger from power supply when not in use SAVE THESE INSTRUCTIONS Refer to them frequently and use them to instruct others who may use this tool If you loan someone this tool loan them these instructions also _I Look for this symbol to point out important safety precautions It means attention H Your safety is involved IMPORTANT INFORMATION FOR RECHARGING HOT BATTERIES When using your drill con...

Page 6: ... _isted might be hazardous KNOW YOUR DRILL See Figure I Before attempting to use any tool familiarize yourself with all operating features and safety requirements WRIST STRAP See Figure 1 A wrist strap is provided to reduce the chances of dropping your drill Place one hand through the wrist strap when carrying tool CHUCK LEVEL BATTERY CHARGER SWITCH TRIGGER WRISTSTRAP INPUTJACK Fig 1 _ WARNING If ...

Page 7: ... and glow when the charger is properly connected to power supply This light indicates the charger is operating properly It will remain on until charger is disconnected from power supply The light only glows while your tool is charging not during use After normal usage 3 to 5 hours of charging time is required to be fully charged The battery pack will become slightly warm to the touch while chargin...

Page 8: ...NLOCK CHUCK BODY DRILL BIT RELEASE LOCK TIGHTEN CHUCK COLLAR Fig 4 _h WARNING Do not hold chuck body with one hand and use power of the drill to tighten chuck jaws on drill bits Chuck body could slip in your hand or your hand could slip and come in contact with rotating drill bit This could cause an accident resulting in serious personal injury TO INSTALL BATTERY PACK Lock switch trigger on your d...

Page 9: ...uck DRILL BIT CHUCK COLLAR RIGHT Fig 6 Tighten the chuck jaws on drill bit To tighten the chuck jaws on driU bit grasp and hold the collar of the chuck with one hand while rotating the chuck body with your other hand Note Rotate the chuck body in the direction of the arrow marked LOCK to tighten chuck jaws Do not use a wrench to tighten or loosen the chuck jaws WRONG Fig 7 REMOVING BITS See Figure...

Page 10: ...rkpiece or if the drill stalls release switch trigger immediately Remove the bit from the workpiece and determine the reason for jamming LEVEL DRILLING See Figure 9 A convenient feature provided with your drill is a level It is recessed in the motor housing on top of your drill It can be used to keep drill bits level during drilling operations Fig 8 When drilling hard smooth surfaces use a center ...

Page 11: ...The screw has left hand threads Insert allen wrench in chuck and tighten chuck jaws securely Tap sharply with a mallet in a counterclockwise direction This will loosen chuck on the spindle It can now be unscrewed by hand See Figure 12 J Fig 12 TO RETIGHTEN A LOOSE CHUCK The chuck may become loose on spindle and develop a wobble Also the chuck screw may become loose causing the chuck jaws to bind a...

Page 12: ...teries they will eventually wear out Do not disassemble battery pack and attempt to replace the batteries Handling of these batteries especially when wearing rings and jewelry could result in a serious burn To obtain the longest possible battery life we suggest the following Store and charge your batteries in a cool area Temperatures above normal room temperature will shorten battery life Never st...

Page 13: ... CORDLESS DRILL or when ordering repair I pads SEE BACK PAGE FOR PARTS ORDERING INSTRUCTIONS 2 1 3 Key No 1 2 3 4 5 Part Number 616478 003 973094 001 974970 001 972000 715 PARTS LIST Description Quan Screw Special 1 Chuck Item No _9 20988 1 Battery Pack Item No _9 11014 1 Battery Charger Item No _9 11018 1 Carrying Case Not Shown 1 Owner s Manual Can Be Purchased Thru RSOS Retail Special Order Sys...

Page 14: ... pi_ces 1 800 469 4663 For the repair or replacement parts you need Call 6 a m 11 p m CST 7 days a week Parts Direct sM 1 800 366 PART 1 800 366 7278 Para ordenar piezas con entrega a domicilio 1 800 659 7084 For the location of a Sears Service Center in your area Carl 24 hours a day 7 days a week 1 800 488 1222 To purchase or inquire about a Sears Maintenance Agreement Call 7 a m 5 p m CST Monday...

Reviews: