background image

15

SERVICE AND MAINTENANCE

GENERAL RECOMMENDATIONS

• 

Always observe safety rules when performing any maintenance.

• 

The warranty on this lawn mower does not cover items that have 
been subjected to operator abuse or negligence. To receive full 
value from warranty, operator must maintain the equipment as  
instructed here.

• 

Changing of engine-governed speed will void engine warranty.

• 

All adjustments should be checked at least once each season.

• 

Periodically check all fasteners and make sure these are tight.

ENGINE MAINTENANCE

Spark Plug

For good performance, the spark plug must be properly gapped and 
free of deposits. Replace the spark plug annually.
1.  Disconnect the cap from the spark plug, and remove any dirt from 

the spark plug area.

2.  Use the proper size spark plug wrench to remove the spark plug.

NOTE:

 Replace with a Champion® RJ2YLE spark plug. 

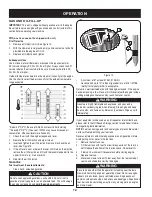
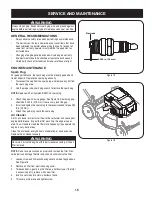
3.  Check the gap with a wire gauge. See Figure 15. Spark plug gap 

should be 0.030 in (0.76 mm). If necessary, reset the gap.

4.  Install and tighten the spark plug to the recommended torque (180 

lb-in [20 Nm]). 

5.  Attach the spark plug cap to the spark plug.

Air Cleaner

A dirty air cleaner will restrict air flow to the carburetor and cause poor 
engine performance. Inspect the filter each time the engine is oper-
ated. You will need to clean the filter more frequently if you operate the 
engine in very dusty areas.
Clean the air cleaner every 25 hours of operation or once a season. 
Replace the air cleaner annually.

NOTE

: Do not use pressurized air or solvents to clean the filter. Pres-

surized air can damage the filter and solvents will dissolve the filter.

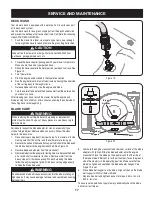
1.  Loosen screw and tilt plastic housing cover on side of engine down. 

See Figure 16.

2.  Remove air filter from plastic housing cover.
3.  To loosen debris, gently tap the filter on a hard surface. If the filter 

is excessively dirty, replace with a new filter.

4.  Insert cover’s tabs into slots in bottom of base.
5.  Tilt cover up into place and tighten screw.

Electrode

0.030 in. (.76mm)

Figure 16

WARNING

Always stop engine, disconnect spark plug wire, and ground against 
engine before performing any type of maintenance on your machine. 

Figure 15

WARNING

Never start or run the engine with the air cleaner assembly or the air 
filter removed.

Summary of Contents for C459-36203

Page 1: ... and follow all safety rules and operating instructions Operator s Manual SAFETY ASSEMBLY OPERATION MAINTENANCE PARTS LIST Sears Canada Inc 290 Yonge Street Toronto On M5B 2C3 Visit our web sears ca 1 30 13 769 07842A 21 LAWN MOWER Model Nos C459 36203 ...

Page 2: ...ntenance 15 Off Season Storage 19 Troubleshooting 20 Warranty Statement 21 Parts List Mower 22 Parts List Engine 24 1 800 4 MY HOME 30 TABLE OF CONTENTS Model Number Serial Number Date of Purchase Record the model number serial number and date of purchase above MODEL NUMBER ...

Page 3: ...g canvas shoes Do not put hands or feet near rotating parts or under the cutting deck Contact with blade can amputate fingers hands toes and feet A missing or damaged discharge cover can cause blade contact or thrown object injuries Many injuries occur as a result of the mower being pulled over the foot during a fall caused by slipping or tripping Do not hold on to the mower if you are falling rel...

Page 4: ...ing this machine on a sloped or hilly area If the slope is greater than 15 degrees do not mow it Do Mow across the face of slopes never up and down Exercise extreme caution when changing direction on slopes Watch for holes ruts rocks hidden objects or bumps which can cause you to slip or trip Tall grass can hide obstacles Always be sure of your footing A slip and fall can cause serious personal in...

Page 5: ...ponents discharge cover and trail shield are subject to wear and damage which could expose moving parts or allow objects to be thrown For safety protection frequently check components and replace immediately with original equipment manufacturer s O E M parts only listed in the Parts pages of this manual Use of parts which do not meet the original equipment specifications may lead to improper perfo...

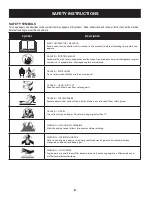
Page 6: ... damaged replace immediately DANGER BYSTANDERS Do not mow when children or others are around DANGER HAND FOOT CUT Keep hands and feet away from rotating parts DANGER THROWN DEBRIS Remove objects that can be thrown by the blade in any direction Wear safety glasses DANGER SLOPES Use extra caution on slopes Do not mow slopes greater than 15 WARNING GASOLINE IS FLAMMABLE Allow the engine to cool at le...

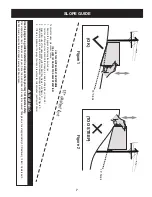
Page 7: ...just gauge up or down until the left corner touches the slope See Figure 1 and Figure 2 5 If there is a gap below the gauge the slope is too steep for safe operation See Figure 2 above 1 5 d a s h e d l i n e Figure 2 Figure 1 15 Slope 15 Slope Use this page as a guide to determine slopes where you may not operate safely Do not operate your lawn mower on such slopes Do not mow on inclines with a s...

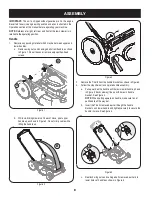
Page 8: ...rlier into lower holes of handle as shown in Figure 5 IMPORTANT This unit is shipped without gasoline or oil in the engine Be certain to service engine with gasoline and oil as instructed in the Operation section of this manual before operating your machine NOTE Reference to right left rear and front of the lawn mower is in relation to the operating position Handle 1 Remove any packing material wh...

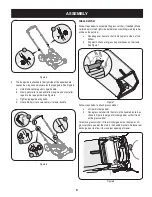
Page 9: ...t side out before assembling warning label will be on the outside a Place bag over frame so that its black plastic side is at the bottom b Slip plastic channel of grass bag over hooks on the frame See Figure 7 Follow steps below to attach grass catcher a Lift rear discharge door b Place grass catcher into the slots in the handle brackets as shown in Figure 8 Let go of discharge door so that it res...

Page 10: ...handle in one of the three positions that is most comfortable See Figure 11 inset 3 Secure into position with wing nuts and carriage bolts removed earlier Side Discharge Chute Your mower may be shipped as a mulcher To convert to side discharge make sure grass catcher is off of the unit and rear discharge door is closed 1 On the side of the mower lift the side mulching plug See Figure 9 2 Slide two...

Page 11: ...epress and squeeze it against the upper handle to operate the unit Release it to stop engine and blade CUTTING HEIGHT ADJUSTMENT LEVERS One adjustment lever is located on the right rear wheel and one is located on the right front wheel Both levers have to be at the same relative position to ensure a uniform cut To adjust the cutting height refer to the Assembly Set Up Section MULCHING PLUG The mul...

Page 12: ...ol or up to 15 MTBE methyl tertiary butyl ether is acceptable Refuel in a well ventilated area with the engine stopped If the engine has been running allow it to cool first Never refuel the engine inside a building where gasoline fumes may reach flames or sparks If your equipment will be used on an infrequent or intermittent basis please refer to the Off Season Storage section for additional infor...

Page 13: ... before performing any work on the mower or to remove the grass catcher WARNING The operation of any lawn mower can result in foreign objects being thrown into the eyes which can damage your eyes severely Always wear safety glasses while operating the mower or while performing any adjustments or repairs on it WARNING Rapid retraction of starter cord kickback will pull hand and arm toward engine fa...

Page 14: ...uel or add stabilizer to a full tank of fresh fuel prior to storage Clean more often under dusty conditions or when airborne debris is present Replace air cleaner if very dirty WARNING Before performing any type of maintenance service disengage all controls and stop the engine Wait until all moving parts have come to a complete stop Disconnect spark plug wire and ground it against the engine to pr...

Page 15: ...recommended torque 180 lb in 20 Nm 5 Attach the spark plug cap to the spark plug Air Cleaner A dirty air cleaner will restrict air flow to the carburetor and cause poor engine performance Inspect the filter each time the engine is oper ated You will need to clean the filter more frequently if you operate the engine in very dusty areas Clean the air cleaner every 25 hours of operation or once a sea...

Page 16: ...r before every use clean grass chaff or accumulated debris from engine Keep linkage spring and controls clean Keep area around and behind muffler free of any combustible debris Keeping engine clean allows air movement around engine Engine parts should be kept clean to reduce the risk of overheat ing and ignition of accumulated debris LUBRICATION Blade Control Lubricate pivot points on the blade co...

Page 17: ...eboltandthebladebellsupportwhichholdthebladeand the blade adapter to the engine crankshaft See Figure 20 3 Remove blade and adapter from the crankshaft 4 Removebladefromtheadapterfortestingbalance Balancetheblade on a round shaft screwdriver to check Remove metal from the heavy side until it balances evenly When sharpening the blade follow the original angle of grind Grind each cutting edge equall...

Page 18: ...or silicone coat the equipment especially cables and all moving parts of your lawn mower before storage WARNING Never store lawn mower with fuel in tank indoors or in poorly ventilated areas where fuel fumes may reach an open flame spark or pilot light as on a furnace water heater clothes dryer or gas appliance Preparing THE Engine For engines stored over 30 days 1 To prevent gum from forming in f...

Page 19: ...k with clean fresh gasoline 3 Clear vent 4 Run engine until it stops from lack of fuel Refill with fresh fuel 5 Refer to Air Cleaner in Engine Maintenance section 6 Contact your Sears Parts Repair Center to have fuel line cleaned Engine overheats 1 Engine oil level low 2 Air flow restricted 1 Fill crankcase with proper oil 2 Clean area around and on top of engine Occasional skips hesitates 1 Spark...

Page 20: ...20 PARTS LIST 45 46 47 3 44 38 41 42 14 19 26 9 10 11 13 36 34 29 20 22 21 24 25 31 16 34 34 33 43 43 35 12 15 1 2 28 7 4 4 39 40 5 8 6 18 17 30 23 16 27 29 32 ...

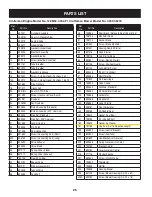
Page 21: ...21 Mulching Blade 21 710 1044 Hex Bolt 3 8 24 x 1 5 Lg Gr 8 22 736 0524B Blade Bell Support 23 748 04096 Blade Adapter 24 764 04082A Grasscatcher Bag Craftsman 25 747 05450 Catcher Frame 26 946 04661A Control Cable 37 58 Lg 27 712 04222 Sq Nut 1 4 20 28 787 01818A 0637 Height Adj Plate 29 631 04389A Rear Baffle Incl rear door 30 732 04673 RH Torsion Spring 31 732 04674 LH Torsion Spring 32 747 051...

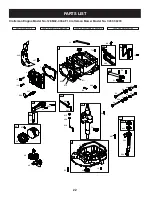
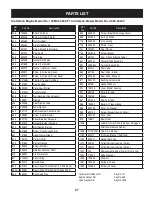
Page 22: ...L 48 SHORT BLOCK 1329 REPLACEMENT ENGINE 1330 REPAIR MANUAL MSC000603 1 128M02 0962 F1 02 13 2013 10 3 1 8 9 718 307 635 337 13 5 7 11 33 36 40 22 20 15 12 4 847 523 287 525 842 45 34 35 40 45 32 32A 27 26 27 25 29 28 24 741 16 43 46 306 684 585 584 868 51 50 54 868 616 404 615 505 562 227 89 524 13A 871 869 870 ...

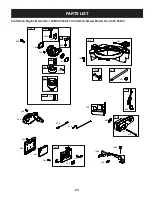
Page 23: ...aftsman Mower Model No C459 36203 MSC000603 2 128M02 0962 F1 02 13 2013 97 975 133 134 617 130 633 163 276 137 104 276 108 633A 125 141 127 601 187 190 972 1059 957 117 443 445 968 425 163 11A 966 1387 1388 1386 883 291 613 81 883 300 188 222 202 209 365 725 ...

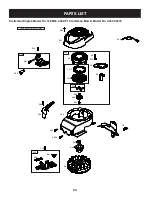
Page 24: ...o 128M02 0962 F1 Craftsman Mower Model No C459 36203 MSC000603 3 128M02 0962 F1 02 13 2013 60 58 592 65 597 456 689 459 1210 1211 55 608 23 455 332 305 304 1036 EMISSIONS LABEL 745 923 621 922 356 851 334 333 37 78 305A 604 564 969 921 635 ...

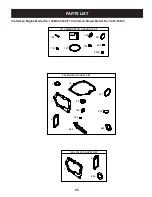
Page 25: ...an Engine Model No 128M02 0962 F1 Craftsman Mower Model No C459 36203 12 9 7 3 358 ENGINE GASKET SET 883 842 617 524 163 20 585 9 883 1095 VALVE GASKET SET 7 134 121 CARBURETOR OVERHAUL KIT 104 127 137 163 633 617 276 633A ...

Page 26: ... Valve 46 590463 Camshaft Ref No Part No Description 48 799984 Short Block Not available at this printing 50 796703 Manifold Intake 51 796704 Gasket Intake 54 691650 Screw Intake Manifold 55 691421 Housing Rewind Starter 58 697316 Rope Starter 60 799716 Grip Starter Rope 65 690837 Screw Rewind Starter 78 691108 Screw Flywheel Guard 81 691740 Lock Muffler Screw 89 692348 Plug Oil Cylinder 97 696565...

Page 27: ... Seal Choke Throttle Shaft Choke Shaft 635 66538s Boot Spark Plug Ref No Part No Description 684 690345 Screw Breather Passage Cover 689 691855 Spring Friction 718 690959 Pin Locating 725 590460 Shield Heat 741 797521 Gear Timing 745 691648 Screw Brake 842 691031 Seal O Ring Dipstick Tube 847 692047 Dipstick Tube Assembly 851 493880s Terminal Spark Plug 868 590410 Seal Valve 869 691155 Seat Valve ...

Page 28: ...REMEDY FOR ANY BREACH OF WARRANTY Customer Responsibilities In additional to complying with all suggested maintenance guidelines and instructions customers obligations shall include but shall not be limited to operating the product in accordance with the owner s manual or any additional instructions or information provided at the time of purchase or in subsequent communications to the purchaser fr...

Page 29: ...02488 Trademarks of Sears Brands Management Corp used under license by Sears Canada Marque déposée MC Marque de commerce de Sears Brands Management Corp utilisée en vertu d une licence de Sears Canada ...

Page 30: ...es Pour connaître le no de téléphone du Service des pièces et de l entretien Sears afin de commander les pièces de rechange accessoires et manuels d instructions requis pour effectuer vous même les réparations www sears ca Pour acheter ou demander des renseignements sur un contrat d entretien Sears téléphonez au 1 800 361 6665 de 9 h à 23 h du lundi au vendredi HNE de 9 h à 16 h le samedi For serv...

Page 31: ...e remplacer le produit ou encore d offrir un remboursement complet de son prix d achat à sa seule discrétion CE RECOURS SERA LE SEUL ET UNIQUE RECOURS DONT VOUS DISPOSEREZ EN CAS D INEXÉCUTION QUELLE QU ELLE SOIT DE LA GARANTIE Responsabilités du client En plus d observer toutes les consignes et directives d entretien le client doit s acquitter entre autres des obligations suivantes utiliser le pr...

Page 32: ...24 x 1 5 po de lg Qual 8 22 736 0524B Support de la lame 23 748 04096 Adaptateur de la lame 24 764 04082A Sac à herbe Craftsman 25 747 05450 Sac à herbe bâti 26 946 04661A Câble de la commande 37 58 po 27 712 04222 Écrou carré 1 4 20 28 787 01818A 0637 Plaque de réglage de hauteur 29 631 04389A Déflecteur arrière Comprend le porte arrière 30 732 04673 Ressort de torsion CD 31 732 04674 Ressort de ...

Page 33: ...20 PIÈCES DÉTACHÉES 45 46 47 3 44 38 41 42 14 19 26 9 10 11 13 36 34 29 20 22 21 24 25 31 16 34 34 33 43 43 35 12 15 1 2 28 7 4 4 39 40 5 8 6 18 17 30 23 16 27 29 32 ...

Page 34: ... le Le moteur hésite parfois à régime élevé 1 L écartement de la bougie est trop petit 2 Réglez l écartement à 0 030 po Consultez le chapitre Entretien Le moteur tourne irrégulièrement 1 La bougie est sale défectueuse ou l écartement est trop grand 2 Le filtre à air est sale 1 Réglez l écartement à 0 030 po ou remplacez la bougie Consultez le chapitre Entretien 2 Consultez le chapitre Entretien Vi...

Page 35: ...s et toutes les pièces mobiles avec une huile légère ou de la silicone PRÉPARATION DU MOTEUR Moteurs entreposés pendant plus de 30 jours 1 Pour empêcher la formation de gomme dans le système de carburant et sur les pièces du carburateur laissez tourner le moteur jusqu à ce qu il tombe en panne d essence ou ajoutez un additif pour essence dans l essence du réservoir Dans ce cas laissez le moteur to...

Page 36: ...ez comme suit pour l entretien de la lame 1 Débranchez le fil de la bougie Inclinez la tondeuse pour qu elle repose sur le plateau de coupe Le côté du filtre à air et du carburateur doit se trouver sur le haut 2 Enlevez le boulon et le support de la lame qui maintiennent la lame et l adaptateur sur le vilebrequin Voir la Figure 20 3 Dégagez la lame et l adaptateur du vilebrequin Voir la Figure 20 ...

Page 37: ...e circulation d air s Les pièces du moteur doivent rester propres pour limiter les risques de surchauffe et d incendie des débris LUBRIFICATION Commande de la lame Lubrifiez les points de pivot de la poignée de commande de la lame au moins une fois par saison avec une huile légère La commande de la lame doit fonctionner facilement dans les deux sens Voir la Figure 18 AVERTISSEMENT Le combustible e...

Page 38: ... fois par saison Remplacez le filtre à air chaque année REMARQUE Ne pas utiliser d air comprimé ni de solvant pour nettoyer le filtre à air L air comprimé peut endommager le filtre les solvants le dissoudre 1 Desserrez la vis et abaissez le couvercle de l habitacle en plastique du moteur Voir la Figure 16 2 Dégagez le filtre à air du couvercle de l habitacle en plastique 3 Frappez doucement le fil...

Page 39: ...z Tous les ans ou toutes les 50 heures 1 Niveau de l huile de la transmission 2 Usure des dents 3 Pression des pneus 1 Vérifiez 2 Vérifiez 3 Vérifiez Toutes les 50 heures 1 Huile à moteur 1 Changez Tous les ans 1 Bougie 2 Filtre à air 1 Changez 2 Changez Avant le remisage 1 Système d alimentation en carburant 1 Laissez le moteur tourner jusqu à ce qu il tombe en panne d essence ou ajoutez un addit...

Page 40: ...clapet d éjection arrière le cas échéant bloquera l ouverture arrière de la tondeuse Pour de meilleurs résultats ne déchiquetez pas une herbe mouillée Le déchiquetage est déconseillé si l herbe mesure plus de quatre pouces de longueur Utilisez plutôt le sac à herbe AVERTISSEMENT Assurez vous que seul le conducteur se trouve à proximité de la tondeuse au moment de sa mise en route ou pendant son ut...

Page 41: ...îche propre sans plomb s Un indice minimum d Octane de 87 87 AKI 91 RON Figure 13 s Il est possible d utiliser de l essence contenant 10 d alcool éthylique essence alcool ou jusqu à 15 de MTBE éther méthyl tertiobutylique Ne pas utiliser d essence non approuvée comme la E15 et E85 Ne pas mélanger d huile à l essence ni modifier le moteur pour fonction ner avec des carburants alternatifs Cela endom...

Page 42: ... la tondeuse Il faut serrer cette poignée contre le guidon pour que la tondeuse fonctionne Le fait de lâcher la poignée arrête le moteur et la lame LEVIERS DE RÉGLAGE DE LA HAUTEUR DE COUPE Un levier de réglage se trouve sur la roue arrière droite et un autre est placé sur la roue avant droite Les deux leviers doivent se trouver à la même position relative pour assurer une tonte uniforme Pour modi...

Page 43: ...s manettes de réglage bougent dans la même direction sur les tondeuses à grandes roues 3 Laissez la manette revenir vers le plateau de coupe IMPORTANT Les roues avant et arrière doivent être réglées à la même position relative Pour travailler sur un terrain accidenté placez le levier à une hauteur plus élevée Vous éviterez ainsi d arracher l herbe Inclinaison du guidon les cas écheant Il est possi...

Page 44: ...démonté de la tondeuse et que le clapet d éjection arrière est fermé 1 Relevez le bouchon de déchiquetage à charnière qui se trouve sur le côté du plateau de coupe Voir la Figure 9 4 Le guide de la corde du démarreur est installé sur la droite du guidon supérieutr Desserrez le boulon à oreilles qui maintient le guide de la corde en place Voir la Figure 6 a Tenez la commande de la lame contre le gu...

Page 45: ...aires dans les trous inférieurs du guidon comme à la Figure 5 IMPORTANT Cette machine est expédiée SANS HUILE NI ESSENCE Faites les pleins d essence et d huile conformément aux instructions du chapitre Utilisation de cette notice d utilisation avant de faire fonctionner la machine REMARQUE Les côtés droit et gauche s entendent vus de la position de conduite de la machine Guidon 1 Retirez les pièce...

Page 46: ... page avec l objet Voir les Figures 1 et 2 4 Remontez ou abaissez l inclinomètre jusqu à ce que le coin gauche touche la pente Voir les Figures 1 et 2 5 S il y a un espace sous l inclinomètre la pente est trop abrupte pour y travailler en toute sécurité Voir la Figure 2 ci dessus Pente à 15 Pente à 15 Servez vous de cet inclinomètre pour déterminer les pentes sur les quelles il serait dangereux de...

Page 47: ...diatement DANGER SPECTATEURS Ne tondez pas si des enfants ou autres spectateurs sont à proximité DANGER AMPUTATION DES MAINS PIEDS N approchez jamais les mains ni les pieds des pièces en mouvement DANGER OBJETS PROJETÉS Enlevez tous les objets qui pourraient être projetés par les lames dans des directions différentes Portez des lunettes de sécurité DANGER PENTES Soyez très prudent sur des pentes N...

Page 48: ... de coupe pendant que la moteur tourne s Les pièces du sac à herbe et le clapet de la goulotte d éjection peuvent s user et être endommagés et par conséquent exposer les pièces mo biles ou causer la projection de débris Par mesure de sécurité vérifiez souvent les pièces et remplacez les immédiatement avec des pièces authentiques seulement de la liste de pièces qui se trouve dans cette notice L emp...

Page 49: ...e sur la pente n y travaillez pas Par mesure de sécurité utilisez l inclinomètre fourni dans la notice d utilisation pour mesurer la pente du terrain avant de commencer à travailler Si selon l inclinomètre la pente est supérieure à 15 n utilisez pas la tondeuse pour éviter toute blessure grave À faire s Travaillez parallèlement à la pente jamais perpendiculairement Faites très attention en changea...

Page 50: ...u d un obstacle De cette façon les débris éventuels ne risquent pas de ricocher et de blesser quelqu un s Pour éviter tout risque de contact avec la lame ou de blessure par un projectile éloignez les enfants passants et animaux à au moins 75 pieds de la tondeuse pendant qu elle fonctionne Arrêtez la machine si quelqu un s approche s Portez toujours des lunettes de sécurité en utilisant la machine ...

Page 51: ...annage 20 Garantie 21 Pièces détachées tondeuse 22 1 800 4 MY HOME 24 Pièces détachées moteur voir la page 24 29 de la version anglaise de cette notice d utilisation Numéro de modèle Numéro de série Date d achat Inscrivez le numéro de modèle le numéro de série et la date d achat ci dessus TABLE DES MATIÈRES NUMÉRO DE MODÈLE ...

Page 52: ...tre site web sears ca ATTENTION LISEZ ATTENTIVEMENT LES RÉGLES DE SÉCURITÉ ET LES INSTRUCTIONS AVANT DE METTRE EN MARCHE LA MACHINE Notice d utilisation SÉCURITÉ MONTAGE UTILISATION ENTRETIEN PIÈCES DÉTACHÉES 1 30 13 769 07842A TONDEUSE 21 PO Modèle Nos C459 36203 ...

Reviews: