background image

Summary of Contents for C950-60901-0

Page 1: ...low All Safety Rules And Instructions Before Operating This Equipment 10 HP ELECTRIC START 30 MOWER MULCHER 5 SPEED REAR ENGINE RIDER Assembly Operation Customer Responsibilities Service And Adjustment F 99635 Sears Canada Inc Toronto Ontario M5B 2B8 Printed inU SA ...

Page 2: ...E 31 HOW TO SET THE CUTTING HEIGHT 31 HOW TO CLEAN THE MOWER HOUSING 31 FRONT WHEEL ALIGNMENT 31 STORAGE OVER 30 DAYS 32 TROUBLE SHOOTING CHART 33 SLOPE GUIDE 34 INDEX 35 REPAIR PARTS 36 LIMITED TWO 2 YEAR WARRANTY ON CRAFTSMAN TRACTOR RIDING EQUIPMENT For two 2 years from date of purchase Sears Canada Inc will repair or replace free of charge at Sears option parts which are defective as a result ...

Page 3: ...y instructions Carefully adjust the unit Know how to operate all standard and accessary equipment on the unit Make sure the operator can correctly operate the unit Operate the unit only with guards shields and other safety items in place and working correctly Complete all maintenance on the unit Service the unit only with authorized or approved replacement parts See the Maintenance Chart MAINTENAN...

Page 4: ...n safely control c Do not turn sharply Use care when backing d Use counterweights or wheel weights when suggested in the Instruction Book 18 Do not operate this machine if you are taking drugs or other medication which can cause drowsiness or affect your ability to operate this machine 19 Do not use this machine if you are mentally or physically unable to operate this machine safely II Slope opera...

Page 5: ...tion regularly 5 To reduce fire hazards keep the machine free of grass leaves or other debris build up Clean up oil or fuel spills Allow the machine to cool before storing 6 Stop and inspect the equipment if you strike an object Repair if necessary before restarting 7 Never make adjustments or repairs with the engine running The carburetor can be adjusted with the engine running Do not change the ...

Page 6: ...sture and nutrients to reach grass roots 36 inch swath 24 hardened 2 5 inch steel coring tips 150 1b weight tray LAWN SWEEPERS let you collect grass clippings and leaves LAWN VACS for powerful collection of heavy grass clippings and leaves Wand attachment to pick up debris in hard to reach places AERATOR promotes deep root growth for a healthy lawn Tapered 2 5 inch steel spikes mounted on 10 inch ...

Page 7: ... lilt lever to the highest position CAUTION Check the bottom of the carton for staples Remove any staples that are in the path of the tires 7 From the back of the dding mower carefully pull the nding mow er backwards off the wood frame TOOLS YOU NEED TO ASSEMBLE THE UNIT 1 Adjustable wrench 2 required 2 Open end wrench 1 2 9 16 3 Open end wrench 7 16 1 2 4 Blade type screwdriver 5 Phillips screwdr...

Page 8: ...harger to charge the battery Charge at a rate of 6 amperes for one hour If you do not have a battery charger have an authorized service center charge the battery 4 Install the battery See How To Install The Battery in the Customer Responsibilities section HOW TO INSTALL THE BA rFERY CABLES _ WARNING To prevent sparks fasten the red cable to the positive terminal before you connect the black cable ...

Page 9: ... the unit to ride rough Also the wrong air pressure will keep the mower housing from cutting level The correct air pressure PSI is as follows Front Tires 22 PSI 1 5 BAR Rear Tires 14 PSI 1 BAR CHECK THE DRIVE BRAKE The drive brake can be easily checked as follows 1 Set the parking brake See page 13 2 Move the shift lever to the neutral N position 3 Push the unit 4 If the rear wheels rotate adjust ...

Page 10: ...eat needs to be adjusted slide the seat bracket forward or backward along the seat adjusting holes as shown To keep the seat straight tighten the rear nut and then tighten the two front nuts Fasten the connector to the wire harness Make sure the tab on the connector locks into the wire harness WARNING For correct and safe operation of the unit fasten the connector to the wire harness if the connec...

Page 11: ...t Sears Retail or Catalog Stores LOCATION OF CONTROLS ATTACHMENT CLUTCH Use the attachment clutch to PARKING BRAKE LEVER Use the parking brake lever start and stop the rotation of the blade to engage the brake when you leave the unit CLUTCH BRAKE PEDAL The pedal has two functions The first function is a clutch The second function is a brake IGNITION SWITCH use the ignition switch to start and stop...

Page 12: ... clutch is next to the steering wheel Figure 8 Use the attachment clutch to engage the blade s 1 Before you start the engine make sure the attachment clutch is in the DISENGAGE position Attachment Clutch Engage Position Disengage Position Figure 8 HOW TO USE THE SHIFT LEVER TOchange the forward speed or the direction of the unit follow the steps below CAUTION Before you move the shift lever comple...

Page 13: ...housing and back to raise the mower housing 2 When you ride on a sidewalk or road move the lift lever to the highest position and move the attachment clutch to the DISEN GAGE position Parking Brake Lever Lift Lever Figure 10 HOW TO STOP THE UNIT 1 Completely push the clutch brake pedal forward to stop the unit Keep your foot on the pedal 2 Move the attachment clutch to the DISENGAGE position 3 Mov...

Page 14: ...peed setting Make sure the level of cut is still correct After you mow a short distance look at the area that was cut If the mower housing does not cut level see the instructions on How To Level The Mower Housing in the Service And Adjustment section _IL ARNING For better control of the unit always select a safe speed HOW TO OPERATE THE UNIT ON HILLS WARNING Do not ride up or down slopes that are ...

Page 15: ...resence system that includes a sensor switch _ mounted in the seat These components tell the elec trical system if the operator is sitting on the seat This system will stop the engine when the operator leaves the seat if the attachment clutch is engaged For your protection always make sure this system operates correctly NOTE The engine will not start unless you depress the clutch brake pedal move ...

Page 16: ... Nut Mulcher Plate Figure 12 3 Lift the mulcher plate away from the mower housing Figure 13 Deflector Figure 13 4 Attach wingnuts B and carriage bolts A to the mulcher plate for future use IMPORTANT There are several different types of grass Some types of grass are more difficult to cut If you remove the mulcher plate and the grass does not discharge correctly replace the blade with a standard bla...

Page 17: ... by turning to the right so that the cut grass will discharge away from shrubs fences drive ways etc After one or two rounds mow in the opposite direc tion making left turns until finished Figure 14 If the grass is very high cut two times to decrease the load on the engine First cut with the mower housing in the highest posi tion and then lower the mower housing for the second cut 10 11 12 13 For ...

Page 18: ...in warranty coverage 2 Check the spark plug drive brake lubricate the unit and clean the air filter once a year 3 Check the fasteners Make sure all fasteners are tight 4 Follow the Customer Responsibility and the Service And Ad justment section to keep the unit in good operating condition WARNING Before you make an inspection adjust ment or repair to the unit disconnect the wire to the spark plug ...

Page 19: ... the top and bottom of the mower housing Remove all the grass and debris Mount the blade and blade adapter on the mandrel Figure 15 Mount the blade so that the hi lift edges are up If the blade is upside down the blade will not cut correctly and can cause an accident Fasten the blade with the original washers and nut Make sure the outside rim of the Belleville washer is against the blade Figure 16...

Page 20: ...Check the operation of the blade brake Rotate the pulley with your hand Make sure that the blade brake pad presses tightly against the pulley Move the attachment clutch to the ENGAGE position Check the pad for the blade brake If the pad is excessively worn or damaged replace the brake pad assembly Correct replacement parts and assistance are available from an authorized service center 10 11 12 Att...

Page 21: ...t clockwise untilthe adjustable nut is in line with the hole inthe brake arm 12 Connect the adjustable nut to the brake arm withthe washer and cotter pin 13 Apply the parking brake Try to push the unit Ifthe rear wheels do not turn the brake is correctly adjusted Release the parking brake Push the unit to see if the wheels will freely roll _ WARNING If you cannot correctly adjust the drive brake t...

Page 22: ...tery every three months 2 Before you charge the battery remove the battery 3 To charge the battery use a 12 volt battery charger Charge at a rate of 3 amperes for 2 to 3 hours 4 Install the battery See How To Install The Battery in the Assembly section BATTERY SERVICE HOW TO REMOVE THE BA I FERY To charge or clean the battery remove the battery from the unit as follows WARNING To prevent sparks di...

Page 23: ...areas shown NOTE Apply grease to the steering gear assembly CAUTION if the unit is operated in dry areas that have sand use a dry graphite spray to lubricate the unit Do not lubricate the nylon bearings for the front wheels Oil or grease will damage the bearings Shift Lever d W_ 1__21 _ _ _ L_ i L_ _ Figure 25 F 99635 23 ...

Page 24: ...oils 5W30 10W30 etc improve starting in cold weather these multi viscosity oils will result in increased oil consumption when used above 320 R Check the engine oil level more frequently to avoid possible engine damage from running low on oil 3 4 Clean the area around the dipstick Remove the dipstick Slowly pour approximately 32 ounces 1 quart of oil into the oil extension tube Insert the dipstick ...

Page 25: ... equipped wash the foam filter in a detergent and water solu tion To remove the water solution tightly roll the foam filter in a dry cloth Remove the foam filter from the cloth Completely dry the foam filter CAUTION Do not wash the filters in gasoline or other solvents that will burn 0 Evenly apply SAE 30W oil to the dry foam filter 9 To clean the paper filter lightly tap the paper filter against ...

Page 26: ...le control to the SLOW position and then back to the FAST position Check the alignment of the throttle control lever See step 3 5 The throttle control is now set at the correct speed When the throttle control is at the FAST position the engine speed is 3400 or 100 RPM When the throttle control is in the SLOW position the engine speed is 2150 or 100 RPM IMPORTANT Do not change the engine governor I...

Page 27: ... Push the mower housing under the left side of the unit 2 Slide the mower drive belt between the stack pulley and the belt guide Putthe mower drive belt around the stack pulley Make sure the V side of the mower drive belt is against the stack pulley Also make sure the mower drive belt is not twisted 3 Attach the mower housing to the front hanger with the long pin Fasten with the washer and hair pi...

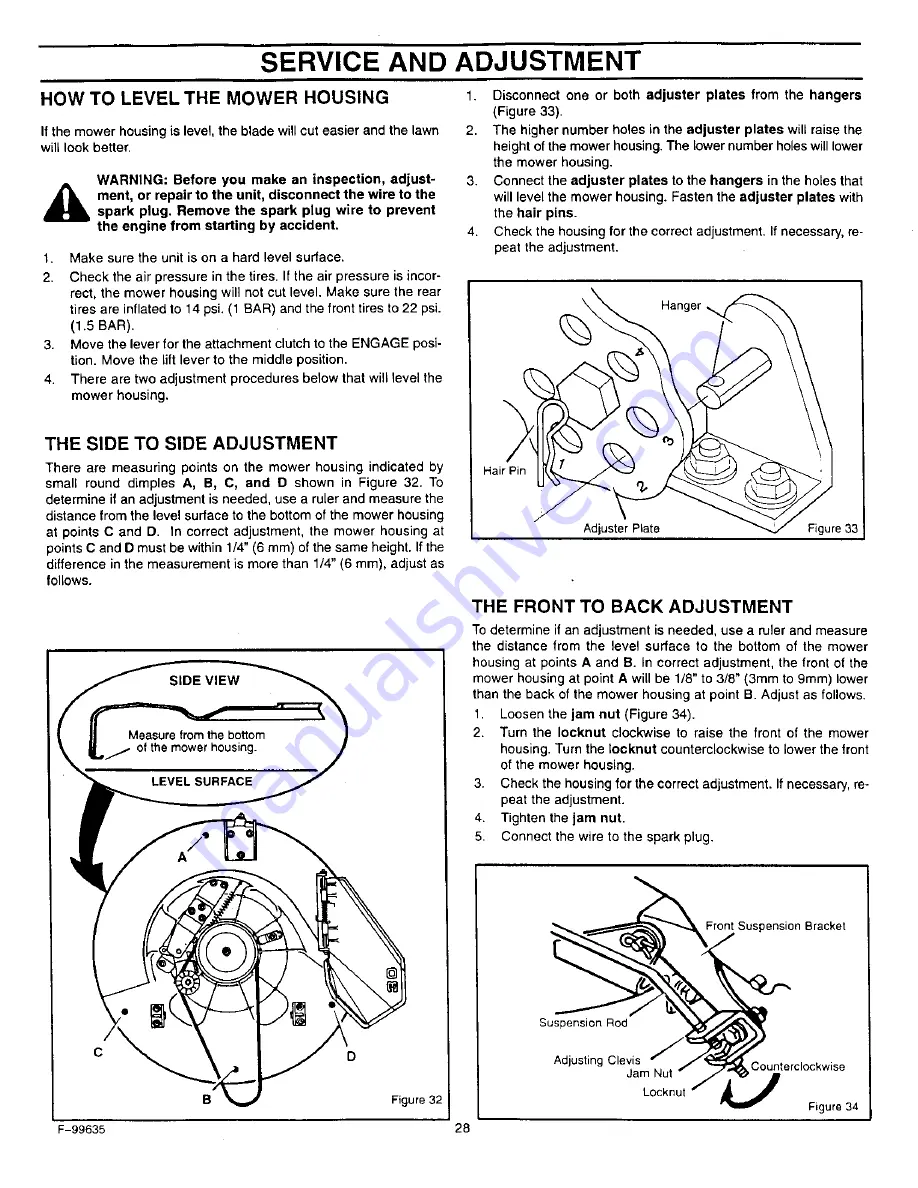
Page 28: ... 6 ram of the same height If the difference in the measurement is more than 1 4 6 ram adjust as follows Disconnect one or both adjuster plates from the hangers Figure 33 The higher number holes in the adjuster plates will raise the height of the mower housing The lower number holeswilllower the mower housing Connect the adjuster plates to the hangers in the holes that will level the mower housing ...

Page 29: ...e the motion drive belt between the stack pulley and the belt guide Install the motion drive belt on the top pulley of the stack pulley Make sure the V side of the belt is against the pulley Figure 35 2 Slide the motion drive belt between the belt retainer and idler pulley Make sure the flat side of the motion drive belt is against the idler pulley Also make sure the belt is not twisted 3 Install ...

Page 30: ... INSTALLATION 1 Pull the belt guides away from the mandrel pulley Slide the belt between the belt guides and the mandrel pulley 2 Make sure the V side of the mower drive belt is against the mandrel pulley Figure 37 Pull the belt retainer away from the idler pulley Put the mower drive belt around the Idler pulley Make sure the mower drive belt is inside all the belt guides Also make sure the mower ...

Page 31: ...eys or belt do not touch the bottom of the frame Hair Pin Lifter Rod Figure 40 HOW TO CLEAN THE MOWER HOUSING _lb WARNING Before you clean the mower housing stop the engine and disconnect the wire to the spark plug Grass and other debris on top of the mower housing can keep the belt from working correctly For safety and correct operation frequently clean the top of the mower housing Remove grass a...

Page 32: ...e at least 10 minutes after adding the stabilizer to allow the stabilizer to reach the carburetor Do not drain the fuel tank and carburetor if stabilizer is used If you do not use a stabilizer do the following 1 Start the engine 2 Run the engine until the fuel tank and the carburetor are out of fuel and the engine stops 3 Do not leave fuet in the fuel tank or the carburetor The fuel can damage the...

Page 33: ...tle control 5 Drain the fuel tank Clean the fuel line Replace the fuel filter F 99635 33 PROBLEM A hot engine causes a decrease in power 1 Clean the air screen 2 Check the oil 3 Adjust the carburetor 4 Replace the fuel filter PROBLEM Excessive vibration 1 Replace the blade 2 Check for loose engine bolts 3 Decrease the air pressure in the tires 4 Adjust the carburetor 5 Check for a damaged belt or ...

Page 34: ...t is greater than 15 degrees If the riding mower is used with a pull behind or rear mounted attachment do not operate the unit on a slope that is greater than 10 degrees A 15 degree slope is a hill that increases in height at approximately 2 5 feet in 10 feet A 10 degree slope is a hill that increases in height at approximately 1 7 feet in 10 feet Use extreme care at all times and avoid sudden tur...

Page 35: ...ration 13 Lubrication Engine 24 Mower 23 M Maintenance Chart 18 Motion Drive Belt Adjust 21 Replace 29 Mower Drive Belt Adjust 20 Replace 30 Mower Housing Clean 31 Cutting Height 13 31 Install 27 Level Adjustment 28 Operation 14 Remove 27 Muffler 24 Spark Arrester 24 Mulcher Install 16 Operation 17 Remove 16 0 Oil Change 24 Check 15 24 35 Type 15 Operation Attachment Clutch 11 12 Clutch Brake Peda...

Page 36: ...ber when you call for service or order repair parts for your unit Repair parts can be ordered from any Sears Service Centre Department and most Sears Stores WHEN ORDERING REPAIR PARTS ALWAYS HAVE THE FOLLOWING INFORMATION AS SHOWN IN THIS LIST PRODUCT REAR ENGINE RIDER MODEL NUMBER C950 60901 0 ENGINE MODEL NO 143 981002 PART NUMBER PART DESCRIPTION Your Sears merchandise has added value when you ...

Reviews: