English
10
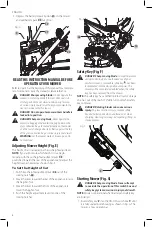
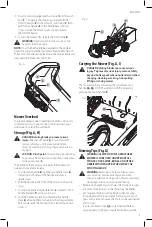
discharge opening. Release bail handle to turn mower
off, remove the safety key and battery pack. Remove the
catcher and shake the grass down to the back end of
the bag. Also clean out any grass or debris which may
be packed around the discharge opening. Replace the
grass catcher.
• If mower should start to vibrate abnormally, release bail
handle to turn mower off, remove the safety key and
battery pack. Check immediately for cause. Vibration
is a warning of trouble. Do not operate mower until a
service check has been made. Refer to
Troubleshooting
Guide
in this manual.
• For best cutting results, keep blade sharpened
and balanced.
• Inspect and thoroughly clean mower after each use as a
deck with caked grass will degrade performance.
• Always release bail handle to turn mower off, remove
safety key and battery pack when leaving it unattended
even for a short period of time.
The following suggestions will help you
to obtain optimum run time from your
cordless mower:
• Slow down in areas where the grass is especially
long or thick.
• Avoid mowing when the grass is wet from rain or
dew-soaked.
• Cut your lawn frequently, especially during high
growth periods.
nOTE:
It is recommended that your mower be recharged
after use to prolong the battery life. Frequent charging will
not harm your battery, and will ensure that the battery is
fully charged and ready for its next use. Storing battery not
fully charged will shorten battery life.
MAINTENANCE
DANGER: To reduce the risk of serious personal
injury, turn unit off, remove safety key, and
remove battery pack before making any
adjustments or removing/installing attachments
or accessories.
An accidental start-up can
cause injury.
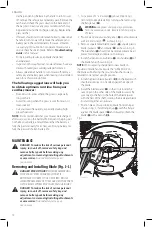
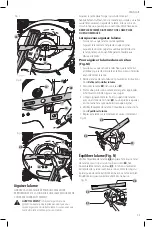
1. Cut a piece of 2" x 4' wood
23
(about 2 feet long)
(610 mm) to keep blade from turning when removing
the flange nut
24
.
WARNING:
Use gloves and proper eye protection.
Turn the mower on its side. Be careful of sharp edges
of blade.
2. Position wood and unscrew flange nut
24
counterclockwise
with a 18 mm wrench
25
as shown in Fig. J.
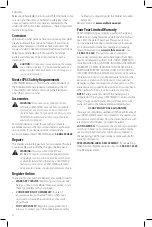
3. Remove square metal blade spacer
26
, square plastic
blade insulator
27
and blade
28
as shown in Fig. K.
The blade fan
29
should not be removed. Examine all
pieces for damage and replace if necessary.
4. Install sharpened or new blade
28
on shoulder
30
of
the blade fan as shown in Fig. K.
nOTE:
When replacing sharpened or new blade on
shoulder of blade fan, make sure the “GRASS SIDE” on
the blade will be facing the ground when the mower is
returned to its normal upright position.
5. Install the plastic blade insulator
27
on the blade such
that the raised lips on one side engage the edges of
the blade.
6. Install the blade spacer
26
so that it sits inside the
raised lips on the other side of the blade insulator. Be
sure to align the flats in the hole of the blade spacer
with the flats of the shaft, rotating the blade and blade
insulator together as necessary.
7. Position piece of wood to keep blade from turning as
shown in Fig. L. Install flange nut
24
with the flange
against the blade spacer
26
and securely tighten the
blade
28
with a wrench
25
.
Fig. J
23
25
24
Removing and Installing Blade (Fig. J–L)
DANGER: RISK OF INJURY.
WHEN REASSEMBLING
THE BLADE SYSTEM, ENSURE EACH PART IS
REINSTALLED CORRECTLY, AS DESCRIBED BELOW.
IMPROPER ASSEMBLY OF THE BLADE OR OTHER PARTS
OF THE BLADE SYSTEM MAY CAUSE SERIOUS INJURY.
DANGER:
To reduce the risk of serious personal
injury, turn unit off, remove safety key, and
remove battery pack before making any
adjustments or removing/installing attachments
or accessories.
An accidental start-up can
cause injury.

