English
6
On(i)/Off(O) switch:
Place this switch
4
in the On(I)
position to provide automatic power to the pressure switch
and Off(O) to remove power at the end of each use.
Pressure switch (not shown):
The pressure switch
automatically starts the motor when the air tank pressure
drops below the factory set “cut-in” pressure. It stops the
motor when the air tank pressure reaches the factory set
“cut-out” pressure.
safety Valve:
If the pressure switch does not shut off the
air compressor at its “cut-out” pressure setting, the safety
valve
8
will protect against high pressure by “popping out”
at its factory set pressure (slightly higher than the pressure
switch “cut-out” setting).
Tank Pressure gauge:
The tank pressure gauge
5
indicates the reserve air pressure in the tank.
Outlet Pressure gauge:
The outlet pressure gauge
9
indicates the air pressure available at the outlet side of the
regulator. This pressure is controlled by the regulator and is
always less than or equal to the tank pressure.
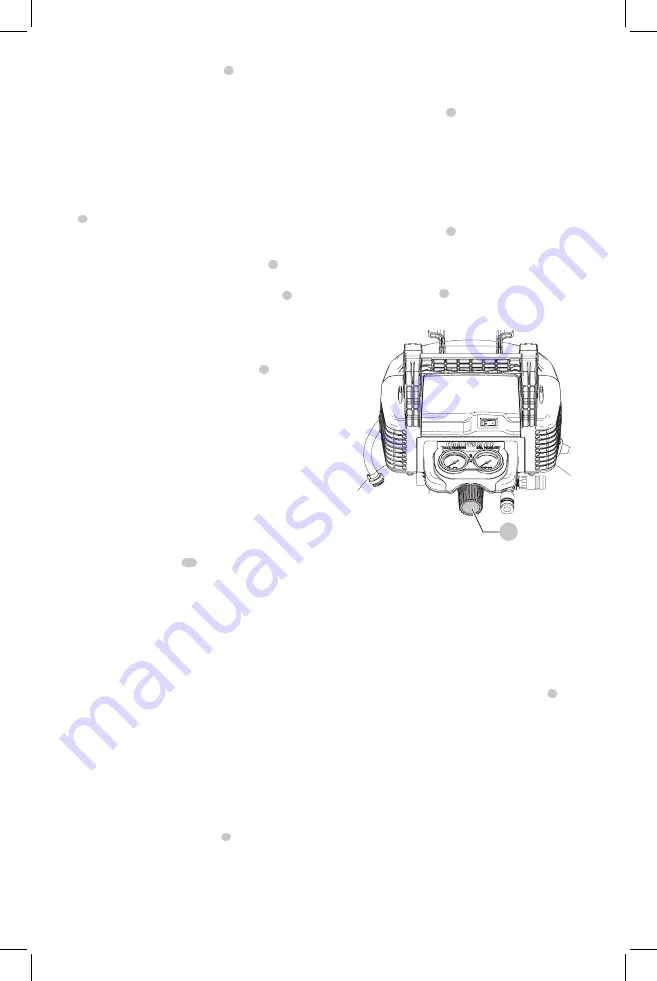
Regulator:
Controls the air pressure shown on
the outlet pressure gauge. Turn regulator knob
7
clockwise to increase pressure and counterclockwise to
decrease pressure.
Cooling system (not shown):
This compressor contains
an advanced design cooling system. At the heart of this
cooling system is an engineered fan. It is perfectly normal
for this fan to blow air through the vent holes in large
amounts. You know that the cooling system is working
when air is being expelled.
Air Compressor Pump (not shown):
Compresses air into
the air tank. Working air is not available until the compressor
has raised the air tank pressure above that required at the
air outlet.
Drain Valve:
The drain valve
10
is located at the base of
the air tank and is used to drain condensation at the end of
each use.
Check Valve (not shown):
When the air compressor is
operating, the check valve is “open”, allowing compressed
air to enter the air tank. When the air compressor reaches
“cut-out” pressure, the check valve “closes”, allowing air
pressure to remain inside the air tank.
Motor Overload Protector (not shown):
The motor has
a thermal overload protector. If the motor overheats for
any reason, the overload protector will shut off the motor.
The motor must be allowed to cool down before restarting.
To restart:
1. Set the On/Off switch to “Off” and unplug unit.
2. Allow the motor to cool.
3. Plug the power cord into the correct branch
circuit receptacle.
4. Set the On/Off switch to “On” position.
Quick Connects :
The quick connects
6
accepts industrial
quick connect plugs. The two quick connect bodies allow
the use of two tools at the same time.
How to Use Your Unit (Fig. A, B)
How to Stop
1. Set the On/Off switch
4
to “Off”.
2. Unplug unit when not in use.
Before Starting
WARNING:
Do not operate this unit until
you read this instruction manual for safety,
operation and maintenance instructions.
Before Each Start-Up
1. Set the On/Off switch
4
to “Off”.
2. Plug the power cord into the correct branch circuit
receptacle. (Refer to
Voltage and Circuit Protection
paragraph in the
installation
section of this manual.)
3. Turn regulator knob
7
counterclockwise until fully
closed. Ensure regulated pressure gauge reads 0 PSI
(0 kPa).
Fig. B
7
4. Attach hose and accessories.
5. Ensure all covers and labels are in place, legible (for
labels) and securely mounted. Do not use compressor
until all items have been verified.
WARNING:
Risk of unsafe operation. Firmly grasp
air hose in hand when installing or disconnecting
to prevent hose whip.
WARNING:
Risk of unsafe operation. Do not use
damaged or worn accessories
.
nOTE:
This unit is equipped with quick connects
6
. The
hose or accessory being connected will require a quick
connect plug.
WARNING:
Risk of Bursting. Too much air pressure
causes a hazardous risk of bursting. Check the
manufacturer’s maximum pressure rating for air
tools and accessories. The regulator outlet pressure
must never exceed the maximum pressure rating.
NOTICE:
Risk of property damage. Compressed air
from the unit may contain wa ter condensation and
oil mist. Do not spray un fil tered air at an item that
could be damaged by moisture. Some air tools and
accessories may require filtered air. Read the
in struc tions for the air tools and accessories.


