background image

5

English

To Remove a Blade (Fig. C)


WARNING:

 Burn hazard. Do not touch the the blade 

immediately after use. Contact with the blade may 
result in personal injury.

1.  Rotate open blade clamp collar 

 6 

 to its full 

open position.

2.  Remove blade.

To Remove a Broken Blade

If the blade breaks so that the broken piece is caught 
inside the clamp, take the following steps to remove the 
remainder of the blade from the saw.

1.  Place the saw on its side on a flat stable surface with the 

blade clamp collar tab pointing up.

2.  Rotate open blade clamp collar to its full open position.

a. 

if the blade has broken inside the clamp

, slide 

a flat object into the opening of the clamp as far 
as it can go, then remove the flat object. This will 
disengage the pin inside the clamp.

b. 

if the blade has broken outside the clamp

, slide 

a flat object into the opening of the clamp to the left 
of the blade as far as it can go, then remove the flat 
object. This will disengage the pin inside the blade 
clamp collar.

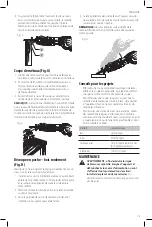
Fig. C

6

3.  While still holding the blade clamp collar open and the 

saw on its side, face the clamp opening down and shake 
until the broken blade falls out.

Adjustable Shoe (Fig. A)


WARNING:

 Cut hazard. Blade breakage may occur 

if the blade does not extend past the shoe and the 
thickness of the workpiece during the cut. Increased 
risk of personal injury, as well as damage to the shoe 
and workpiece may result. 


WARNING:

 Cut hazard. Turn off and disconnect tool 

from power source before making any adjustments or 
removing or installing attachments or accessories. 


CAUTION:

 Cut hazard. To prevent loss of control, 

never use tool without shoe.


CAUTION:

 Risk of personal injury and property 

damage. Ensure the shoe is locked into position before 
using tool.

The adjustable shoe 

 5 

 will adjust to limit the depth of cut. 

Using a M4 (5/32") hex wrench, loosen the adjustable shoe 
screws 

 4 

 (but do not remove) and slide the shoe out to the 

desired depth then retighten screws securely.

OPERATION


WARNING: To reduce the risk of serious personal 
injury, turn unit off and disconnect it from 
power source before making any adjustments or 
removing/installing attachments or accessories.


An accidental start-up can cause injury. 

Proper Hand Position (Fig. D)


WARNING:

 To reduce the risk of serious personal injury, 

ALWAYS

 use proper hand position as shown. 


WARNING:

 To reduce the risk of serious personal injury, 

ALWAYS

 hold securely in anticipation of a sudden 

reaction.

Proper hand position requires one hand on the main 
handle 

 2 

 and one hand on the secondary gripping 

handle 

 3 

. During cutting operations, the blade may 

suddenly bind in the work and may cause the saw to 
kickback towards the operator.

2

3

Fig. D

Cutting (Fig. A, D)


WARNING:

 Cut hazard. Blade breakage may occur 

if the blade does not extend past the shoe and the 
thickness of the workpiece during the cut. Increased 
risk of personal injury, as well as damage to the shoe 
and workpiece may result. 

The blade 

 7 

 should extend past the adjustable shoe 

 5 

 and 

the thickness of the workpiece during the cut. Select the 
blade best suitable for the material to be cut and use the 
shortest blade suitable for the thickness of the material. Do 
not use jigsaw blades with this tool.

nOTE:

 Before cutting any type of material, be sure it is firmly 

anchored or clamped to prevent slipping.
•  Place blade and adjustable shoe 

 5 

 lightly against work 

to be cut.

•  Switch on saw motor and allow it to attain maximum 

speed before applying pressure.

•  Always hold saw firmly with both hands while cutting. 

Whenever possible, the saw shoe must be held firmly 
against the material being cut. This will prevent the 
saw from jumping or vibrating and will minimize 
blade breakage.

Variable Speed Switch (Fig. A) 

The variable speed trigger switch 

 1 

 will give you added 

versatility. The further the trigger is depressed the higher the 
speed of the saw. To turn the tool “OFF” release the trigger. 

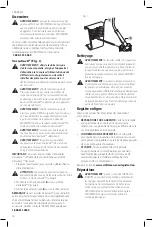
Summary of Contents for CMES300

Page 1: ...ciprocating Saw Scie alternative 7 5A Sierra Alternativa 7 5A CMES300 INSTRUCTIONMANUAL GUIDED UTILISATION MANUALDEINSTRUCTIONES IFYOUHAVEQUESTIONSORCOMMENTS CONTACTUS POURTOUTEQUESTIONOUTOUTCOMMENTAIRE NOUSCONTACTER SITIENEDUDASOCOMENTARIOS CONTÁCTENOS 1 888 331 4569 WWW CRAFTSMAN COM ...

Page 2: ...ns avec des produits de qualité innovants Avec vous nous formons une équipe de bâtisseurs Veuillez prendre un moment pour lire le présent guide pour vous familiariser avec votre nouvel outil Il est important de comprendre les avis et avertissements de sécurité avant d utiliser votre nouvelle acquisition Connaître la bonne façon de la faire fonctionner vous permettra de l utiliser à son plein poten...

Page 3: ... injury Used without word Indicates a safety related message NOTICE Indicates a practice not related to personal injury which if not avoided may result in property damage WARNING Read all safety warnings and all instructions Failure to follow the warnings and instructions may result in electric shock fire and or serious injury WARNING Never modify the product or any part of it Damage or personal i...

Page 4: ...ol or medication A moment of inattention while operating power tools may result in serious personal injury b Use personal protective equipment Always wear eye protection Protective equipment such as dust mask non skid safety shoes hard hat or hearing protection used for appropriate conditions will reduce personal injuries c Prevent unintentional starting Ensure the switch is in the off position be...

Page 5: ...on Hold front of saw by grasping the contoured gripping area Do not insert fingers or thumb into the vicinity of the reciprocating blade and blade clamp Do not stabilize the saw by gripping the shoe Additional Safety Information WARNING ALWAYS use safety glasses Everyday eyeglasses are NOT safety glasses Also use face or dust mask if cutting operation is dusty ALWAYS WEAR CERTIFIED SAFETY EQUIPMEN...

Page 6: ...r minute 2 two phase alternating current 2N two phase alternating current with neutral 3 three phase alternating current 3N three phase alternating current with neutral x rated current of the appropriate fuse link in amperes SAVE THESE INSTRUCTIONS FOR FUTURE USE COMPONENTS FIG A Motor Be sure your power supply agrees with the nameplate marking Voltage decrease of more than 10 will cause loss of p...

Page 7: ...osen the adjustable shoe screws 4 but do not remove and slide the shoe out to the desired depth then retighten screws securely OPERATION WARNING To reduce the risk of serious personal injury turn unit off and disconnect it from power source before making any adjustments or removing installing attachments or accessories An accidental start up can cause injury Proper Hand Position Fig D WARNING Tore...

Page 8: ...tal 3 Avoid forcing cutting blade as this reduces blade life and causes costly blade breakage NOTE You should spread a thin film of oil or other coolant along the line ahead of the saw cut for easier operation and longer blade life For cutting aluminum kerosene is preferred Fig G Pocket Cutting Wood Only Fig H Measure the surface area to be cut and mark clearly with a pencil chalk or scriber Tip t...

Page 9: ... chemicals may weaken the plastic materials used in these parts Use a cloth dampened only with water and mild soap Never let any liquid get inside the tool never immerse any part of the tool into a liquid WARNING When hanging objects on a Versatrack Trackwall rail adequately space the tools in order to not exceed 75 lb 35 kg per linear foot IMPORTANT Versatrack accessories mount compatible tools s...

Page 10: ...abuse For further detail of warranty coverage and warranty repair information visit www craftsman com or call 1 888 331 4569 This warranty does not apply to accessories or damage caused where repairs have been made or attempted by others THIS LIMITED WARRANTY IS GIVEN IN LIEU OF ALL OTHERS INCLUDING THE IMPLIED WARRANTY OF MERCHANTABILITY AND FITNESS FOR A PARTICULAR PURPOSE AND EXCLUDES ALL INCID...

Page 11: ...TENTION indique une situation potentiellement dangereuse qui si elle n est pas évitée pourrait entraîner des blessures légères ou modérées Si utilisé sans aucun terme Indique un message propre à la sécurité AVIS indique une pratique ne posant aucun risque de dommages corporels mais qui par contre si rien n est fait pour l éviter pourrait poser des risques de dommages matériels AVERTISSEMENT lire t...

Page 12: ...t les risques de choc électrique e Pour l utilisation d un outil électrique à l extérieur se servir d une rallonge convenant à cette application L utilisation d une rallonge conçue pour l extérieur réduira les risques de choc électrique f S il est impossible d éviter l utilisation d un outil électrique dans un endroit humide brancher l outil dans une prise ou sur un circuit d alimentation dotés d ...

Page 13: ...ise glissante ne permettent pas la manutention et le contrôle sécuritaires de l outil dans les situations imprévues 5 Réparation a Faire réparer l outil électrique par un réparateur professionnel en n utilisant que des pièces de rechange identiques Cela permettra de maintenir une utilisation sécuritaire de l outil électriques Consignes de sécurité pour les scies alternatives Tenez l outil électriq...

Page 14: ... auditive individuelle adéquate homologuée ANSI S12 6 S3 19 Sous certaines conditions et suivant la durée d utilisation le bruit émanant de ce produit pourrait contribuer à une perte de l acuité auditive Prendre des précautions à proximité des évents car ils cachent des pièces mobiles Vêtements amples bijoux ou cheveux longs risquent de rester coincés dans ces pièces mobiles Pour la sécurité de l ...

Page 15: ...sur son côté sur une surface stable plate avec la languette du collier du serre lame pointant vers le haut 2 Tournez pour ouvrir complètement le collier du serre lame a Si la lame s est brisée à l intérieur du collet de fixation glisser un objet plat dans l ouverture du collet aussi loin que possible puis retirer l objet plat Cette action désengagera la goupille à l intérieur du collet de fixation...

Page 16: ... en position avant d utiliser l outil Le sabot ajustable 5 s ajustera pour limiter la profondeur de la coupe À l aide d une clé hexagonale M4 5 32 po desserrez les vis du sabot ajustable 4 mais sans retirer et glissez le sabot vers l extérieur jusqu à la profondeur désirée puis resserrez les vis de façon sécuritaire l épaisseur du matériau Ne pas utiliser de lames pour scie sauteuse avec cet outil...

Page 17: ...mobile 2 Mettre le moteur en marche et laisser la lame atteindre sa vitesse maximale 3 Saisir la poignée de la scie de manière constante et imprimer un mouvement ascendant lent 4 La lame pénétrera dans le matériau Toujours s assurer que la lame a bien transpercé tout le matériau avant de continuer la coupe en poche REMARQUE dans les endroits où la visibilité de la lame est limitée utiliser le bord...

Page 18: ...ral Versatrack Tà l aide du crochet de suspension Versatrack AVERTISSEMENT assurez vous que le poids de l outil ne dépasse pas le poids nominal maximum pour le crochet Versatrack sélectionné AVERTISSEMENT lorsque vous suspendrez des objets sur le mur Versatrack rail distancez adéquatement les outils de sorte à ne pas excéder 35 kg 75 lb par pied linéaire IMPORTANT Les outils et accessoires compati...

Page 19: ... panne pour cause d abus ou d usure normale de l outil Pour plus de détails au sujet de la couverture de la garantie et l information de réparation sous garantie visitez www craftsman com ou composez le 1 888 331 4569 Cette garantie ne s applique pas aux accessoires ou dommages causés par des réparations effectuées ou tentées par d autres CETTE GARANTIE REMPLACE TOUTES LES AUTRES INCLUANT LES GARA...

Page 20: ...e o lesiones graves ATENCIÓN Indica una situación de peligro potencial que si no se evita posiblemente provocaría lesiones leves o moderadas Utilizado sin palabras indica un mensaje de seguridad relacionado AVISO Se refiere a una práctica no relacionada a lesiones corporales que de no evitarse puede resultar en daños a la propiedad ADVERTENCIA Lea todas las advertencias de seguridad e instruccione...

Page 21: ... aumentan el riesgo de descarga eléctrica e Al operar una herramienta eléctrica en el exterior utilice un cable prolongador adecuado para tal uso Utilice un cable adecuado para uso en exteriores a fin de reducir el riesgo de descarga eléctrica f Si el uso de una herramienta eléctrica en un lugar húmedo es imposible de evitar utilice un suministro protegido con un interruptor de circuito por falla ...

Page 22: ...odría originar una situación peligrosa h Mantenga las manijas y superficies de sujeción secas limpias y libres de aceite y grasa Las manijas y superficies de sujeción resbalosas no permiten el manejo y control seguros de la herramienta en situaciones inesperadas 5 Mantenimiento a Solicite a una persona calificada en reparaciones que realice el mantenimiento de su herramienta eléctrica y que sólo u...

Page 23: ...roductivas Ejemplos de estos químicos son plomo de algunas pinturas en base a plomo polvo de sílice proveniente de ladrillos y cemento y otros productos de albañilería y arsénico y cromo provenientes de madera tratada químicamente Su riesgo de exposición a estos químicos varía dependiendo de la frecuencia con la cual realiza usted este tipo de trabajo Para reducir su exposición a estas sustancias ...

Page 24: ...e al ras 4 Suelte el collar de la abrazadera de la cuchilla y jale suavemente de la cuchilla para asegurarse que la cuchilla esté firmemente sujeta Fig B 6 7 Para Sacar una Cuchilla Fig C ADVERTENCIA Riesgo de quemaduras No toque la hoja de inmediato después de usarla El contacto con la hoja puede ocasionar lesiones personales 1 Gire el collar de abrazadera de la cuchilla abierta 6 a su posición c...

Page 25: ...de la zapata ajustable 4 pero no los extraiga y deslice la zapata hasta la profundidad deseada luego vuelva a apretar los tornillos firmemente Puede aumentar el riesgo de lesiones personales así como daños en la zapata y la pieza de trabajo La cuchilla 7 debe extenderse más allá de la zapata ajustable 5 y el espesor de la pieza de trabajo durante el corte Select the blade best suitable for the mat...

Page 26: ...rial antes de continuar un corte interno NOTA En áreas donde la visibilidad de la cuchilla sea limitada utilice el borde de la zapata pivote como guía Fig H Sugerencias para el Proyecto Corte solamente con las cuchillas afiladas éstas pueden realizar cortes más limpios más rápidos y requieren menos esfuerzo del motor durante el corte Al cortar siempre asegúrese de que la zapata pivote esté contra ...

Page 27: ...ara encontrar cualquier accesorio comuníquese con CRAFTSMAN llame al 1 888 331 4569 Fig I 9 8 Reparaciones ADVERTENCIA Para asegurar la SEGURIDAD y la CONFIABILIDAD del producto las reparaciones el mantenimiento y los ajustes inclusive la inspección y el cambio de las escobillas cuando proceda deben ser realizados en un centro de mantenimiento en la fábrica CRAFTSMAN u en un centro de mantenimient...

Page 28: ...ducto no hubiese sido operado de acuerdo con el instructivo de uso que se acompaña Cuando el producto hubiese sido alterado o reparado por personas distintas a las enlistadas al final de este certificado Anexo encontrará una relación de sucursales de servicio de fábrica centros de servicio autorizados y franquiciados en la República Mexicana donde podrá hacer efectiva su garantía y adquirir partes...

Page 29: ... le den servicio en un centro de servicio autorizado Elinterruptorautomáticoestáactivado Reinicie el interruptor automático Si el producto causa repetidamente que se funda el fusible de circuito descontinúe el uso de inmediato y pida que le den servicio en un centro de servicio autorizado Interruptorocabledañado Pida que un centro de servicio autorizado reemplace el cable o interruptor Cuchilla ro...

Page 30: ......

Page 31: ......

Page 32: ...05 18 Part No N553354 CRAFTSMAN 701 East Joppa Road Towson MD 21286 Copyright 2018 ...

Reviews: