background image

13

English

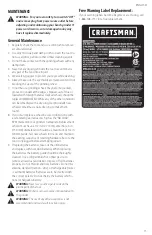
MAINTENANCE

  WARNING:  For your own safety, turn switch "OFF" 

and remove plug from power soure outlet before 
adjusting and maintaining your bench grinder. If 
power cord is worn, cut or damaged in any way, 
have it replaced immediately.

General Maintenance

1.  Regularly check the tool and use a soft brush to remove 

accumulated dust.

2.  Use only mild soap and damp cloth to clean the tool. Do 

not use alcohol, petrol or other similar cleaning agents. 

3.  Do not make contact with the grinding wheels with any 

damp cloth.

4.  Never let any liquid get inside the tool; never immerse 

any part of the tool into a liquid.

5.  Wear safety goggles to protect your eyes while cleaning.
6.  Always make sure the eyeshields are transparent and not 

blocking the view of the grinding wheel.

7.  In normal use, grinding wheels may become cracked, 

grooved, rounded at the edges, chipped, out of true or 
loaded with foreign material. Cracked wheels should be 
replaced IMMEDIATELY. While any of the other conditions 
can be remedied with a dressing tool (included), new 
wheels sometimes require dressing to make them 
round.

8.  If you must replace a wheel be sure to obtain one with 

a safe rated speed at least as high as the “NO LOAD” 
RPM marked on your grinder’s nameplate. Replacement 
wheels must have a 1/2 in. (12.7 mm) center hole, 6 in. 
(150 mm) diameter and should be a maximum of 3/4 in. 
(20 mm) wide. Test new wheels for cracks and maintain 
the existing sequence of retaining hardware. Be sure the 
tool is unplugged before attempting repairs.

9.   If replacing the batteries, take out the old batteries 

and replace with new AAA batteries. When replacing 
the batteries, the battery guide should be thoroughly 
cleaned. Use a soft paintbrush or similar device, to 
remove all sawdust and debris. Dispose off old batteries 
properly. Do not mix old and new batteries. Do not mix 
alkaline, standard (carbon - zinc), or rechargeable (nickel 
- cadmium) batteries. Batteries are to be inserted with 
the correct polarity. Do not charge the battery which is 
not a rechargeable battery.


WARNING: 

Never use caustic agents to clean the 

plastic parts of the tool.

 WARNING: 

Water must never come into contact with 

the grinder.

 WARNING: 

The use of any other accessories is not 

recommended and may result in serious injury.

Free Warning Label Replacement:          


If your warning labels become illegible or are missing, call 
1-888-398-7737 for a free replacement.

Summary of Contents for CMXEGAR500

Page 1: ...Bench Grinder Amoladora de banco de 150 mm 6 pulgadas CMXEGAR500 INSTRUCTIONMANUAL MANUALDEINSTRUCTIONES IFYOUHAVEQUESTIONSORCOMMENTS CONTACTUS SITIENEDUDASOCOMENTARIOS CONTÁCTENOS 1 888 398 7737 WWW CRAFTSMAN COM ...

Page 2: ...English original instructions 1 Español traducido de las instrucciones originales 21 ...

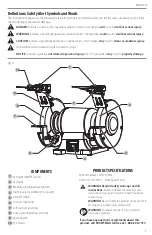
Page 3: ...related to personal injury which if not avoided may result in property damage WARNING Read all safety warnings and all instructions Failure to follow the warnings and instructions may result in electric shock fire and or serious injury WARNING Never modify the product or any part of it Damage or personal injury could result WARNING To reduce the risk of injury read the instruction manual If you ha...

Page 4: ...e when operating a power tool Do not use a power tool while you are tired or under the influence of drugs alcohol or medication A moment of inattention while operating power tools may result in serious personal injury b Use personal protective equipment Always wear eye protection Protective equipment such as dust mask non skid safety shoes hard hat or hearing protection used for appropriate condit...

Page 5: ...eel immediately B Always use the guards and eye shields C Do not overtighten the wheel nut D Use only flanges furnished with this grinder Always inspect grinding wheels prior to use for cracks missing pieces etc Replace wheel immediately before use USE ONLY GRINDING WHEELS that comply with ANSI B7 1 and rated greater than 3450 RPM GUARD AGAINST ELECTRICAL SHOCK by preventing body contact with grou...

Page 6: ...IFY THE PLUG PROVIDED If it will not fit the receptacle have the proper receptacle installed by a qualified electrician ALWAYS EASE THE WORKPIECE AGAINST THE ABRASIVE WHEEL when starting to grind A harsh impact can break the wheel Use light pressure when starting to grind Too much pressure on a cold wheel can cause the wheel to crack USE ONLY FLANGES furnished with this bench grinder IF ANY PART O...

Page 7: ...our extension cords from sharp objects excessive heat and damp or wet areas WARNING This tool is for indoor use only Do not expose to rain or use in damp locations This tool is intended for use on a circuit that has a receptacle like the one illustrated in Fig B Fig B shows a three pronged electrical plug and receptacle that has a grounding conductor If a properly grounded receptacle is not availa...

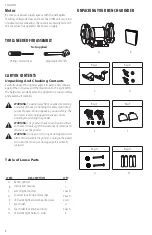
Page 8: ...the power cord into a source of power during unpacking and assembly The cord must remain unplugged whenever you are adjusting assembling the grinder WARNING The grinder is heavy and should be lifted with care If needed get the assistance of someone to lift and move the grinder WARNING If any part is missing or damaged do not attempt to assemble the grinder or plug in the power cord until the missi...

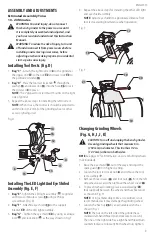
Page 9: ...upport bracket 19 of the LED light assembly 3 Bag G Tighten the eye shield 10 by using a carriage bolt 20 and lock knob 21 as the way shown in Fig F Fig D 4 6 11 12 13 14 15 16 4 Repeat the above steps for installing the other LED light and eye shield assembly NOTE Adjust eye shidlds to appropriate distance from tool rests avoiding interference when operation Changing GrindingWheels Fig G H I J K ...

Page 10: ...a wood wedge 25 not supplied between the wheel and the wheel cover as shown in Fig K 10 Tighten the hex nut 26 by an adjustable wrench NOTE Do not overtighten the nut as this can crack the grinding wheel 11 Replace the wheel cover 24 and screws 22 12 Reinstall and adjust the tool rest to 1 16 in 1 6 mm away from the wheel and tighten securely 13 Adjust the eye shield 10 to a point between your eye...

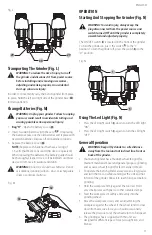
Page 11: ... the plug disconnected from the power source and switch turned OFF until the grinder is completely assembled and adjusted properly The ON OFF switch 5 is located on the front of the grinder To turn the grinder on press the switch 5 to the I position To turn the grinder off press the switch 5 to the O position UsingThe Led Light Fig N 1 Press the LED light switch 1 down to turn the LED light ON 2 P...

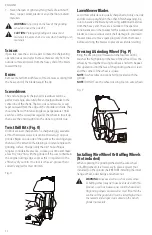
Page 12: ...ure to maintain the original cutting edge angle as this is important to the efficiency of your bits One tool rest has a V groove that is correctly angled for most drill bits Lawn Mower Blades Lawn mower blades are usually sharpened on only one side and dressed up slightly on the other After sharpening be sure to balance the blade by removing additional material from the heavy end There are a numbe...

Page 13: ...nd 8 If you must replace a wheel be sure to obtain one with a safe rated speed at least as high as the NO LOAD RPM marked on your grinder s nameplate Replacement wheels must have a 1 2 in 12 7 mm center hole 6 in 150 mm diameter and should be a maximum of 3 4 in 20 mm wide Test new wheels for cracks and maintain the existing sequence of retaining hardware Be sure the tool is unplugged before attem...

Page 14: ... a certified and licensed technician and not by the buyer The buyer assumes all risk and liability including injuries to persons and damage to property associated with and arising out of any attempt of the buyer at repairs or replacement of parts to the product PROBLEM PROBLEM CAUSE SUGGESTED CORRECTIVE ACTION Motor will not run 1 Not plugged into power outlet 2 Switch is not in ON position 3 Moto...

Page 15: ... 1 888 398 7737 This warranty does not apply to accessories or damage caused where repairs have been made or attempted by others THIS LIMITED WARRANTY IS GIVEN IN LIEU OF ALL OTHERS INCLUDING THE IMPLIED WARRANTY OF MERCHANTABILITY AND FITNESS FOR A PARTICULAR PURPOSE AND EXCLUDES ALL INCIDENTAL OR CONSEQUENTIAL DAMAGES Some states do not allow limitations on how long an implied warranty lasts or ...

Page 16: ...IP 1 X712 ROTOR 1 X713 BALL BEARING 2 X714 CORD BUSHING 1 X715 PHILIPS SCREW WITH SPRING WASHER FLAT WASHER M4 8 2 X716 TOOTHED WASHER 1 X718 WAVY WASHER 1 X71A PHILIPS SCREW AND FLAT WASHER M4 118 2 X71C FLAT WASHER 2 X71D HEX NUT 6 X71F LEFT TOOL REST 1 X71G PHILIPS SCREW AND SPRING WASHER M5 10 4 X71H GRINDING WHEEL 36 1 X71J FLANGE 4 X71K HEX NUT 1 X71M PHILIPS SCREW M5 42 6 X71N EYESHIELD BRA...

Page 17: ...715 X714 X713 X712 X70S X70R X70Q X70P X715 X70N X70M 2 X70L 4 X710 X711 X713 X70Z X71C X70Y X71D 3 X70X 2 X71G 2 X71J X71J X70W X70V X70U 3 X71M 3 X71S X71R X71P 2 X71N X70K X70J 2 X70H X70F X70G X70G X70E 2 2 2 X84E X84S X84N X84M X84J X84R X84H X84H X84Q X84P X84L X84P X84S X84D X84D X84K X84E C Hardware bag D Hardware bag E Hardware bag F Hardware bag G Hardware bag H Hardware bag X84N ...

Page 18: ...English 18 NOTES ...

Page 19: ...19 English NOTES ...

Page 20: ...English 20 NOTES ...

Reviews: