background image

5

SAFETY INSTRUCTIONS

5. 

Never douse or hose the tractor with water. Avoid getting any liquid in the 

motors and electrical connections. Clean the tractor after each use. Refer to  

cleaning and storage. Do not use solvents or strong detergents.

6. 

To reduce fire hazard, keep the motor(s) free of grass, leaves and debris 

build-up.

7. 

Periodically check to make sure the blade(s) come(s) to complete stop within 

(5) five seconds after operating the blade on/off button. If the blade(s) do not 

stop within the this time frame, your tractor should be serviced professionally 

by an authorized service dealer.

8. 

Check brake operation frequently as it is subjected to wear during normal 

operation. Adjust and service as required.

9. 

Check the blade(s) and mounting bolts at frequent intervals for proper 

tightness. Also, visually inspect blade(s) for damage (e.g., excessive 

wear, bent, cracked).   Replace the blade(s) with the original equipment 

manufacturer’s (O.E.M.) blade(s) only. “Use of parts which do not meet the 

original equipment specifications may lead to improper performance and 

compromise safety!” 

10.  Tractor blade(s) are sharp. Wrap the blade or wear gloves, and use extra 

caution when servicing them.

11.  Keep all nuts, bolts, and screws tight to be sure the equipment is in safe 

working condition. 

12.  Never tamper with the safety interlock system or other safety devices. Check 

their proper operation regularly.

13. 

After striking a foreign object, stop the tractor, remove the key and thoroughly 

inspect the tractor for any damage. Repair the damage before operating the 

tractor.

14.  Never attempt to make adjustments or repairs to the tractor while the power 

key is ON.

15.  Grass catcher components and the discharge cover are subject to wear and 

damage which could expose moving parts or allow objects to be thrown. For 

safety protection, frequently check components and replace immediately 

with original equipment manufacturer’s (O.E.M.) parts only. “Use of parts 

which do not meet the original equipment specifications may lead to 

improper performance and compromise safety!”

16.  Maintain or replace safety and instruction labels, as necessary. 
17.  This product has an 

Average Useful Life

 of seven (7) years, or 270 hours of 

operation. At the end of the 

Average Useful Life

 have the tractor inspected 

annually by an authorized service dealer to ensure that all mechanical and 

safety systems are working properly and not worn excessively. Failure to do 

so can result in accidents, injuries or death.

18.  Do not dispose of the battery(ies) in a fire.  The cell may explode.  Check with 

local codes for proper disposal instructions.

19. 

Do not touch the motor(s). These parts can get hot from operation, even after the 

tractor is turned off.

20.  Exercise care in handling batteries in order not to short the battery with 

conductive materials such as rings, bracelets, and keys.  The battery or 

conductor may be hot and cause burns.

21.  For continued protection against risk of injury or electric shock, do not 

replace blown fuses. Please call authorized service personnel.

General Electric Safety

1. 

Do not expose the tractor to rain or wet conditions.

2. 

Do not handle the tractor with wet hands.

3. 

Do not operate the tractor in the rain, in wet conditions or on wet surfaces.

4. 

To reduce the risk of electric shock, avoid body contact with grounded 

conductors, such as metal pipes or wire fences.

5. 

Do not operate the tractor in explosive atmospheres, such as in the presence 

of flammable liquids, gases or dust.

Battery Charger Safety

  WARNING

Only use a Delta-Q  battery charger (model # IC650-048-CAN/part # 

950-0004 or model # IC650-048-COMMD/part # 950-0007) (OEM part# 725-

07253 or part# 725-07253A) to charge batteries. DO NOT attempt to charge 

any other batteries with a Delta-Q battery charger. Other types of batteries 

may burst, causing fire, personal injury or property damage.

1. 

A nameplate on the charger indicates the voltage used. Never connect the charger to 

an AC voltage that differs from this voltage.

2. 

An extension cord should not be used unless absolutely necessary. Use of 

an improper extension cord could result in a risk of fire, electric shock or 

electrocution.

3. 

Do not use multiple extension cords

4. 

Make sure the extension cord is heavy enough to carry the current drawn by 

the charger. An undersized extension cord will cause a drop in line voltage, 

resulting in a loss of power and overheating. If in doubt, use the next heavier 

gauge cord. The smaller the gauge number, the heavier the cord.

MINIMUM WIRE SIZE FOR EXTENSION CORDS FOR 120 VOLT APPLIANCES USING 0-6 

AMPS

Cord Length (ft.)

25

50

100

150

Wire Size (AWG)

16

16

16

14

5. 

Make sure the cords are in good condition. Inspect the power cord and extension 

cord periodically. Look closely for deterioration, cuts or cracks in the insulation. If a 

cord is damaged in any manner while plugged in, disconnect the cord from both 

the outlet and the charger. Do not use a damaged cord. Damaged cords should be 

repaired or replaced.

6. 

Do not abuse cords. Never pull or carry the charger by a cord. Keep cords 

away from heat, oil, water, sharp edges, and moving objects. Always grasp 

the plug when disconnecting a cord.

7. 

Never modify a plug, cord or outlet in any way.

8. 

Ground Fault Circuit Interrupter (GFCI) protection should be provided on the 

circuit(s) or outlet(s) to be used with this charger. For an extra measure of safety, use 

receptacles with built-in GFCI protection.

9. 

Do not place the battery charger where cords might be stepped on, tripped 

over or subjected to damage.

10.  Do not charge batteries in the rain or in wet conditions. Keep the battery 

charger in a cool and dry area.

11.  Keep the battery charger away from all liquids.
12. 

Do not allow small metal items or material such as steel wool, aluminum foil or 

other foreign particles into the charger port.

13.  Do not probe the charger with conductive material. There is a risk of electric 

shock.

14.  Do not cover the battery charger. The battery charger may overheat.
15.  Do not allow the battery or battery charger to overheat. If they are warm, 

allow them to cool down. Only charge batteries in temperatures between 

32° and 104° F (0° and 40° C).

16.  Always unplug the battery charger when it is not in use.

Battery Safety

1. 

Do not expose the battery to fire or to temperatures over 176º F (80º C). 

Doing so could cause an explosion.

Summary of Contents for CMXGRAM1130049

Page 1: ...TS CONTACTUS SITIENEDUDASOCOMENTARIOS CONTÁCTENOS 1 888 331 4569 WWW CRAFTSMAN COM Form No 769 18972 November 26 2018 Battery Powered Lithium Ion Tractor Montable alimentado por batería de ión de litio ModelName Number Description CMXGRAM1130049 33AA27JD793LawnTractor ...

Page 2: ...mber and date of purchase above Safe Operation Practices Page 3 Assembly Page 9 Operation Page 13 Service Maintenance Page 17 Off Season Storage Page 18 Troubleshooting Page 22 Español Page 24 Warranty Statement Separate Supplement WARNING Beforeusingthisequipment readthemanualandfollowallsafetyrulesandoperatinginstructions NOTE ThisOperator sManualcoversseveralmodels Featuresmayvarybymodel Notall...

Page 3: ...ot intendedforuseonanypublicroadway 17 Do not operate the tractor while under the influence of alcohol or drugs 18 Mow only in daylight or good artificial light 19 Never carry passengers 20 Donotturnthekeyoffandcoastdownhill 21 Donottowthistractor 22 Turn off blade s before traveling in reverse Back up slowly Always look down and behind before and while backing to avoid a back over accident 23 Slo...

Page 4: ...ng your foot on the ground 5 Donotuseagrasscatcheronsteepslopes 6 Do not mow or drive on wet grass Reduced traction could cause sliding 7 Do not press the Start Stop button and coast downhill Over speeding may cause the operator to lose control of the tractor resulting in serious injury or death 8 Do not tow heavy pull behind attachments e g loaded dump cart lawn roller etc on slopes greater than ...

Page 5: ...sonnel General Electric Safety 1 Do not expose the tractor to rain or wet conditions 2 Do not handle the tractor with wet hands 3 Do not operate the tractor in the rain in wet conditions or on wet surfaces 4 Toreducetheriskofelectricshock avoidbodycontactwithgrounded conductors suchasmetalpipesorwirefences 5 Do not operate the tractor in explosive atmospheres such as in the presence of flammable l...

Page 6: ...ts on your clothing or shoes remove isolate and wash the contaminated clothing thoroughly FCC Statement Bluetooth Models only CAUTION Changes or modifications not expressly approved by the party responsible for compliance could void the user s authority to operate the equipment NOTE This equipment has been tested and found to comply with the limits for a Class B digital device pursuant to part 15 ...

Page 7: ...e cutting deck Contact with the blade s can amputate hands and feet Be sure blade s and power are off before placing hands or feet near blade s Always remove the power key when not in use WARNING SLOPE OPERATION Go up and down slopes not across Use extra caution on slopes Do not mow or drive on lopes greater than 12 21 If tractor stops going uphill stop blade s back down slowly WARNING ELECTRIC SH...

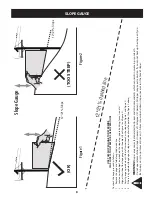
Page 8: ...s the slope See Figure 1 and Figure 2 5 If there is a gap below the gauge the slope is too steep for safe operation See Figure 2 above 1 2 2 1 d a s h e d l i n e Slope Gauge Figure 2 Figure 1 12 21 Slope 12 21 Slope WARNING Slopes are a major factor related to tip over and roll over accidents which can result in severe injury or death Do not operate machine on slopes in excess of 12 degrees 21 pe...

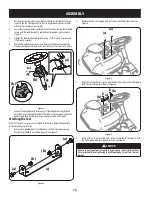
Page 9: ...llation remove all the contents from the crate and all the hardware from the pack to make sure everything is present Hardware is listed below Hitch Plate Seat Mounting Bracket w two shoulder bolts lock nuts installed Recommended Tools for Assembly 3 8 wrench and or socket 7 16 wrench and or socket 1 2 wrench and or socket 9 16 wrench and or socket Phillips screw driver 1 4 or 3 8 drive ratchet Man...

Page 10: ... to the right to clip into place Secure the pedestal cap b with the screw c previously removed See Figure 3 Attaching the Seat If the seat for your tractor was not attached at the factory follow the applicable instructions below to attach it 1 Remove the shoulder bolts a and lock nuts b from the seat mounting bracket c included in your hardware pack See Figure 4 c a b a b Figure 4 2 Remove the two...

Page 11: ...kchute SeeFigure8 Important Make certain that the upper rear portion of deck chute b is depressing the safety switch e located on the deck surface and under the tab f on the rear deck bracket g The blade s will not start without the deck chute b properly in place 10 Secure the deck chute b by tightening the wing knobs a removed in step 1 See Figure 8 Installing the Mulch Plug If equipped WARNING N...

Page 12: ...re 11 2 Insert the charging cord b into the charge port c Plug charger cord b into wall outlet See Figure 11 Note It will take approximately 4 hours to fully charge the batteries Note The Vehicle Control Module VCM LED s will blink continuously when charging and the LCD display will display percentage of charge The battery is completely charged when all green lights are illuminated and the LCD dis...

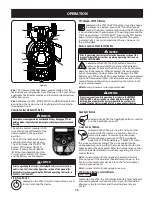
Page 13: ...cruise control is activated The cruise control can be disengaged by pressing either the cruise control button the brake pedal or the drive pedal Refer to the Operation section of this manual for detailed instructions regarding the cruise control feature Note Cruise control will not engage at the tractor s fastest ground speed If the operator should attempt to do so the tractor will automatically d...

Page 14: ...ctor s right fender the deck lift lever is used to change the height of the cutting deck 5 positions To use move the lever to the left then place in the notch best suited for your application The lowest position is 1 and the highest position is 5 Position 1 is approximately a 1 cutting height Position 5 is approximately a 4 cutting height and the change in height is approximately 3 4 between each ...

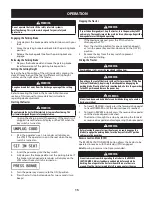
Page 15: ...t stop button down for two seconds two beeps Stopping the Tractor WARNING Ifyoustrikeaforeignobject stopthetractor turnthepowerkeytoOFF andremove Thoroughlyinspectthemachineforanydamage Repairthe damagebeforerestartingandoperating 1 If the blade is engaged press the PTO button to disengage the PTO 2 Press the start stop button for one second one beep or turn the power key counter clockwise to the ...

Page 16: ... light under the PTO button is illuminated Mulching If equipped Mulching is a process of recirculating grass clippings repeatedly beneath the cutting deck The ultra fine clippings are then forced back into the lawn where they act as a natural fertilizer Refer to the Assembly Set up section of this manual for instructions on how to install the mulch kit if equipped Using the Deck Lift Lever To rais...

Page 17: ...r deck should be cleaned after each use as grass clippings leaves dirt and other debris will accumulate This accumulation of grass clippings etc is undesirable as it will promote rust and corrosion 1 Remove any buildup of grass and leaves on or around the motor DO NOT USE WATER Wipe the tractor clean with a dry cloth 2 If debris is allowed to build up on the underside of the machine tilt the tract...

Page 18: ...re functioning properly Maintenance WARNING Beforeperforminganymaintenanceorrepairs disengageblade s PTO set parkingbrake turnkeyswitchtoOFFpositionandremovepowerkeyto preventunintendedstarting Lubrication Pivot Points Linkage Lubricate all the pivot points on the drive system parking brake and lift linkage at least once a season with light oil Rear Wheels The rear wheels should be removed from th...

Page 19: ... from the power source d Plug the charger back into the power source e Plug the charger back into the tractor f It the problem persists contact qualified service personnel Battery Charging Tips Use only the battery charger provided with this tractor The batteries should be fully charged before the initial use Never charge a frozen battery It is recommended that the tractor be charged once every mo...

Page 20: ...ower the front of the deck Tires RefertotheAssembly Set Upsectionformoreinformationregardingtirepressure Service Cutting Deck Removal To remove the cutting deck proceed as follows 1 Remove power key and engage the parking brake 2 Lower the deck by moving the deck lift lever into the lowest 1 position on the right fender 3 Remove the bow tie cotter pin a and flat washer b from the deck lift assembl...

Page 21: ... be sure that the connections are secure Blade s WARNING Shutthetractoroff engageparkingbrakeandremovepowerkeybefore removingthecuttingblade s forsharpeningorreplacement Protect yourhandsbyusingheavygloveswhengraspingtheblade WARNING Periodicallyinspecttheblade s and orspindleforcracksordamage especiallyafter you vestruckaforeignobject Donotoperatethemachine until damagedcomponentsarereplaced CAUT...

Page 22: ...it Do not dispose of the battery in the regular household trash Do not dispose of the battery in a fire The cell may explode Do not dispose of the battery where it will become part of any waste landfill or municipal solid waste stream Cover the battery terminals with heavy duty adhesive tape Dispose of the battery according to local state and federal regulations Dispose of the battery promptly Abo...

Page 23: ...deck as instructed in the Post Operation Tractor Care section and restart the tractor Raise the deck and or cut at a slower pace If problem persists contact qualified service personnel Drive Motor Over Current Fault The deck and drive shut off Power off let the tractor cool and restart tractor If problem persists contact qualified service personnel Drive Motor Control Fault The deck and drive shut...

Page 24: ...ADVERTENCIA Antesdeusaresteequipo leaelmanualysigatodaslasmedidasdeseguridadeinstruccionesdefuncionamiento NOTA Estemanualdeloperadorcubrevariosmodelos Lascaracterísticaspuedenvariarsegúnelmodelo Notodaslasfuncionesdeestemanualsonaplicablesatodoslos modelosyelmodeloquesemuestrapuedediferirdelsuyo Prácticas operación seguras Página 25 Montaje Página 31 Funcionamiento Página 35 Servicio y Mantenimie...

Page 25: ...chilla s puede amputar manos y pies 14 Una cubierta de descarga faltante o dañada puede provocar lesiones por contacto con la cuchilla o por objetos arrojados 15 Detenga la s cuchilla s cuando cruce caminos de gravilla senderos o caminos y cuando no esté cortando el césped 16 Vigile el tránsito vehicular cuando esté operando cerca de caminos o en cruces Este montable no está diseñado para ser usad...

Page 26: ... freno de mano 3 No corte el césped ni conduzca cerca de barrancos zanjas o terraplenes El montable puede volcarse repentinamente si una de las ruedas pasa el borde de un acantilado o zanja o si se desmorona un borde 4 No intente estabilizar el montable poniendo el pie en el suelo 5 No utilice colector de césped en pendientes empinadas 6 No corte el césped ni conduzca sobre césped húmedo La falta ...

Page 27: ...sivo desgaste Si no lo hace puede ocasionar accidentes lesiones o la muerte 18 No arroje las baterías al fuego El elemento de la batería puede explotar Consulte los códigos locales para obtener instrucciones sobre la eliminación adecuada 19 No toque los motores Estas partes se ponen calientes por el funcionamiento incluso después de que se apaga el montable 20 Tenga cuidado al manejar las baterías...

Page 28: ...les para materiales peligrosos Si la fuga entra en contacto con su piel o sus ojos realice los siguientes pasos Lave inmediatamente el área con jabón y agua Lávese los ojos inmediatamente con agua limpia como mínimo durante 20 minutos y procure atención médica inmediata Si la fuga entra en contacto con su vestimenta o calzado quítese los mismos aísle y lave la vestimenta contaminada a fondo ADVERT...

Page 29: ...ibayhaciaabajo no demaneratransversalTengamásprecauciónenlas pendientes Nocorteelcéspedenpendientesque superenlos12 21 Sielmontableseparamientras subelapendiente parelascuchillasyretroceda lentamenteparaabajo Símbolo Descripción ADVERTENCIA DESCARGA ELÉCTRICA No cargue el montable bajo la lluvia o en lugares húmedos No utilice el montable a baterías en la lluvia ADVERTENCIA DESCARGA ELÉCTRICA No c...

Page 30: ...ultar Figura 1 and Figura 2 5 Si hay un espacio por debajo de la pendiente de calibre el pendiente es demasiado escarpa por operación segura consultar Figura 2 above 1 2 2 1 l í n e a d i s c o n t i n u a Pendiente de Calibre Figura 2 Figura 1 12 21 Pendiente 12 21 Pendiente PENDIENTE DE CALIBRE 30 ADVERTENCIA L as pendientes son un factor importante relacionado con accidentes por tumbos y vuelco...

Page 31: ... del paquete para comprobar que no falte nada Los elementos de ferretería se detallan a continuación Placa de enganche Soporte de montaje del asiento con dos pernos con reborde y tuercas de sujeción instalados Herramientas recomendadas para el montaje Llave de 3 8 in y o de cubo Llave de 7 16 in y o de cubo Llave de 1 2 in y o de cubo Llave de 9 16 in y o de cubo Destornillador Phillips Llave de t...

Page 32: ...a las instrucciones correspondientes que se incluyen a continuación para instalarlo 1 Extraiga los pernos con reborde a y las tuercas de seguridad b del soporte de montaje del asiento c incluidos en el paquete de elementos de ferretería Consulte la Figura 4 c a b a b Figura 4 2 Extraiga los dos pernos autorroscantes a instalados en fábrica en el montable Consulte la Figura 5 a a Figura 5 3 Alinee ...

Page 33: ...ma b esté oprimiendo el interruptor de seguridad e ubicado en la superficie de la plataforma y debajo de la lengüeta f del soporte de la parte trasera de la plataforma g Las cuchillas no se accionarán si el canal de la plataforma no está b correctamente ubicado 3 Sujete el canal de la plataforma b ajustando las perillas de aleta a que extrajo en el Paso 1 Consulte la Figura 8 Instalación del adapt...

Page 34: ...ribuidor autorizado de servicio 1 Levante la puerta del puerto de carga a que se encuentra en el panel posterior del cuerpo de la podadora Ver Figura 11 c a b Figura 11 2 Inserte el cable de carga b en el puerto de carga c Enchufe el cable del cargador b en el tomacorriente de la pared Ver la Figura 2 11 Nota tomará aproximadamente 4 horas cargar completamente las baterías Nota Los LED del Módulo ...

Page 35: ...tro de energía a la plataforma de corte El indicador verde no se ilumina cuando no hay suministro de energía hacia la plataforma de corte Botón del modo de precaución marcha atrás RCM PRECAUCIÓN Antes de utilizar el montable consulte la sección Funcionamiento de este manual para obtener instrucciones detalladas relacionadas con el uso del montable en el MODO DE PRECAUCIÓN MARCHA ATRÁS Situado en e...

Page 36: ...va la palanca hacia la izquierda luego colóquela en la muesca que mejor se adapte a la aplicación deseada La posición más baja es 1 y la posición más alta es la posición 5 La posición 1 tiene una altura de corte de aproximadamente 1 in 2 5 cm la posición 5 tiene una altura de corte de aproximadamente 4 in 10 cm y el cambio de altura es de aproximadamente 3 4 entre cada posición Faro delantero H El...

Page 37: ... dos pitidos Detención del montable ADVERTENCIA Si golpea un objeto extraño detenga el montable gire la llave de encendido a la posición APAGADO y quiítela Inspeccione minuciosamente la máquina para ver si está dañada Repare el daño antes de volver a arrancar y hacer funcionar 1 Si las cuchillas están conectadas pulse el botón de la PTO para desconectar la PTO 2 Presione el botón de encendido dete...

Page 38: ...ión está incluida El abono es un proceso por el cual se recirculan los recortes de césped de manera repetida debajo de la plataforma de corte Los recortes muy finos luego son despedidos de vuelta para que se depositen en el césped donde actúan como fertilizante natural Consulte la sección Configuración y Montaje de este manual para ver instrucciones sobre cómo se instala el kit de abono si es part...

Page 39: ...s graves o pueden producirse daños en el montable Limpieza de la parte inferior de la plataforma ADVERTENCIA Paraevitarlesionesgraves nouseaguaparalimpiarelmontable lasbaterías oelcargadordebaterías Noutilicedetergentesfuertes Losproductosde limpiezaparaelhogarquecontienenaceitesaromáticoscomopinoylimón y losdisolventescomoelqueroseno puedendañarelplástico Debelimpiarlaparteinferiordelaplataformad...

Page 40: ...ADO y retire la llave para evitar encendidos accidentales Lubricación Puntos de pivote y varillaje Lubrique todos los puntos de pivote del sistema de transmisión el freno de mano y el varillaje de elevación al menos una vez por temporada con aceite ligero Ruedas traseras Las ruedas traseras se deben retirar de los ejes una vez por temporada Lubrique bien los ejes y las llantas con una grasa multiu...

Page 41: ...llave de encendido b Desconecte el cargador del jinete c Desenchufe el cargador de la fuente de alimentación d Vuelva a conectar el cargador a la fuente de alimentación e Enchufe el cargador de nuevo en el jinete f Si el problema persiste póngase en contacto con el personal de servicio calificado Consejos para la carga de las baterías Use solo el cargador de batería provisto con este rider Las bat...

Page 42: ...sección Montaje y configuración para obtener más información sobre la presión de los neumáticos Servicio Extracción de la plataforma de corte Para extraer la plataforma de corte proceda de la siguiente manera 1 Extraiga la llave de encendido y accione el freno de mano 2 Baje la plataforma colocando la palanca de elevación de la plataforma hasta la posición más baja N º 1 en el guardabarros derecho...

Page 43: ...ebeasegurarsedeque lasconexionesseanseguras Empujehaciaarribaenlosmanguitosubicados alrededordelosconectoresygírelosenelsentidodelasagujasdelrelojhasta quesientaquelaposicióndedetenciónindiqueunaconexiónsegura Cuchillas ADVERTENCIA Apague el motor accione el freno de mano y extraiga la llave antes de retirar las cuchillas de corte para afilarlas o reemplazarlas Proteja sus manos utilizando guantes...

Page 44: ...ine la batería en un lugar donde pase a ser parte de algún relleno sanitario o de los desechos sólidos municipales Cubra los bornes de la batería con cinta adhesiva reforzada Deseche la batería de acuerdo con las regulaciones federales estatales y locales Elimine la batería sin demora Acerca de los sellos de batería Call2Recycle El programa de auxiliares de la industria Call2Recycle ayuda a los fa...

Page 45: ...l montable Levante la plataforma y o corte a un ritmo más lento Si el problema persiste póngase en contacto con el personal de servicio autorizado Falladesobrecargadecorrientedelmotordetransmisión Laplataformayla transmisiónseapagaron Apagueelmontable dejequeseenfríeyvuelvaaencender elmontable Sielproblemapersiste póngaseencontactoconelpersonaldeservicio autorizado Falla del control del motor de t...

Page 46: ...NOTES 46 ...

Page 47: ...NOTES 47 ...

Page 48: ...or MTDLLC P O BOX361131CLEVELAND OHIO44136 0019 CRAFTSMAN isaregisteredtrademarkofStanleyBlack Decker Inc usedunderlicense CRAFTSMAN esunamarcaregistradadeStanleyBlack Decker Inc utilizadabajolicencia 2018CRAFTSMANU S CanadaOnly CRAFTSMAN com ...

Reviews: