background image

4

or replaced by a

Sears Service

Centre

These include head parts

that are cracked, or chipped,
guards, and any other part that is
damaged.

S

Do not repair unit yourself.

S

Use only 0.065 in. (1.65 mm) diam-
eter recommended trimmer line (see

SERVICE AND ADJUSTMENTS

). Nev-

er use wire, rope, string, etc.

S

Use specified trimmer spool. Make
sure spool is properly installed and
all parts are securely fastened.

S

Use only

Craftsman

replacement

parts and accessories as recom-
mended.

CUTTING SAFETY

S

Inspect area to be cut. Remove ob-
jects (rocks, broken glass, nails,
wire, string, etc.) which can be
thrown or become entangled in cut-
ting head.

S

Do not overreach or stand on unsta-
ble support. Keep firm footing and
balance.

S

Keep the cutting head below waist
level. Do not raise handles above
your waist. Cutting head can come
dangerously close to your body.

S

Keep away from cutting head and
spinning line.

S

Use unit properly. Use only for trim-
ming, scalping, and mowing. Do
not force unit. It will do the job better
and with less risk of injury at the rate
for which it was designed.

S

Use only in daylight or in good artifi-
cial light.

MAINTENANCE SAFETY

WARNING:

Disconnect unit from

the power supply before performing
maintenance, or when changing trim-
mer line.

S

Maintain unit according to recom-
mended procedures. Keep cutting
line at proper length. Follow instruc-
tions for changing trimmer line.

S

Have all service and maintenance
not explained in this manual per-
formed by a

Sears Service Centre

to

avoid creating a hazard.

S

Never douse or squirt the unit with
water or any other liquid. Clean unit
and labels with a damp sponge.
Keep handles dry, clean, and free
from oil and grease.

S

Keep the air vents clean and free of
debris to avoid overheating the mo-
tor. Clean after each use.

TRANSPORTING AND STORAGE

S

Stop the unit and disconnect the
power source when not in use.

S

Carry the unit with motor stopped.

S

Store the unit so the line limiter
blade (on underside of shield) can-
not cause injury.

S

Store unit indoors in a high, dry
place out of the reach of children.
Store unit unplugged.

S

Do not hang unit so that the trigger
switch is depressed.

DOUBLE INSULATION
CONSTRUCTION
This unit is double insulated to help
protect against electric shock. Double
insulation construction consists of two
separate “layers” of electrical insula-
tion instead of grounding.
Tools built with this insulation system
are not intended to be grounded. No
grounding means is provided on this
unit, nor should a means of grounding
be added to this unit. As a result, the
extension cord used with your unit can
be plugged into any standard 120 volt
electrical outlet.
Safety precautions must be observed
when operating any electrical tool.
The double insulation system only
provides added protection against in-
jury resulting from an internal electrical
insulation failure.

WARNING:

All electrical repairs

to this unit, including housing, switch,
motor, etc., must be diagnosed and
repaired by qualified service person-
nel. Replacement parts for a double
insulated appliance must be recom-
mended by the manufacturer. A
double insulated appliance is marked
with the words “double insulation” or
“double insulated”. The symbol
(square within a square)

may also

be marked on the appliance. Failure
to have the unit repaired by qualified
service personnel can cause the
double insulation construction to be-
come ineffective and result in serious
injury.

SAVE THESE INSTRUCTIONS

Summary of Contents for ELECTRIC WEEDWACKER C944.512200

Page 1: ...n Line WARNING Read and follow all Safety Rules and Operating Instructions before first use of this product For answers to your questions about this product Call 7 am 7 pm Mon Sat Sun 10 am 7 pm 1 800 235 5878 Instruction Manual Hours listed are Central Time S S S S Safety S S S S Assembly S S S S Operation S S S S Maintenance S S S S Français ...

Page 2: ...ars Canada Inc Toronto Ontario M5B 2B8 SAFETY RULES WARNING When using electric gardening appliances basic safety precautions must always be followed to reduce the risk of fire electric shock and serious injury Read and follow all instructions SAFETY INFORMATION ON THE UNIT This power unit can be dangerous Operator is responsible for following the warnings and instructions in this manual and on th...

Page 3: ... fit into the polarized wall outlet only one way If plug does not fit fully into the wall outlet reverse the plug If it still does not fit contact a qualified electrician to install the proper wall outlet Do not change the equipment plug extension cord receptacle or extension cord plug in any way S To reduce risk of electrical shock use extension cords specifically marked as suitable for outdoor a...

Page 4: ...onge Keep handles dry clean and free from oil and grease S Keep the air vents clean and free of debris to avoid overheating the mo tor Clean after each use TRANSPORTING AND STORAGE S Stop the unit and disconnect the power source when not in use S Carry the unit with motor stopped S Store the unit so the line limiter blade on underside of shield can not cause injury S Store unit indoors in a high d...

Page 5: ...ndle Tube Trigger Housing ATTACHING THE SHIELD WARNING The shield must be properly installed The shield provides partial protection from the risk of thrown objects to the operator and others Your unit is equipped with a line limiter blade which cuts excess line to the proper length while running The line limiter blade on underside of shield is sharp and can cut you NOTE If shield is not properly i...

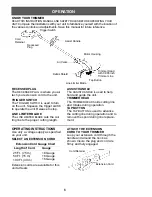
Page 6: ...stop LINE LIMITER BLADE The LINE LIMITER BLADE cuts the cut ting line to the proper cutting length ASSIST HANDLE The ASSIST HANDLE is used to help hold and guide the unit TRIMMER HEAD The TRIMMER HEAD holds cutting line and rotates during operation TAP BUTTON The TAP BUTTON is used to advance the cutting line during operation and to remove the spool during line replace ment OPERATING INSTRUCTIONS ...

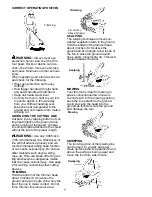
Page 7: ...ause serious injury Do not use other materials such as wire string rope etc Wire can break off during cut ting and become a dangerous missile that can cause serious injury See page 2 for warning concerning other cutting devices TRIMMING Hold the bottom of the trimmer head about 3 inches 8 cm above the ground and at an angle Allow only the tip of the line to make contact Do not force trimmer line i...

Page 8: ...CT AND CLEAN UNIT AND LA BELS S After each use inspect complete unit for loose or damaged parts Clean the unit using a damp cloth with a mild detergent S Wipe off unit with a clean dry cloth SERVICE AND ADJUSTMENTS REPLACING THE LINE 1 Remove the spool by firmly pulling on the tap button 2 Clean entire surface of hub and spool 3 Replace with a pre wound spool C944 510210 or cut a length of 30 feet...

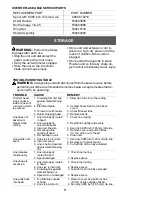
Page 9: ...line out of head 5 Clean unit Line welds onto spool 1 Use only 0 065 inch 1 65 mm dia line 2 Replace with correct spool 3 Cut with tip of line fully extended Line releases continuously 1 Check line routing 2 Replace spool Line pulls back into head 1 Too little line outside of head 2 Line size incorrect 1 Remove cover and pull 4 inches 10 cm of line outside of head 2 Use only 0 065 inch 1 65 mm dia...

Reviews: