

1. Slide cover past the normal “up stop”
position.
2. Unscrew the two screws and remove the
battery cover.
3. Replace the batteries. Screw the battery
cover back on.
4. Slide entry cover back into place.
To prevent possible SERIOUS INJURY or DEATH:
• NEVER allow small children near batteries.
• If battery is swallowed, immediately notify doctor.
WARNING
CAUTION
WARNING
WARNING
THE BATTERY
The batteries should produce power for at least
one year. Replace when the Fail LED flashes
during use.
The unit requires 4 AAA batteries.
Dispose of old batteries properly.
FOR SERVICE DIAL OUR TOLL FREE NUMBER:
1-800-4-MY-HOME
®
(1-800-469-4663)
ENROLL
FAIL
RETRY
SEND
PASS
READY
ENROLL
Scre
w
s
Co
v
er
Battery
Co
v
er
Replacement parts:
Unit cover . . . . . . . . . . . . . . . . . . . . . . . . . . . . . . . . . . . . . . . .41A579
NOTE:
The unit requires at least 3 good
swipes to enroll a user.
1. Ensure that Enroll LED and Ready LED are
lit and not flashing.
2. Swipe fingerprint down the sensor strip. The
Pass LED will light briefly if a good swipe
was achieved. If Retry LED lights followed
by Ready LED, continue swiping until Pass
LED is lit.
3. When enroll process is complete, the Enroll
LED and Pass LED will flash.
ENROLLING INITIAL USER
ENROLL
FAIL
RETRY
SEND
PASS
READY
ENROLL
TO ENROLL ADDITIONAL USERS
The device can store up to four fingerprints at a time.
1. Turn unit on and wait for Ready LED to light.
2. Press and hold Enroll button for 1 second.
3. The Enroll LED will flash and an enrolled user must swipe
fingerprint to allow new enrollment.
4. The Enroll LED and Ready LED will light up when ready for
scan. The new user can now swipe their fingerprint. The
fingerprint will be swiped at least 3 times to ensure that a
good scan is made.
5. The Enroll LED and Pass LED will flash indicating successful
enrollment and unit will return to Ready mode.
TO ERASE USERS
NOTE:
Erasing a user will erase
ALL
stored fingerprints and
will no longer be programmed to the opener.
1. Enrolled user must swipe fingerprint.
2. Press and hold the Enroll button for at least 6 seconds. The
Pass LEDs will flash for 15 seconds. During this time the
Resend button is active. After 15 seconds the Enroll and
Ready LEDs will light indicating fingerprints are erased. The
unit will return to Enroll mode.
ENROLL
FAIL
RETRY
SEND
PASS
READY
ENROLL
TROUBLESHOOTING
•
If no known enrolled users are available:
— The unit must be reset using the Factory Reset process.
•
If the unit does not recognize a swiped fingerprint:
— Ensure that the Ready LED is lit before you swipe.
— Ensure that fingerprint is swiped correctly (See Tips for
Successful Enrollment).
— Ensure that fingerprint is enrolled.
— Ensure that sufficient pressure is being applied to sensor
strip (do not press too hard).
— The finger may need to be moistened if skin is too dry.
•
If the unit is Enroll mode at power up:
— Complete enrollment process for initial user.
— The initial enroll process failed (signalled by a lit Enroll
LED and Fail LED) and must be repeated.
•
If enrolling new user and all LEDs flash and unit returns to
Ready mode:
— The memory is full.
•
If the unit does not wake:
— A button may be stuck. Press Enroll and Resend buttons
to ensure free movement.
— The batteries may need to be replaced.
NOTE:
If sensor is dirty, user should wipe sensor with a clean
finger to remove any residue. It is recommended that the sensor
be periodically cleaned with a lint-free cloth dampened with
alcohol.
® Registered Trademark / ™ Trademark /
SM
Service Mark of Sears, Roebuck and Co.
114A3393
® Marca Registrada / ™ Marca de Fábrica /
SM
Marca de Servicio de Sears, Roebuck and Co.
© 2007 Sears
FACTORY RESET
1. When unit is on, press and hold the Enroll button until all
LEDs turn off (approximately 6 seconds).
2. Release the Enroll button.
3. Press and hold the Enroll button until the Ready and Enroll
LEDs are lit and not flashing. The unit will clear all enrolled
users and return to factory reset state.
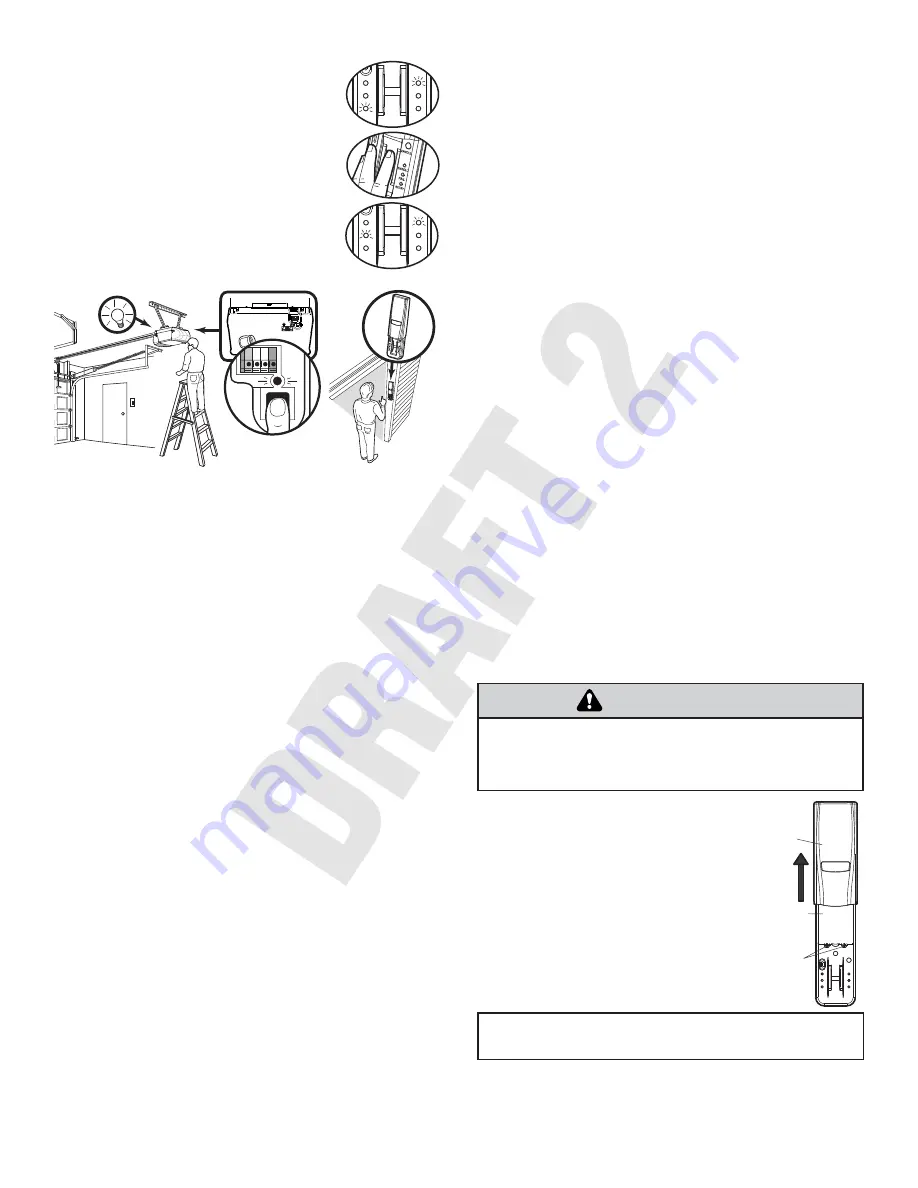
PROGRAMMING TO OPENER
NOTE:
The unit must have an enrolled user before it can be
programmed to the opener.
1. Press the purple “learn” button on the motor unit of the
opener.
2. Within 30 seconds, swipe enrolled fingerprint then press the
Resend button.
NOTE:
Due to the 30 second time interval, a second person
may be needed to press the “learn” button.
OPERATION
1. Open cover and unit will turn on. If cover is already open,
press either the Resend or the Enroll button to turn unit on.
2. When Ready LED is lit, swipe an enrolled finger.
3. The Pass LED will flash and garage door will either open or
close depending on the door’s current state. The Fail LED
will light if another swipe is required.


