background image

Craig warrants this product to be free from manufacturing defects in material and

workmanship under normal use for a period of 90 days from date of purchase. If service

is required, please return the product to the store where it was purchased for exchange;

or, pack the unit in the original packing material with all accessories if applicable, a copy

of your sales receipt and a Cashier’s check or Money Order for $18.00 (to cover shipping

and handling costs) payable to Craig Electronics Inc. For consumers in Canada, please

make sure that the cashier check or money order is redeemable through a U.S. bank.

Ship your product freight pre-paid. Your unit will be repaired, replaced or if the unit can

not be repaired or replaced, a refund will be forwarded to you within four weeks of receipt

of your unit. Please ship your unit to:

Craig Electronics Inc.

1160 NW 163 Drive

Miami, Fl 33169

This warranty is void if the product has been: a) Used in a commercial application or

rental. b) Damaged through misuse, negligence, or abuse. c) Modified or repaired by

anyone other than an authorized Craig service center. d) Damaged because it is

improperly connected to any other equipment.

Note: This warranty does not cover: a) Ordinary adjustments as outlined in the Owner’s

Manual which can be performed by the customer. b) Damage to equipment not properly

connected to the product. c) Any cost incurred in shipping the product for repair. d)

Damage to the product not used in the USA.

This warranty is not transferable and only applies to the original purchase. Any implied

warranties, including the warranty of merchantability, are limited in duration to the period

of this expressed warranty and no warranty whether expressed or implied shall apply to

the product thereafter.

Under no circumstance shall Craig be liable for any loss or consequential damage arising

out of the use of this product. This warranty gives specific legal rights. However, you may

have other rights which may vary from state to state. Some states do not allow limitations

on implied warranties or exclusion of consequential damage. Therefore, these

restrictions may not apply to you.

To Obtain Service on your Product

email:service@craigelectronics.com

LIMITED WARRANTY

Printed in China

CHT912-IB-E0FT1-B0US

Meijer.com

Summary of Contents for CHT912

Page 1: ...Meijer com ...

Page 2: ...tallation If this equipment does cause harmful interference to radio or television reception which can be determined by turning the equipment off and on the user is encouraged to try to correct the interference by one or more of the following measures Reorient or relocate the receiving antenna Increase the separation between the equipment and receiver Connect the equipment into an outlet on a circ...

Page 3: ...Meijer com ...
Page 4: ...ccessories the sound bar can be mounted onto a wall Distance Between Two Brackets 1 Placing on the table Ventilation When placing the Sound Bar on an entertainment center bookshelf or any type of enclosed space be sure to allow at least 2 3 inches of space around the Sound Bar for ventilation If the Sound Bar is enclosed in a tight space without ventilation heat generated from the Sound Bar could ...

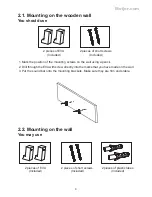
Page 5: ... screw directly into the marks that you have made on the wall 3 Put the sound bar onto the mounting brackets Make sure they are firm and stable 4 You may use 2 2 Mounting on the wall 2 pieces of plastic tubes Included 2 pieces of short screws Included 2 pieces of EVA Included 2 pieces of short screws Included 2 pieces of EVA Included Meijer com ...

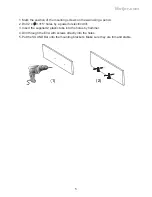
Page 6: ...ncil 2 Drill 2 x 0 315 holes by a powerful electric drill 3 Insert the supplied 2 plastic tubs into the holes by hammer 4 Drill through the EVA with screws directly into the holes 5 Put the SOUND Bar onto the mounting brackets Make sure they are firm and stable Meijer com ...

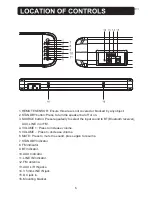
Page 7: ...t the input sound to BT Bluetooth receiver AUX LINE in or FM 4 VOLUME Press to increase volume 5 VOLUME Press to decrease volume 6 MUTE Press to mute the sound press again to resume 7 STANDBY Indicator 8 FM Indicator 9 BT Indicator 10 AUX Indicator 11 LINE IN Indicator 12 FM antenna 13 AUX L R IN jacks 14 3 5mm LINE IN jack 15 DC jack in 16 Mounting bracket 6 Meijer com ...

Page 8: ...eble up or down 6 AUX button Press to switch to AUX mode 7 MUTE button Press to mute the sound press again to resume 8 LINE button Press to switch to LINE In mode 9 FM button Press to switch to FM Radio mode 10 CH button Press to skip to next stored channel 11 CH button Press to skip to previous stored channel 12 MOVIE button Press to switch to the EQ optimized for movie sound 13 VOICE button Pres...

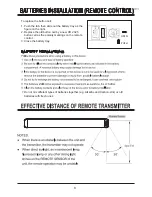
Page 9: ...out the battery tray as the figure on the right 2 Replace the old button cell by a new CR 2025 button cell as the polarity markings on the remote control 3 Close the battery tray To replace the button cell 7 Do not mix different types of batteries together e g Alkaline and Carbon zinc or old batteries with fresh ones Meijer com ...

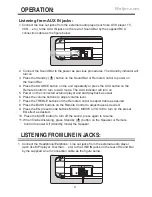
Page 10: ...layer and start playback as usual 6 Press the volume buttons to adjust volume level 7 Press the TREBLE buttons on the Remote Control to adjust treble as desired 8 Press the BASS buttons on the Remote Control to adjust bass as desired 9 Press the EQ preset mode buttons MUSIC MOVIE or VOICE to turn on the preset EQ effect as desired 10 Press the MUTE button to turn off the sound press again to resum...

Page 11: ... previous stored channel Repeat the same procedures until the desired station are found and play 4 Other operations are same as AUX IN mode BT PAIRING AND PLAYBACK 1 Power on the Sound Bar as previous procedures 2 Press the SOURCE button on the Sound Bar repeatedly or press the BT Bluetooth button on the Remote Control to turn to BT mode The BT indicator will turn on 3 Turn on the BT function in t...

Page 12: ...eplace the battery Make sure there are no obstacles obscuring the front of the Speaker Check if you have pairing or not It needs to pair the external BT player and the speaker with password 0000 before 1st time listening 1 Do not use harsh or abrasive cleaning agents or solvents 2 Do not attempt to disassemble your product 3 Do not paint your product 4 Do not drop throw or try to bend your product...

Page 13: ...10W Radio Coverage FM 87 5 108 0 MHz Impedance of Speakers Woofer 8 Ohm 25W x 2 Left Channel 4 Ohm 15W Right Channel 4 Ohm 15W 1 x User s Manual 1 x Remote Control uses 1X CR 2025 button cell Included 1 x AC DC Adaptor Input AC 100 240V 50 60 Hz 1 5A Output DC 18V 2500mA 1 x RCA cable 1 x 3 5mm LINE In cable 2 x Screws 2 x Plastic Tubes 2 x EVA spacer 12 Meijer com ...

Page 14: ... repaired by anyone other than an authorized Craig service center d Damaged because it is improperly connected to any other equipment Note This warranty does not cover a Ordinary adjustments as outlined in the Owner s Manual which can be performed by the customer b Damage to equipment not properly connected to the product c Any cost incurred in shipping the product for repair d Damage to the produ...

Reviews: