background image

  How to remove the personal data/email accounts from the device 

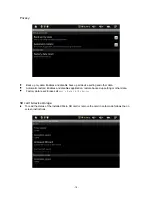
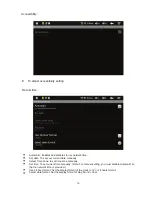
  In setting menu, select and enter to “Privacy” setting.   

  Tap “Factory data reset” button to enter.   

  Tap “reset device” button. 

  Tap “Erase everything” button to start reset. Wait until the device finish resetting by itself. 

The device will turn off automatically. (It may need a few minutes). 

  Press the 

  Power (Standby) button to turn on the unit. Screen calibration menu will 

appear on the screen. Follow the on screen instructions to calibrate the touch screen.   


IMPORTANT:   

After Factory Data reset, all users’ data (users installed applications, passwords, e-

mail accounts, g-mail accounts, medi a files ...) will be deleted. Backup this data before 

reset.  

  Can USB Mouse compatible? 

  Yes, you can connect the USB Mouse to the USB Host. But, make sure the "HOST MODE" in 

"USB Mode select" in setting menu is set to check. (Icon 

  should be green). 


  The cabinet become warm   

  It’s normal. After couple hours operation/recharging, the cabinet will become to warm. 

- 24 - 


Forgotten the Password (Pattern)

        Reset the unit to factory default settings by: 

1. Continue to tap on with random pattern at least 5 times until the message appears and ask 

    for your gmail address to rest and unlock your device.

2. In case you did not register the gmail account previously, you will need to download the 

    new firmware from our home page to reinstall system. Please note that all your information 

    being stored in the device will be deleted and can not be recovered.

  Cannot hook up with Wi-Fi or the Wi-Fi signal is weak 

  Make sure the Wi-Fi is available in your location and you are authorized (to have password) 

to hook up to it. 

  The device may be too far from the signal source. Move your device closer to the signal   

source. 


  3G module mal-function: 

  This device is 3G ready. But the function depends on your service provider. Please contact 

the cellular provider in your area to get more information.   

Summary of Contents for CMP738b

Page 1: ......

Page 2: ...IMPORTANT SAFETY INSTRUCTIONS 2 ...

Page 3: ...IMPORTANT SAFETY INSTRUCTIONS 3 ...

Page 4: ...IMPORTANT SAFETY INSTRUCTIONS 4 ...

Page 5: ...n after restart C Operation key shows no reaction Notes Chargers of other models cannot be used for this device because it may cause damage to the device which we are not responsible for Please contact our customer service department if you need a replacement charger Please do not disconnect the device while formatting downloading and uploading otherwise it may cause application errors We are not ...

Page 6: ...t use force when touching the touch screen as it may cause damage to the screen B To avoid damage to the touch screen do not use any object other than your fingers or the supplied Touch Screen Pen to operate it C Do not tap press on the touch screen if your fingers are not clean D Do not tap press on the touch screen with gloves on E The touch screen may not function if you use a fingernail or oth...

Page 7: ... your computer after turning on the Device you may have to wait a short while to let the operating system boot up before the home page appears on the screen 7 A Press and hold the button approximate 5 seconds to power on the unit Touch and slide the key bar shown on the screen upward to unlock B In power on mode press the button to turn off the screen for saving battery power Turn on the screen ag...

Page 8: ...eo tap the screen once The setting menu will appear C Tap the Three Dots button on the right bottom corner the Selection menu will appear Tap the HDMI button D Tap Output to HDMI 720p button to turn on the HDMI output the screen on the device will turn off and the correct picture will appear on your TV E To turn off the HDMI output unplug the connection cable from the Device and TV the screen on t...

Page 9: ...ro SD card 2 7 2 8 DC jack DC input 2 15 Touch Screen Pen take out from the case and tap the touch screen to avoid finger prints on the screen 2 14 Speaker 2 10 Menu button press to turn on the menu 2 11 Power Standby button press and hold approx 5 seconds to start the device after Power switch is in ON position If pressed while the screen is on the device will shut down 2 12 Home button press to ...

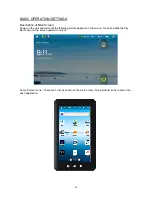
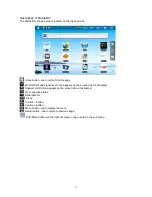
Page 10: ...ower on the unit and wait until the following picture appears on the screen Touch and slide the Key Bar shown on the screen upward to unlock Home Screen Icons There are 12 icons shown on the main screen Tap individual icons to enter into each application 10 ...

Page 11: ...d signal level icon appears on the screen when it activates Speaker on off icon appears on the screen when it activates 3G connection status Battery Meter Clock Volume button Volume button Menu button tap to display the menu Return button tap to return to previous page Sub Menu button on the right of screen tap to enter to the sub menu 11 ...

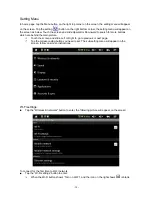
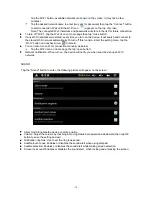
Page 12: ...which are behind the main picture Touch the screen and slide Left or Right to go to previous or next page Tap the corresponding button you need to set The sub setting menu will appear on the screen follow on screen instructions Wi Fi settings Tap the Wireless networks button to enter the following picture will appear on the screen To connect for the first time to Wi Fi network Tap the Wi Fi settin...

Page 13: ...he Wi Fi button and uncheck icon to blank You can also turn on Wi Fi connection manually as below Tap the Wi Fi icon on Home page the tap open button Network notification When turn on the device will notify you when searched an open Wi fi network 13 SOUND Tap the Sound button to enter the following picture will appear on the screen Silent mode Enables the device on mute position Volume Adjust the ...

Page 14: ...re typing on the screen Select device administrators Add or remove device administrators Credential storage Allow applications to access secure certificates and other credentials Install from SD card Install encrypted certificates from SD card Set password Set or change the credential storage password Clear storage clear credential storage of all contents and reset its password IMPORTANT After act...

Page 15: ...s view and control currently running services Development set options for application development Background data Enables or disables applications can sync and receive data at any time Auto sync Enables or disables applications sync data automatically Add account To set up and allow accounts from different applications to sync with the device Account sync ...

Page 16: ...card in safe mode follows the on screen instructions 16 Privacy Back up my data Enables and disable back up all device setting and other data Automatic restore Enables and disables application restore backed up setting or other data Factory data reset Erases all user s data in the device ...

Page 17: ... 17 Language Keyboard To select language for device and keyboard type settings Voice input output To set or reset Test to speech settings ...

Page 18: ...r current date manually Select Time zone to set time zone manually Set time To set current time manually Note For manual setting you must disable Automatic so that no network time is provided Use 24 hour format Set the display format of the clock to 12 or 24 hours format Select date format Set the display format of Day Month Year ...

Page 19: ...Select and tap where your APK file is located either Internal memory or external SD Card The files list will appear on the screen Select and tap into the file to install the file onto your device Select and Tap the Manage button for installed application management Select and tap the application being shown on the screen for Launch Export uninstall and cancel Select and tap Exit to exit 19 Touch p...

Page 20: ...ail settings after entering the email address and password simply follow the on screen instructions for set up This application supports IMAP mail such as Hotmail Gmail and Yahoo Mail POP3 mail and Exchange Press Menu button on screen to choose and remove email account Music Player z Tap the iTTcon to enter the music list The buttons of Artists Albums Songs Playlists will appear on the screen Tap ...

Page 21: ...PP Store Main page Input your email address at Get Started which located at right top corner of main page then click GO button Quickstart instructions will pop up on screen Please read and follow all procedures Then you will receive the app download link in your email from Amazon Click it to start downloading After download the Amazon APP store apk you can go to file browser on the second page of ...

Page 22: ...connected Confirm whether the storage space is full on the device Confirm whether the USB cable is damaged Check and reconfirm the HOST MODE in USB Mode select in setting menu is set to uncheck Icon should be blank Cannot go online Check if your Wi Fi setting is correct proper password may be needed Check if your router is working properly Check your signal bar on the Device It may not be connecte...

Page 23: ... level if reading No HDMI pictures on connected HDMI TV HDMI only works with Video Playback function Turn the HDMI output by the following instructions on page 8 Media files can t be found If new files were added into the device tap the Update Media Library button in setting menu to update your Device Use the correct apps to open corresponding media files Tap Video player to play video files Tap P...

Page 24: ...eck Icon should be green The cabinet become warm It s normal After couple hours operation recharging the cabinet will become to warm 24 Forgotten the Password Pattern Reset the unit to factory default settings by 1 Continue to tap on with random pattern at least 5 times until the message appears and ask for your gmail address to rest and unlock your device 2 In case you did not register the gmail ...

Page 25: ... 6 hours for Music playback Assuming 3G Wi Fi and others program application are turned OFF brightness and volume set to middle Input of the supplied AC DC Adaptor AC 100 240V 50 60Hz 0 5A Output of the supplied AC DC Adaptor DC 9V 1 5A Software Configuration Operating System Android 2 2 1 Browser Web Browser Video file supported MKV H 264 HP AVI RM RMVB FLV MPEG 1 MPEG 2 Music file supported MP3 ...

Page 26: ...by anyone other than an authorized Craig service center d Damaged because it is improperly connected to any other equipment Note This warranty does not cover a Ordinary adjustments as outlined in the Owner s Manual which can be performed by the customer b Damage to equipment not properly connected to the product c Any cost incurred in shipping the product for repair d Damage to the product not use...

Reviews: