background image

English


Sweeper


Original Operation Manual  


-6 

3.3 

Operating elements for all models  

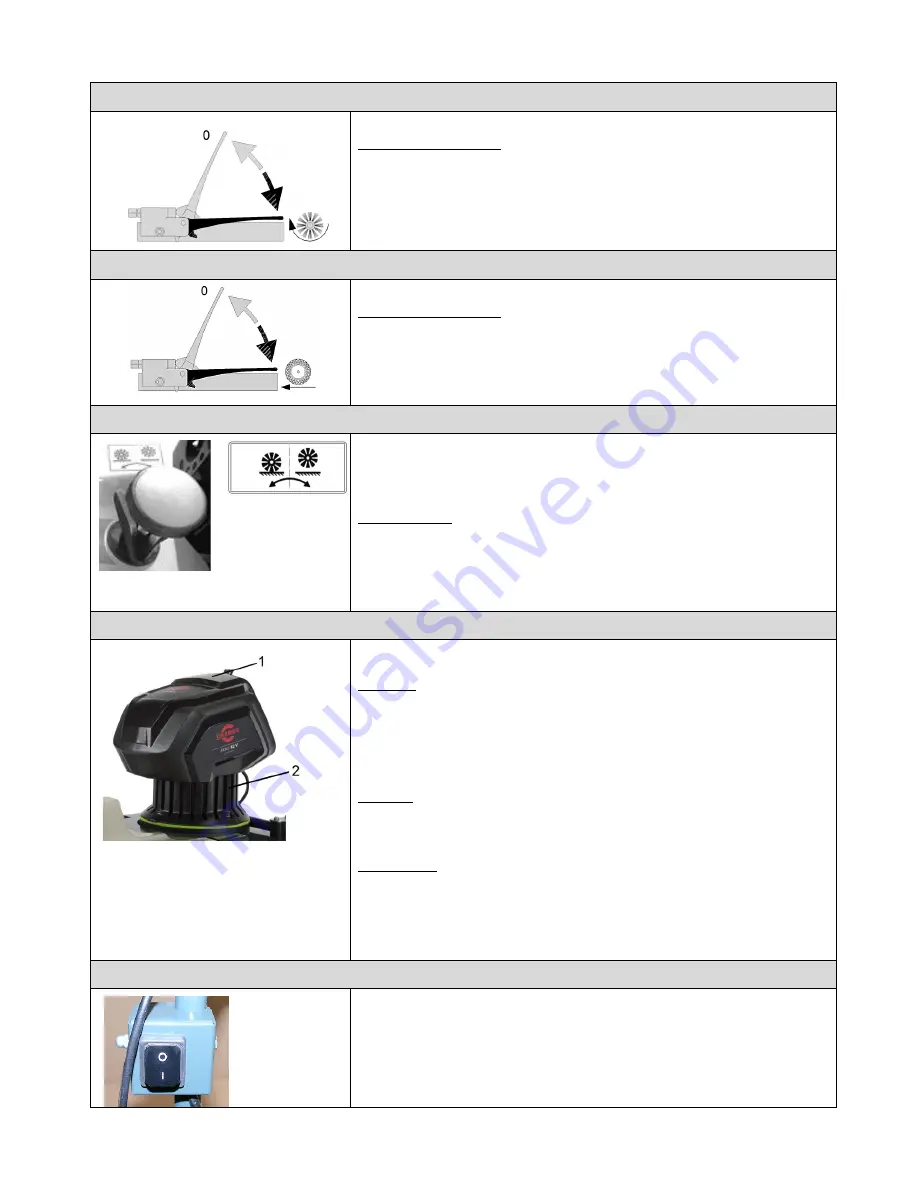
Lever for brush drive 


The left-hand lever is used to operate the sweeper brush mechanism. 

Operate the lever as follows: 

Lever activated:         Brush turns    

Lever released (

O

):     Deactivate brush 


Lever for travel drive. 


The right-hand lever is used to operate the sweeper drive mechanism. 

Operate the lever as follows: 

Lever pulled:    Machine moves forward  

Lever released (

O

):      Deactivate travel drive 

Brush height adjustment


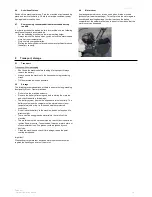
The crank handle is used to set the height of the sweeper brushes by adjusting the support 
wheel. The bristles of the brushes should only just touch the floor to be set optimally. An 
excessively deep setting results in an overload of the drives and in inappropriate wear of the 
brushes. An improperly adjusted brush will also result in a faster consumption of the battery 
capacity. 

Height adjustment: 

Loosen the star grip nut, subsequently turn the screw to the requested position.  

Turn right = sweeper brush is lifted 
Turn to the left    = lower the sweeping brush 

Tighten the star grip nut in this position. 

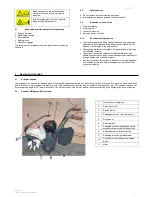
Electric motor 82V 

Battery cover


Electric motor 82 Volt 

The KM domus Akku 82 V is equipped with a battery-operated electric motor. The motor is 
simply started and stopped by operating a toggle on steering arm.  

Start motor: 

1.  Lift the battery cover of the battery compartment 

2.  Push the charged battery over the battery holder into the battery compartment until the 

battery release button engages 

3.  Close the battery cover 

4.  Operate the ON/OFF toggle 

Stop motor 

1.  Operate the ON/OFF toggle  

Do not leave the battery in the machine after operation. 


Remove battery 

Important! Before removing the battery, the machine must be shut down and the motor must 
be at a standstill.


1.  Open the battery compartment. 
2.  Push the release button so that you can remove the battery. 
3.  The release function will push the battery slightly out of the battery. 

ON/OFF toggle 


Toggle for starting and stopping the motor 

O = Stop 

I = Start 


Summary of Contents for KM domus 82 V

Page 1: ...English Sweeper KM domus 82V Original Operation Manual 687 01 46 1216 Operation Manual Sweeper Models Machine no Sweeper KM domus 82 V ...

Page 2: ...5 2 10 Environmental protection 5 3 Design and function 5 3 1 Brief description 5 3 2 Sweeper KM domus 82V overview 5 3 3 Operating elements for all models 6 4 Operation 9 4 1 Safety 9 4 2 Activities prior to use 9 4 3 Charge battery system 9 4 4 Start and stop 9 4 5 Normal operation 9 4 6 Activities after use 10 4 7 Energy saving recommendations for extended battery runtime 10 4 8 Motor cover 10 ...

Page 3: ...National occupational safety regulations shall be complied with Other applicable documents Installation instructions Declaration of Conformity 1 2 Symbols DANGER This symbol cautions against an immediate threat resulting in serious injuries or death if not avoided WARNING This symbol cautions against a potentially dangerous source of risk which may result in death or serious injury if not avoided ...

Page 4: ...r and maintenance work Risk of electric shock 2 3 4 Risks from battery and battery charger When using battery driven equipment general precautions must be observed at all times in order to minimise the risk of fire leaking batteries or injuries Only use the enclosed battery charger for charging Do not use the enclosed charger for charging other batteries The battery system and the charger have to ...

Page 5: ... contain valuable recyclable materials which should be collected for reuse These devices may be disposed of through appropriate collection systems Any toxic materials lithium ions in batteries must be disposed of as instructed by the local waste management or environmental protection authority 3 Design and function 3 1 Brief description The sweeper may be used for sweeping and collecting if a swee...

Page 6: ...star grip nut subsequently turn the screw to the requested position Turn right sweeper brush is lifted Turn to the left lower the sweeping brush Tighten the star grip nut in this position Electric motor 82V 1 Battery cover 2 Electric motor 82 Volt The KM domus Akku 82 V is equipped with a battery operated electric motor The motor is simply started and stopped by operating a toggle on steering arm ...

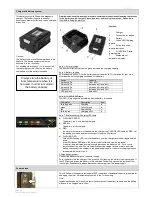
Page 7: ...hing green Charging a green Fully charged b red Overheating c flashing red Charging error d As to 7 Explanation reg Charging LED lamp a FLASHING GREEN The battery is o k and is being charged b GREEN The battery is fully charged c RED If a warm or hot battery is inserted into the charger the CHARGE LED lights up RED Let the battery cool down outside the charger for approx 30 minutes d FLASHING RED ...

Page 8: ...ogue or our homepage Mounting accessories Mount accessories in the provided elongated hole guide and secure them using the included R clips For more details regarding accessory mounting please refer to the installation instructions of the relevant accessory R clip Disengage or fold steering arm adjust steering arm height The steering arm may be folded for transport and space saving storage In addi...

Page 9: ...e using it in order to ensure the maximum operating time Please also refer to the batter operating instructions Charge battery Charge the battery in accordance with the enclosed operating instructions and the description in Section 3 A completely discharged battery needs approx one hour to be charged completely 4 4 Start and stop WARNING Danger to life due to toxic gases and caustic liquids A crac...

Page 10: ...nsport Transport without packaging Shut down the machine before loading it for transport Always remove the battery Always secure the machine to the transporter using tensioning straps Tilt the machine as little as possible 5 2 Storage The following recommendations will help to ensure the long standing functionality of your Cramer machines Do not store the machine outdoors Remove the battery after ...

Page 11: ...tion O Not described in the present Operation Manual F Work may only be performed by a qualified expert in this field B Description is enclosed in attached motor operation instructions 6 3 Maintenance work Only original parts should be used for maintenance Spare parts should be replaced by an authorized service engineer CAUTION Risk of injuries from motor and battery Cleaning and repair work must ...

Page 12: ...ing properly Rapid and heavy wear of brush Check sweeping brush for wear replace if required Lower and or lift sweeping brush by height adjustment Significantly reduced brush speed V belt slips Tighten belt using adjustment screw on brush drive lever Re adjust Bowden cable of sweeping drive Brushes are rotating Adjust Bowden cable at set screws of belt tensioner Check coupling belt Snow is thrown ...

Page 13: ...wheel Ø 300 4 00 4 Air pressure bar 1 8 Support wheel Ø 125 Wheel drive Worm gear Ambient conditions Temperature C 5 to 40 please also refer to battery storage conditions Working ground Asphalt industrial flooring floor screed concrete pavement Application area Normal use in facilities and landscaping maintenance Noise emission Guaranteed acoustic power level dB 92 Sound pressure level at operator...

Page 14: ...English Sweeper Original Operation Manual 14 ...

Page 15: ...English Sweeper Original Operation Manual 15 ...

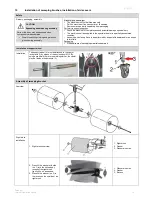
Page 16: ...plied to the specialist dealer in a partially assembled condition Assembly and start up have to be performed by a specialist dealer and or an expert in this field Packaging Please dispose of packaging materials separately Installation of support wheel Installation The support wheel 2 must be attached to the castor receptacle 1 by means of the enclosed nut M12 By using a mandrel Ø 5mm or something ...

Page 17: ...ft into the gear unit drill hole with feather keys on the left and right 1 Gear boring 2 Feather key 3 Brush shaft Overview Install brushes on machine 1 Push pre assembled brushes on brush shafts 2 Push threaded rod through the entire brush unit from one side 3 Subsequently place a washer and the lock nut onto the end of the threaded rod and tighten the nut Installation of side covers Assemble sid...

Page 18: ...n d une telle notice vous trouvez sur notre site Internet différentes langues pour chacune de nos machines tant pour information que pour un éventuel téléchargement http www cramer eu service international manuals html FI Pyrimme Cramer yhtiössä rajoittamaan paperinkäytön välttämättömään ympäristön suojelemiseksi ja luonnonvarojen tuhlaamisen vähentämiseksi Tästä syystä koneidemme mukana toimiteta...

Page 19: ...English Sweeper Original Operation Manual 19 ...

Page 20: ...lied without stickers Weather protection cover The weather protection cover protects the motor against rain and snow White snow brush The snow brushes are especially intended for use on snow The bristles are harder than those of the comfort brush Winter set item no 1 490 533 ...

Reviews: