background image


Tourno pick-up 
Original Operation Manual English  


- 7 -


3.3 

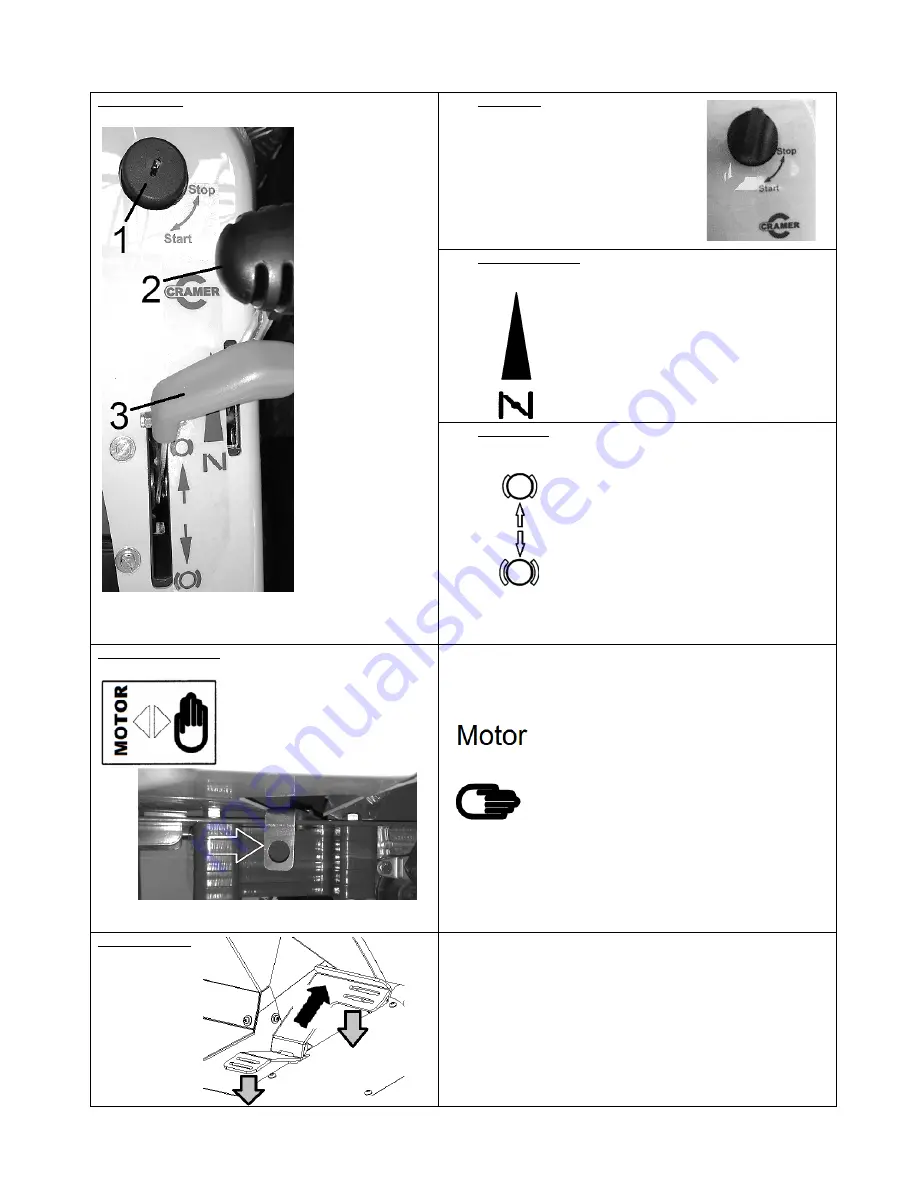
Displays and operating elements  

Operating panel 


1


 Starter (ignition lock) 

2


 Throttle with choke 

3


 Parking brake


1


Ignition lock 

Put the ignition key into the ignition lock and 
turn it. 

Stop   →   Machine inopera ve 
Start   →   Machine in opera on (motor is 

running) 


2


Throttle with choke 

Push throttle to the requested position. 


Idle 

Full throttle 

Choke 

3


Parking brake 

Push the lever for the parking brake. 


Brake on 


Brake off 

Note! 

The machine cannot be started with the parking brake on. 

Motor-gear connection 


The lever is located behind the right front wheel.


You may move the machine manually by setting the lever for the motor-
gear connection as follows:


=  Drive over motor 

=  Motor is decoupled, manual pushing is possible. 

Note!  

Do not start the machine in the manual setting - potential damage to 
gear.


Accelerator pedal 

The accelerator pedal has a progressive drive in two directions. 
 
Forward:   Push the

 upper

 pedal downward with your            

                                             foot. 
Backward: Push the

 lower

 pedal downward with your   

                                              foot. 

Summary of Contents for TOURINO PICK-UP

Page 1: ...Tourno pick up Original Operation Manual English 02 2014 Operation Manual Models TOURNO pick up Machine no ...

Page 2: ...viour in case of fire 5 2 10 Environmental protection 5 3 Design and function 6 3 1 Brief description 6 3 2 Overview 6 3 3 Displays and operating elements 7 3 4 Working position and areas of risk 10 3 5 Accessories and spare parts 10 3 6 Transport 10 3 7 Storage short term 10 3 8 Storage long term 10 4 First commissioning first inspection of the machine after installation 10 4 1 Safety 10 4 2 Asse...

Page 3: ...s must also be observed National occupational safety regulation shall be complied with Other applicable documents Installation instructions declaration of conformity 1 2 Symbols DANGER This symbol cautions against an immediate threat resulting in serious injuries or death if not avoided WARNING This symbol cautions against a potentially dangerous source of risk which may result in death or serious...

Page 4: ...touch any parts of the motor during or after operation Significant risk of burning by hot surfaces Stop the motor and let it cool down before working on the machine as well as before performing maintenance cleaning and repair work Do not refill the tank when the motor is running danger of life by burning and explosion Immediately remove spilled fuel with a cloth danger of life by burning and explo...

Page 5: ...cess any slopes with an inclination exceeding 2 when loaded 2 7 Required protection equipment for operation Rugged footwear Close fitting clothing Ear protection Safety gloves 2 8 Safety devices Do not remove any covers during operation Immediately remedy any damage to safety devices 2 9 Behaviour in case of fire 1 Stop immediately 2 Stop the motor 3 Leave the machine 4 Remedy the risk situation 2...

Page 6: ...ne has an articulated steering with a steering stool The speed is controlled progressively by a hydrostatic drive Various Cramer mounting tools may be connected to the front and back of the TOURNO pick up for different applications 3 2 Overview 1 Tipping trough 2 Driver s seat 3 Tank Tank lid 4 Steering wheel 5 Pedal for lifting and lowering the front device 6 Pedal locking 7 Receipt carrier for f...

Page 7: ...sh the lever for the parking brake Brake on Brake off Note The machine cannot be started with the parking brake on Motor gear connection The lever is located behind the right front wheel You may move the machine manually by setting the lever for the motor gear connection as follows Drive over motor Motor is decoupled manual pushing is possible Note Do not start the machine in the manual setting po...

Page 8: ... seat have to be loosened 1 Tilt the driver s seat to the top 2 Slightly loosen all four bolts 3 Adjust the driver s seat and fix it in this position 4 Tighten the bolts again 5 Tilt the driver s seat back Lifting and lowering the front device 1 Pedal for lifting and lowering the front device and locking the lifted front device 2 Pedal unlocking In order to lift or lower the front device the follo...

Page 9: ...pick up Original Operation Manual English 9 Receiver points The TOURNO pick up has two receiver points to mount Cramer accessory devices 1 Receiver point for trailer devices 2 Receiver point for front devices ...

Page 10: ...ace Please refer to the attached motor operation manual for instructions on how to care for the motor 4 First commissioning first inspection of the machine after installation Installation and first commissioning shall be performed by your authorized Cramer dealer 4 1 Safety Unauthorized restart It is prohibited to start the machine while another person is working on it Risks of non applied protect...

Page 11: ...led fuel or similar substances 1 Basic setting Park machine on an even surface Refill consumables Set throttle to Stop Fix mounting devices as required 2 Start the machine Release parking brake Set throttle to Choke on operating panel Put ignition key into ignition lock and turn to Start to start the machine Let the motor run for a short time Only then move throttle to Full throttle In the Full th...

Page 12: ... cleaning in order to avoid damage to the electronics 1 Park machine on an even surface before cleaning it and activate the parking brake 2 Clean the machine with a soft brush 3 Subsequently clean the machine with a damp cloth NOTE Machine damage Do not clean the machine with spray water 6 2 2 Check safety precautions Safety precautions comprise Cover of blades and V belts Covers of drive wheels M...

Page 13: ...or otherwise Please always indicate the machine serial no in inquiries Please refer to nameplate on the machine or on the Operation Manual cover 7 3 First action for troubleshooting Failure Cause Remedy Notes Motor will not start Check tank filling level and refill as appropriate Observe motor manufacturer Operation Manual Check and adjust choke setting Ignition plug failure Clean ignition plug co...

Page 14: ...city KW HP at 3600 rpm 13 5 Fuel type Petrol Tank contents litres Approx 8 5 Motor oil type 10W 30 Motor oil filling quantity litres 1 4 Tires Drive wheel 15x6 00 6 Air pressure bar 2 0 Wheel drive Front drive Ambient conditions Temperature C See Briggs Stratton motor data Working ground Green areas asphalt concrete paving industrial floors Application area Normal use in facilities and landscaping...

Page 15: ...ick up complies with all relevant regulations of the above stated Directive as well as all other applicable Directives including their amendments applicable at the date of this declaration The following other EU Directives were applied EMC Directive 2004 108 EC EU Directive 2000 14 EC The following harmonized standards were applied EN 836 1997 A4 2011 EN ISO 12100 2010 EN ISO 3744 2010 DIN EN ISO ...

Page 16: ...dition Assembly and start up have to be performed by a specialist dealer and or an expert in this field Packaging Please dispose of packaging materials separately Overview Fix steering wheel 1 Place the feather key into the groove on the steering axle and hold it Place the steering wheel on the steering axle 2 Place the washer on the opening in the centre of the steering wheel 3 Fix it by the hexa...

Reviews: