background image

Page 62

6840070

August, 2005

Café VII

®

 Setup

OVERALL CLEANING

Inspect your machine both inside and out.  Be sure to check corners and all less 
visible parts of the machine.

Clean where needed.

Allow the inside of the cabinet to dry thoroughly before you close the door.

National Vendors recommends using the following supplies:

A mild detergent and warm water on the cabinet, brewer, and other NON 
ELECTRICAL components.

CAUTION

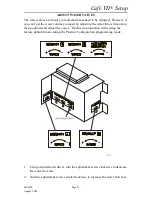
The plastic parts in your machine should be cleaned with mild 
detergent and warm water.  The use of other cleaning agents 
may damage the material, and should be avoided.

PREVENTIVE MAINTENANCE CLEANING

Periodically, you should visually inspect your machine's hot water tank for 
excessive lime and scale buildup.  This buildup on the tank walls, water valves, 
and heater element will vary dramatically, depending upon water quality.  You 
should develop a cleaning and deliming schedule based on the apparent local 
water quality.

NOTE

To aid in removing scale from your machine, National Vendors 
has a service kit available:  part number 6400080.  In addition, 
if your machine has the Everpure water inlet filter system 
option, a second kit (part number 6400086) is also available.

Summary of Contents for Cafe VII

Page 1: ...6840070 Copyright 8 05 6840070 Café VII 1 2 3 4 5 6 7 8 9 Q 0 Set Up Guide 12955 Enterprise Way Bridgeton Missouri 63044 1200 314 298 3500 Service 800 628 8363 www CraneMS com ...

Page 2: ......

Page 3: ...ional Base Cabinet 3 Water Tank 3 Weights 3 Power Requirements 3 External View 5 Internal View 7 SITE REQUIREMENTS 8 Power Supply 8 Water Supply 8 Water Pressure 8 Waste Water 8 Clearances 9 MACHINE INSTALLATION 10 INSTALL WATER FILTER 13 Everpure Brand 14 INSTALL FILTER PAPER 15 Load The Filter Paper Housing 15 Feed Paper Through The Brewer 16 SET UP THE COIN MECHANISM 17 17 Loading The Coin Mech...

Page 4: ...e Setpoint 28 Grounds Pail Safety Feature 29 Configuration Codes 30 Key Mapping drink Recipes 31 Factory Defaults And Drink Sizes 34 Filter Paper Advance Delay Time 36 Setup coin mech 36 Setup card option 36 Set Prices For Price Lines 37 Set Up Selections 38 Operation 42 Making A Single Drink 42 Using A Carafe 42 Scrolling Messages 44 Other Problems And Solutions 45 SERVICE KEYPAD 46 TESTING 48 Wa...

Page 5: ...k Error 54 Clear Grounds Pail Count 54 Test Brewer Operation 55 Rinse Brewer 55 Rinse Mixing Bowl 55 Change Fuses 56 Adjust Water Valves 57 CLEANING AND SANITATION 58 How Do I Sanitize 58 A Good Place To Start Your Sanitation Kit 59 Sanitation Procedures 60 Food contact Parts 60 Non Food contact Parts 61 Overall Cleaning 62 Preventive Maintenance Cleaning 62 Clean The Brewer 63 Sanitation Interval...

Page 6: ...Page iv 6840069 July 2001 Café VII Setup Notes ...

Page 7: ...ROLLED FEATURES BUILT IN SOFTWARE CONTROLS ALL OPERATIONAL FUNCTIONS OF THE MACHINE Machine configuration Multiple pricing with optional coin mechanism Data retrieval Drink timing and recipe settings Water temperature setting Diagnostic messages COIN MECHANISM STANDARD None standard OPTIONAL 24 VDC 15 Pin connector Dumb mechanism Executive coin mechanism interface MDB interface BREWING SYSTEM Awar...

Page 8: ...ectric water pump kit for installing plumbing to bottled water Choice of Hydrolife or Everpure water filter Bolt on manual cup dispensers to fit paper or foam cups with color matched housing for cup dispensers Insulated 60 oz thermal carafe Bolt on condiment tray with compartments for napkins stirring sticks sugar and lightener packets and for customer cup placement while adding condiments to drin...

Page 9: ...stic Heating Element 1250 watts 115 VAC International Heating Element 2000 watts 230 VAC WEIGHTS Machine 145 lbs Optional Base Cabinet 105 lbs POWER REQUIREMENTS Domestic and Canada 115 VAC 60 Hz 15 Amp Circuit International 230 VAC 50 Hz 10 Amp Circuit INDOOR USE ONLY Standard 7 variable product selections 2 drink sizes of the following Coffee Decaf Coffee Blended Coffee Espresso Mochaspresso Hot...

Page 10: ...Page 4 6840070 August 2005 Café VII Setup EXTERNAL VIEW ...

Page 11: ...FINITION 1 Coin return button optional 2 Coin insert optional 3 Message display 4 Selection and programming keypad 5 Drink selection menu 6 Carafe keyswitch 7 Coin return cup optional 8 Liquid drain tray 9 Carafe platform 10 Cup platform swings back out of the way when using a carafe 11 Point of purchase photo display optional ...

Page 12: ...Page 6 6840070 August 2005 Café VII Setup INTERNAL VIEW 684p0007 1 2 3 4 5 6 7 8 7 7 9 7 7 7 7 10 11 12 13 ...

Page 13: ...rts bag 6 Coin mech optional 7 Door lock 8 Water filter assembly 9 Coin box 10 Brewer 11 Coffee grounds pail 12 Dispensing nozzles 13 Door switch 14 Liquid drain tray float and switch 15 Filter paper roll 16 Ingredient whippers 17 Filter paper housing 18 Mixing bowl 19 Floor liner 20 Exhaust filter element 21 Exhaust system blower 22 Chocolate ingredient canister 23 Main power switch 24 Primary co...

Page 14: ...rs recommends the Hydrolife Brand or the Everpure Brand Model OCS filter products to provide the proper level of filtration If your location has chemically softened water do one of the fol lowing Install a non softened water supply line to the machine location Contact your local water filter supplier for information and suggestions Use a bottled water source with the optional electric water pump A...

Page 15: ...cord and water connections are on the back of the unit Three 3 inches of clearance is recommended at the back of the machine Each side of the unit should have at least six 6 inches of clearance This will allow for key access on one side and door swing on the other ...

Page 16: ...le cup brewer may be installed on a counter top or on the optional factory supplied base If the base option is used follow the instructions included with it COUNTER TOP INSTALLATION The unit provides three levels of counter top installation SET AND SEAL Locate the unit make the water connection plug in the unit and seal the coffee maker to the counter top with the gasket provided MACHINE INSTALLAT...

Page 17: ... verify both clearance and accessibility from beneath the counter top This option allows the use of a large waste grounds pail located under the counter top Remove the floor liner from the bottom of the unit Take out the two screws holding the cover plate Cut a hole corresponding to the opening in the bottom of the unit in the floor liner Field Supplied Parts Four 4 5 16 thread cutting screws Four...

Page 18: ...ubing use appropriate inserts at the connections to prevent collapse FLUSHING LINES Water lines should be flushed before connecting to the machine This will prevent sediment from entering the unit SEALING THE UNIT TO THE COUNTER TOP FACTORY AND FIELD SUPPLIED PARTS A sealing strip is supplied by the factory Remove the paper back from a section of the strip and apply to the base Work a length at a ...

Page 19: ...6840070 Page 13 August 2005 Café VII Setup HYDROLIFE BRAND INSTALL WATER FILTER ...

Page 20: ...Page 14 6840070 August 2005 Café VII Setup EVERPURE BRAND ...

Page 21: ...ove the filter paper cover 2 Insert filter paper in the filter paper housing as shown 3 Feed the paper out of the housing as shown by the arrows molded into the back wall of the filter paper housing 4 Lift up the limit switch and feed the paper past it as shown Release the limit switch 5 Replace the cover INSTALL FILTER PAPER ...

Page 22: ...der the brewer cylinder and the idler rollers 3 Release the idler roller axle capturing the filter paper 4 Route the paper into the grounds bucket For machines with base cabinets Feed filter paper through the upper bucket into the lower grounds bucket IDLER ROLLER AXLE FILTER PAPER BREWER CYLINDER CYLINDER CARRIER FILTER PAPER HOUSING ASSY 640P0007 ...

Page 23: ... coin mechanism you are using COINCO 9302 GX MDB COINCO 9302 LF COINCO USD G701 MDB CONLUX USLZ 001 MDB MARS TRC6010 XV MARS TRC6512 MDB MARS VN4510 MDB LOADING THE COIN MECHANISM 1 Open the cabinet door 2 Insert coins into their respective tubes until each tube has been filled 3 Inspect the tubes for shingled coins and correct if necessary SET UP THE COIN MECHANISM OPTIONAL ...

Page 24: ...005 Café VII Setup Two sets of menu inserts are included with your machine One set is used in machines where two different drink sizes are available the other is used when only one drink size is offered SET UP THE MENU INSERTS ...

Page 25: ...hows you where each of the menu inserts are used Blank inserts are provided in the event that all selections are not sold Refer to Key Mapping Drink Sizes to verify the order in which these inserts will appear on the menu NOTE Shown as a two cup size machine ...

Page 26: ...the machine The main power switch should be turned off when servicing any AC line voltage component WHEN SERVICING ANY COMPONENTS WITHIN THE POWER PANEL ASSEMBLY ALWAYS UNPLUG THE MACHINE FROM THE WALL RECEPTACLE DOOR OPEN Access to programming modes is provided when the door is open DOOR CLOSED Machine returns to the vending mode SWITCHES ...

Page 27: ...anister is correctly engaged with the rear mounting bracket gently push down on the front edge of the canister lid 5 Replace stainless steel product chutes FILLING CANISTERS 1 Flip open the machine lid to gain access to the product canisters 2 Open each canister lid and carefully pour product into the canister 3 Close or replace each canister lid after filling LOAD PRODUCTS PINS ON MOTOR SHAFT MUS...

Page 28: ...isplay shows cfiifkd This clears any tank error and starts filling the tank if necessary When the tank is full the display returns to q khKcfii e If it is taking longer than 6 minutes to fill the tank AND THERE ARE NO LEAKS you may see q kh boo in the diagnostic list again Just repeat steps b d after making sure there are no other problems such as a restriction in the water inlet line or a clogged...

Page 29: ...6840070 Page 23 August 2005 Café VII Setup ...

Page 30: ...by pressing followed by a number key For example to enter the SERVICE mode you press then INSIDE A FUNCTION Pressing moves you forward through all the different programming screens There is no way to move backwards so if you have to go back to a previous screen just press until that screen shows up again If you can choose between two or more options in a function pressing switches between the opti...

Page 31: ... the previous display If you enter the wrong code the previous display is shown If you successfully enter the code the display shows prmbosfplo one time You can now access all programming functions 4 To leave Supervisor mode shut the door VIEW OR CHANGE THE SUPERVISOR CODE 1 Enter the SUPERVISOR mode as instructed above 2 Enter the CONFIGURATION mode by pressing and 3 Press to advance through the ...

Page 32: ...y only lasts for a short time then it is replaced by J J J J J J J J The dashes are placeholders for the nine programming functions and will be replaced by numbers representing which functions you have protected prevented others from using 4 Press any or all of the following keys to protect its corresponding function from unauthorized access OR REG LG DRINKS SETUP NOT USED VIEW DATA COUNTERS PAY C...

Page 33: ...have not locked in these items as yet Press and to lock in the protected functions The decimal is now gone from the display If you don t lock in these numbers the old numbers if any are still active SPECIAL NOTES a Functions 1 and 2 selection setup both activate the 1 in the display b Function 3 data recall has an additional choice Pressing once causes a plus sign to be displayed This means that o...

Page 34: ...our water tank temperature to be displayed in degrees Fahrenheit or Celsius Press to switch between rkfqp oc and rkfqp o WATER TANK TEMPERATURE SETPOINT 1 Use the number keys to change the water tank temperature setpoint Vending will be inhibited if the tank temperature falls more than 20 below the setpoint This feature preserves the quality of the drink served to the customer The valid range of t...

Page 35: ...nds pail To prevent the pail from overflowing the machine s computer counts the number of cups brewed and shuts the brewer function off after 80 cups have been brewed This factory set value of 80 can be changed to any number between 5 and 995 in increments of 5 A setting of 0 will disable this function allowing an overflow problem The higher settings are used with a base cabinet ...

Page 36: ...nly when is pressed 2 Whip drinks unless is pressed Whitener Configuration Enter for Y Definition 1 No whitener whitener not available 2 Whitener is used whitener is available Machine Configuration Enter for Y Definition 1 All Freeze Dry 2 Single Fresh Brew Made from product in canister 1 3 INVALID NOT USED 4 Dual Fresh Brew Made from products in canisters 1 and 2 NOTE If you program the whipper o...

Page 37: ...etter of the desired recipe appears Repeat this for all keys When the keymap is satisfactory save the new map by pressing and Note that there are more possible recipes than keys Because of this and other factors it is important to reload the timers after altering the keymap even if only the order of recipes was changed This may be done manually or by using the default load screen following the key...

Page 38: ... Espresso 1 A short throw from canister 1 Timers are fully programmable 5 Espresso 2 A short throw from canister 2 Timers are fully programmable 6 Mochaspresso 1 A percentage only mix of coffee and hot chocolate Both coffee and chocolate must be configured for this to work 7 Mochaspresso 2 A percentage only mix of decaf coffee and hot chocolate Both decaf coffee and chocolate must be configured fo...

Page 39: ...5 Café VII Setup g Since you are not vending anything from buttons 8 and 9 press twice The display should now look like this NOPQVMM h Press then to lock in this setting i Press twice to leave the CONFIGURATION mode at any time ...

Page 40: ...chaspresso and utilizes the blank inserts More complicated arrangements can be built by mixing the order of the menu inserts and the key mapping The choice is up to you FACTORY DEFAULTS AND DRINK SIZES Your machine is pre loaded with factory default times for dispensing 8 oz and 12 oz drinks To change one or both drink sizes or to dispense one drink size only use the following procedure 1 Set drin...

Page 41: ...ular or large you DO NOT want to enter defaults for by setting it to JJJ NOTE This setting only inhibits loading defaults for this size It WILL NOT inhibit this cup size from vending b Press and When the transfer is finished the display shows cfkfpeba 4 Enter defaults for both drink sizes at one time CAUTION THIS WILL ERASE ANY CUSTOM DISPENSE TIMES YOU HAVE ESTABLISHED FOR ALL SELECTIONS a Make s...

Page 42: ...shows asK uuu XXX is the time in minutes between a cycle and when the filter paper advances one more time 2 Using the number keys enter the desired time Entering a zero 0 will disable this feature NOTE Since filter paper drying times will vary depending upon your location you should experiment with different times Advancing the paper too soon will waste paper advancing it too late will allow it to...

Page 43: ...moKN KPR 4 Press to display the remaining seven price line numbers Repeat step 3 until all desired price line numbers are set up 5 Press twice to leave the PRICE LINE MODE IMPORTANT After prices have been set for each of the price lines you must assign a price line to each selection See SET UP SELECTIONS in the following section TIMESAVING TIP When you have more than one selection with the same pr...

Page 44: ...codes definitions allowable range and increments are shown in the table on the next page NOTE Some of the codes may not show up depending upon machine configuration and the type of product being set up 4 You can change the displayed settings by pressing the appropriate number keys For example let s set up your selection This selection is typically hot chocolate so some of the codes and options wil...

Page 45: ...ink selection enter a zero for the water time To check water settings first disconnect the water line leading from the water valve to the brew cylinder Collect the water for measurement at the free end of the water line in a measuring cup or graduated cylinder BE CAREFUL OF THE HOT WATER Press then The water valve opens and you can measure the dispensed water volume with a graduated cylinder Refer...

Page 46: ...time 0 12 75 seconds 0 05 second steps B Extra strong product dispense time freeze dried and fresh brewed 0 12 75 seconds 0 05 second steps C Steep time brewed drinks only 0 99 5 seconds 0 5 second steps C Total steep time for an extra strong brewed drink 0 99 5 seconds 0 5 second steps D Pump time brewed drinks only 0 99 5 seconds NOTE Must be greater than twice the water time or selection is inh...

Page 47: ...full control over the timers In addition there is a percentage screen which allows you to compute approximate times for these drinks as a starting point for setup When computing new times for Café Mocha Cappuccino and Caffè Latte the program uses times from existing coffee hot whitener and hot chocolate drinks base drinks if they are available If those drinks do not exist then standard default tim...

Page 48: ...your drink press USING A CARAFE Any valid drink shown on the menu may be made to fill a carafe as follows 1 Place your carafe on the carafe platform This will push the cup platform inside the machine and out of your way 2 Insert your key in the carafe key switch and turn it 90 clockwise to the ON position The display shows rmp N 3 Press until the number of cups your carafe will contain is displaye...

Page 49: ...e goes back to the single vend mode even if the keyswitch is still turned ON To fill another carafe you must turn the keyswitch 90 counter clockwise then 90 clockwise to the ON position 6 If your machine has a coin mechanism deposit at least enough money to pay the cost of the number of cups you are going to vend If you have change coming the machine will pay the change after the last cup is vende...

Page 50: ...ting on the platform and not hanging in the float well Position the float so it hangs freely in the well It will slightly touch the bottom of the drain tray qo vKcrii dolrkap m fi fp crii Empty the coffee grounds pail and reset the pail count see MAINTENANCE m fiKcrii lia t qbo J qov i qbo Check for leaks pinched water line closed water valve or a closed water filter valve If these are ok perform ...

Page 51: ...teps given in SET UP CONFIGURATION If the machine is on free vend turn free vend off Some keys will not work in the programming mode You are not authorized to use these functions Contact your supervisor DISPLAY DEFINITION CORRECTIVE ACTION lkcKboo Configuration error Check configuration code is correct qo vKcrii Drain tray is full Empty drain tray ensure switch is not sticking m fiKcrii Grounds pa...

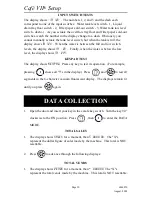
Page 52: ...SERVICE Press once to view the water tank temperature tank temperature is displayed in either Fahrenheit or Celsius depending upon the configuration setting See WATER TANK TEMPERATURE DISPLAY on page 48 Press twice to view the input switch status See INPUT SWITCH TESTS on page 50 _obt boo Brewer is in incorrect position Run brewer test _obt g j Brewer has jammed Free brewer jam tefm NOP Whipper ha...

Page 53: ...6840070 Page 47 August 2005 Café VII Setup TANK FILL Fills the water tank and or clears a TANK ERR message See WATER TANK FILL on page 48 ...

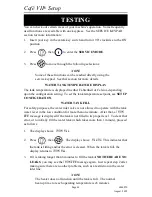
Page 54: ...WATER TANK FILL For safety purposes the water inlet valve is not allowed to operate with the tank water level in the low condition for more than one minute After that a q kh boo message is displayed if the tank is not filled to its proper level To clear that error or to initially fill the water tank which takes more than 1 minute proceed as follows 1 The display shows q khKcfii 2 Press then The di...

Page 55: ...display shows jlsb JO This indicates that the brewer is moving to its closed position When it reaches that position the display shows i jm N J 1 is the switch that is closed when the brewer is clamped 2 Press then The display shows jlsb N J This indicates that the brewer is moving to its opened position When it reaches that position the display shows lmbk J O 2 is the switch that is closed when th...

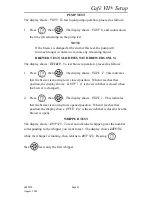
Page 56: ...hen the water is below the low level the display shows fk K J OPQ KEYPAD TEST The display shows hbvm a Press any key to test its operation For example pressing shows all 3 s in the display Press and to test all segments in the 8 character vacuum fluorescent display The displays remain lit until you press again 1 Open the door and insert your key in the carafe key switch Turn the key 90 clockwise t...

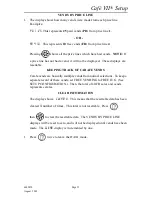
Page 57: ...EPING TRACK OF CARAFE VENDS Carafe vends are basically multiple vends from normal selections To keep a separate record of these vends set FREE VENDING to FREE JUG See SETUP CONFIGURATION Then the total of all FR sales and vends represents carafes CLEAR INFORMATION The display shows ib o u This means that the resettable data has been cleared X number of times This total is not resettable Press then...

Page 58: ... number label attached to the EPROM chip itself PAYOUT This feature is only available if you have a coin mechanism other than an exec mech installed in your machine 1 Open the door and insert your key in the carafe key switch Turn the key 90 clockwise to the ON position 2 Press then to enter the PAYOUT MODE 3 The display shows kan PQR This means that pressing causes the coin mech to pay out Nickel...

Page 59: ...tion instructions The plastic carafe platform is removable for easy cleaning by lifting it out of the tray 4 Replace the drain tray in the machine EMPTY THE GROUNDS PAIL 1 Remove and empty the drain tray see above Be careful not to spill any liquid 2 Tear off filter paper at brewer housing Place all used grounds and paper in the grounds bucket 3 Remove the grounds pail from the machine 4 Empty the...

Page 60: ...blems such as a restriction in the water inlet line or a clogged water filter NOTE The heater will not function until the tank is full The normal heat up time to reach operating temperature is 45 minutes CLEAR GROUNDS PAIL COUNT NOTE This item will not display if the vend limit was set to 0 during CONFIGURATION 1 Empty the grounds pail 2 Press until the display shows m fi u X represents the number...

Page 61: ...ntainer below the dispensing nozzles to catch the HOT rinse water 3 Press and to rinse the brewer The brewer closes hot water runs through the brewer the pump and coffee whipper run and the display shows ofkpfkd then returns to _obt ofk RINSE MIXING BOWL 1 Press until the display shows _lti ofk CAUTION Rinse water is hot Be careful not to get any on you during the following steps 2 Place a cup or ...

Page 62: ...NE OF THE SAME TYPE AND RATING 1 Unplug the machine 2 Remove all canisters see above Remove valve cover 3 Loosen the two screws holding the cabinet electronics cover Remove the cover 4 The fuse is located in a clip near the left side of the cabinet controller 5 Remove the old fuse by pulling straight out of the clips Install new fuse 6 Replace all parts in reverse order of assembly Plug in the mac...

Page 63: ... you need by adjusting the water throw time alone then go ahead and adjust the valves Do this in conjunction with setting the factory default timers during the Product Configuration programming mode 1 Using a slotted screwdriver turn the adjustment screw clockwise to decrease the water flow rate 2 Turn the adjustment screw counterclockwise to increase the water flow rate ...

Page 64: ...dal compound Heat Raise the temperature of the object high enough to kill bacteria Water must be at least 170 F Unplug the machine before using water on the machine In either case the object must be thoroughly clean and completely rinsed in order for the sanitizing process to work Caked on soils not removed by cleaning for example may shield bacteria from a sanitizing solution CLEANING Cleaning me...

Page 65: ... pail Tube and nozzle brushes for food contact surfaces Utility brush for dry spillage around canisters etc Disposable towels wet strength and lint free NOTE Wiping with towels can re contaminate sanitized food contact parts Therefore towels should not be used to dry food contact surfaces Instead these parts should be air dried Spray detergent diluted to desired strength Urn cleaner packets for co...

Page 66: ...ws Press until the display shows _lti ofk CAUTION Rinse water is hot Be careful not to get any on you during the following steps Place a cup or other suitable container below the dispensing nozzles to catch the HOT rinse water Press then to rinse the bowl Hot water runs through all mixing bowls each whipper runs and the display shows ofkpfkd then returns to _lti ofk Beverage Discharge Nozzles Disc...

Page 67: ...w to air dry before reassembling d To reassemble see detail A Note that the whipper motor shaft has a flat section Make sure this flat section lines up with the D shaped hole in the impeller Press the impeller all the way onto the whipper motor shaft Replace the cover NON FOOD CONTACT PARTS Brewer Mechanism Cleaning Remove the brewer assembly to clean See CLEAN THE BREWER Exhaust Fan Filter Remove...

Page 68: ...ent and warm water The use of other cleaning agents may damage the material and should be avoided PREVENTIVE MAINTENANCE CLEANING Periodically you should visually inspect your machine s hot water tank for excessive lime and scale buildup This buildup on the tank walls water valves and heater element will vary dramatically depending upon water quality You should develop a cleaning and deliming sche...

Page 69: ... them with the brewer in the machine or the entire brewer can be removed as one unit 1 On the left side of the brewer cut off and discard the filter paper 2 Remove the hose at the top of the brew barrel 3 Grasp the top of the brew barrel and turn it turn to the left as shown Lift straight up and remove 4 Remove the hose from the bottom of the screen and seal assembly ...

Page 70: ...er or leave it in the machine a To remove the brewer pivot the bottom of the unit up toward you lift upward slightly and pull straight out 6 Remove the screen and seal assembly as shown a Press down on the tabs with your fingers and slide straight back b Lift straight up and pull out ...

Page 71: ...insing thoroughly with hot water Air dry or blow dry with compressed air if available 8 If you removed the brewer make sure the motor drive link is aligned as shown If the motor drive link is aligned properly the notch in the cam wheel will capture the bearing CAM WHEEL BEARING MOTOR DRIVE LINK BREWER BODY ...

Page 72: ... must manually turn the cam wheel to capture the bearing in the notch 9 Assemble in the reverse order of disassembly NOTE when replacing the screen and seal assembly make sure you hear TWO CLICKS as you push it all the way in 10 Feed new filter paper through the brewer and don t forget to connect the hoses CAM WHEEL BEARING MOTOR DRIVE LINK BREWER BODY ...

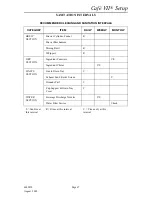
Page 73: ...r Funnel R Brewer Mechanism Mixing Bowl R Whippers R DRY SECTION Ingredient Canisters C S Ingredient Chutes C S WASTE SECTION Liquid Drain Tray C Exhaust Fan Filter Screen C Grounds Pail C Cup Support Drain Tray Cover C WATER SECTION Beverage Discharge Nozzles C S Water Filter Service Check S Sanitize at this interval R Rinse at this interval C Clean only at this interval ...

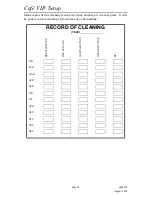
Page 74: ...of this cleaning record cut it out and keep it in a safe place It will be your record of cleaning all four areas of your machine RECORD OF CLEANING YEAR BREW SECTION DRY SECTION WASTE SECTION WATER SECTION BY JAN FEB MAR APR MAY JUN JUL AUG SEP OCT NOV DEC ...

Page 75: ...6840070 Page A1 August 2005 Café VII Setup APPENDIX A FACTORY DEFAULT TIMES ...

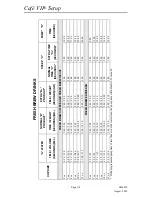
Page 76: ... 20 2 30 8 20 3 00 5 00 17 00 9 oz 8 20 240 2 50 8 90 2 50 8 90 3 00 5 00 19 00 10 oz 9 00 265 2 80 10 00 2 80 10 00 3 00 5 00 22 00 12 oz 11 00 315 3 40 12 10 3 40 12 10 3 00 5 00 26 00 FRESH BREW ESPRESSO 5 oz 2 25 65 1 40 5 00 1 40 5 00 3 00 5 00 9 00 7 oz 3 20 95 2 00 7 10 2 00 7 10 3 00 5 00 11 00 8 oz 3 75 110 2 30 8 20 2 30 8 20 3 00 5 00 12 00 9 oz 4 10 120 2 50 8 90 2 50 8 90 3 00 5 00 13...

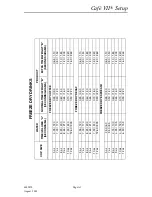
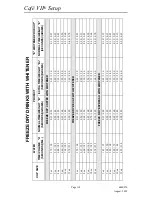
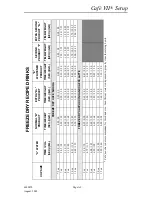
Page 77: ...20 2 00 10 oz 7 90 240 0 70 1 80 1 35 2 20 12 oz 12 60 305 0 90 2 20 1 60 2 60 FREEZE DRY DECAF 5 oz 4 95 120 0 35 0 90 0 65 1 10 7 oz 7 00 170 0 50 1 20 0 90 1 50 8 oz 8 25 200 0 60 1 50 1 10 1 80 9 oz 8 65 210 0 65 1 60 1 20 2 00 10 oz 7 90 240 0 70 1 80 1 35 2 20 12 oz 12 60 305 0 90 2 20 1 60 2 60 FREEZE DRY ESPRESSO 5 oz 2 50 60 0 35 0 90 0 65 1 10 7 oz 3 50 85 0 50 1 20 0 90 1 50 8 oz 4 15 1...

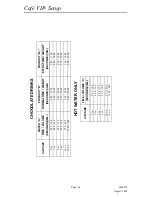
Page 78: ...T SECONDS GR 5 oz 4 85 100 2 80 17 00 2 80 17 00 7 oz 6 80 160 4 00 24 00 4 00 24 00 8 oz 8 25 170 4 65 28 00 4 65 28 00 9 oz 8 75 180 5 15 31 00 5 15 31 00 10 oz 9 70 200 5 65 34 00 5 65 34 00 12 oz 11 65 240 6 80 41 00 6 80 41 00 HOT WATER ONLY CUP SIZE TIME VOLUME A SECONDS ML 5 oz 4 85 100 7 oz 6 80 160 8 oz 8 25 170 9 oz 8 75 180 10 oz 9 70 200 12 oz 11 65 240 ...

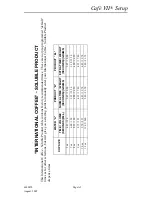
Page 79: ...ve you a starting point to manually enter your International Coffee Soluble Product dispense times CUP SIZE WATER A PRODUCT B PRODUCT B TIME VOLUME SECONDS ML NORMAL TIME WEIGHT SECONDS GRAMS EXTRA TIME WEIGHT SECONDS GRAMS 5 oz 4 85 110 2 45 10 00 2 45 10 00 7 oz 6 80 150 3 35 13 50 3 35 13 50 8 oz 8 25 180 4 00 16 20 4 00 16 20 9 oz 8 75 195 4 35 17 80 4 35 17 80 10 oz 9 70 215 4 85 19 70 4 85 1...

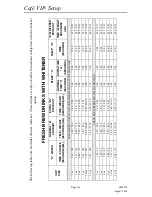
Page 80: ...0 3 00 5 00 12 00 0 15 0 25 7 oz 5 10 150 2 00 7 10 2 00 7 10 3 00 5 00 15 00 0 20 0 35 8 oz 6 00 175 2 30 8 20 2 30 8 20 3 00 5 00 17 00 0 25 0 45 9 oz 7 05 205 2 50 8 90 2 50 8 90 3 00 5 00 19 00 0 30 0 50 10 oz 7 75 225 2 80 10 00 2 80 10 00 3 00 5 00 22 00 0 35 0 60 12 oz 9 45 280 3 40 12 10 3 40 12 10 3 00 5 00 26 00 0 40 0 70 FRESH BREW ESPRESSO WITH WHITENER 5 oz 1 05 30 1 40 5 00 1 40 5 00...

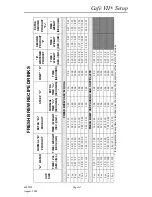
Page 81: ...00 0 35 0 60 1 35 8 25 1 35 8 25 9 oz 3 15 95 2 50 8 90 2 50 8 90 3 00 5 00 13 00 0 40 0 70 1 55 9 25 1 55 9 25 10 oz 4 00 115 2 80 10 00 2 80 10 00 3 00 5 00 14 00 0 45 0 80 1 70 10 25 1 70 10 25 12 oz 5 55 165 3 40 12 10 3 40 12 10 3 00 5 00 15 00 0 50 0 90 2 00 12 25 2 00 12 25 FRESH BREW CAPPUCCINO AND CAFFÈ LATTE 5 oz 2 65 75 1 40 5 00 1 40 5 00 3 00 5 00 9 00 0 45 0 80 7 oz 4 30 125 2 00 7 1...

Page 82: ...5 0 70 1 80 1 35 2 20 0 35 0 60 12 oz 9 70 235 0 90 2 20 1 60 2 60 0 40 0 70 FREEZE DRY DECAF WITH WHITENER 5 oz 3 70 90 0 35 0 90 0 65 1 10 0 15 0 25 7 oz 5 15 125 0 50 1 20 0 90 1 50 0 20 0 35 8 oz 6 00 145 0 60 1 50 1 10 1 80 0 25 0 45 9 oz 6 60 160 0 65 1 60 1 20 2 00 0 30 0 50 10 oz 7 65 185 0 70 1 80 1 35 2 20 0 35 0 60 12 oz 9 70 235 0 90 2 20 1 60 2 60 0 40 0 70 FREEZE DRY ESPRESSO WITH WH...

Page 83: ...0 1 80 0 35 0 60 1 35 8 25 1 35 8 25 9 oz 3 30 80 0 65 1 60 1 20 2 00 0 40 0 70 1 55 9 25 1 55 9 25 10 oz 4 55 110 0 70 1 80 1 35 2 20 0 45 0 80 1 70 10 25 1 70 10 25 12 oz 6 40 155 0 90 2 20 1 60 2 60 0 50 0 90 2 00 12 25 2 00 12 25 FREEZE DRY CAPPUCCINO AND CAFFÈ LATTE 5 oz 2 90 70 0 35 0 90 0 65 1 05 0 45 0 80 7 oz 4 75 115 0 50 1 20 0 90 1 50 0 65 1 15 8 oz 6 00 145 0 60 1 50 1 10 1 80 0 75 1 ...

Page 84: ... TIME VOLUME SECONDS ML NORMAL TIME WEIGHT SECONDS GRAMS EXTRA TIME WEIGHT SECONDS GRAMS 5 oz 4 95 110 0 70 1 20 0 70 1 20 7 oz 7 00 150 1 00 1 75 1 00 1 75 8 oz 8 25 180 1 15 2 00 1 15 2 00 9 oz 8 65 195 1 30 2 25 1 30 2 25 10 oz 9 90 215 1 45 2 50 1 45 2 50 12 oz 12 60 260 1 70 3 00 1 70 3 00 ...

Reviews: