12
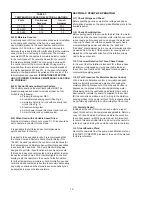
TABLE 1
TEMPERATURE SENSOR ELECTRICAL RATINGS
Volts
Continuous
Amperes
Inrush
Amperes
110-120
3.00
30.0
220-240
1.50
15.0
440-480
0.75
7.5
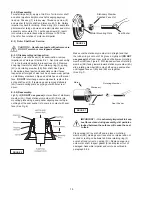
B-4.4) Moisture Sensors:
A normally open (N/O) set of moisture probes are is installed
in the pump seal chamber, which can be used detect
any moisture present in the seal chamber and/or motor
chamber. A 330 K-Ohm, 1 watt test resistor is mounted
between the probes to allow for verification that the moisture
sensor circuit is in-tact using a multi-meter. The moisture
sensors MUST be connected to moisture detector control
in the control panel. The normally closed (N/C) contact of
the moisture detector MUST be connected in series with
the control circuit of the motor contactor. Wiring must be
provided from the moisture detector sensor probe leads of
the motor designated W1 and W2. In the event of moisture
detection, the pump should be pulled and the source of the
failure located and repaired.
IF MOISTURE DETECTION
HAS OCCURRED, SCHEDULE MAINTENANCE AS SOON
AS POSSIBLE!
B-4.5) Control Panel and Electrical System:
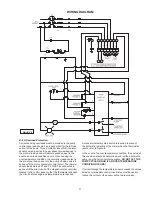
The control panel and the electrical system MUST be
properly designed and wired to include at least, but not
limited to the following;
a. Proper grounding per NEC.
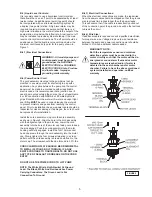
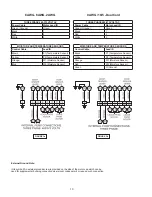
b. A temperature sensing circuit (See Fig. 4)
c. A moisture detection circuit with continuity test
circuit (See Fig. 4)
d. A level control system.
e. A main power manual disconnect and lock out.
f. A motor starter and overload system.
B-5) When Used with a Variable Speed Drive:
Maximum turndown should not exceed 2:1. Drive should be
set to operate in constant torque mode.
It is advisable that all three phase control panels be
purchased from the factory.
If a panel is to be supplied locally, it is recommended that
the Crane Pumps & Systems Pump Monitor Relay (P/N
134667) be used to perform the control circuit functions for
the Temperature and Moisture Sensor Monitoring described
in sections B4.3 and B4.4. The Pump Monitor Relay was
designed to perform these functions in a compact module
that can be base or panel mounted and is resistant to noise
issues found with some VFD’s. Indicator lights on the front
display notify the operator in the event of a fault condition
for either temperature, moisture or both. Normally open and
normally closed contacts are flexible to accommodate nearly
any wiring scenario and the moisture sensor sensitivity can
be adjusted to prevent nuisance alarms.
SECTION: C START-UP OPERATION
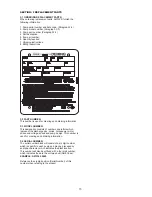
C-1) Check Voltage and Phase:
Before operating pump, compare the voltage and phase
information stamped on the pump’s identification plate to the
available power.
C-2) Check Pump Rotation:
Before putting pump into service for the first time, the motor
rotation must be checked. Improper motor rotation can result
in poor pump performance and can damage the motor and/
or pump. To check the rotation, suspend the pump freely,
momentarily apply power and observe the “kickback”.
“Kickback” should always be in a counter-clockwise direction
as viewed from the top of the pump motor housing and will
always be in the opposite direction of the rotation arrows
cast in the pump volute.
C-2.1) Incorrect Rotation for Three-Phase Pumps:
In the event that the rotation is incorrect for a three-phase
installation, interchange any two power cable leads at
the control box. Recheck the “kickback” rotation again by
momentarily applying power.
C-2.2) Test Procedure For Moisture Sensor Control:
With a moisture detection control, a normally open push
button is typically provided as a means of checking the
moisture sensing components. When the push button is
depressed, the probes will be shorted simulating water.
While being held, the seal leakage indicating lamp will be
illuminated to indicate (A) power is supplied to the control,
(B) the control is operative, and (C) wiring to the moisture
sensing probes in the pump is intact. This procedure should
be performed periodically to confirm integrity of the circuit.
C-3) Start-Up Report:
Included at the end of this manual is one start-up report
sheet, this sheet is to be completed as applicable. Return a
copy to Crane Pumps & Systems and store the second in
the control panel or with the pump manual. It is important
to record this data at initial start-up since it will be useful to
refer to should servicing the pump be required in the future.
C-3.1) Identification Plate:
Record the numbers from the pump’s identification plate on
the START-UP REPORT provided at the end of the manual
for future reference.
Summary of Contents for DEMING 7365N-X54-95-30N
Page 18: ...18 FIGURE 9 Vortex Enclosed CROSS SECTIONS FIGURE 10 ...
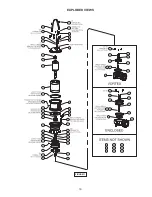
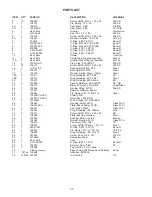
Page 19: ...19 EXPLODED VIEWS FIGURE 11 ...
Page 22: ...22 Notes ...


