background image


1.


Place the fan on the floor in the desired location.   


2.


Ensure that the fan’s Power is Off.   


3.


Plug the fan into a 120V AC outlet.  This fan has a 
polarized plug ((one blade is wider than the other).  As a 
safety feature to reduce the risk of electrical shock, this 
plug is intended to fit in a polarized outlet only one way.  
If the plug does not fit fully in the outlet, reverse the plug.  
If it still does not fit, contact a qualified electrician.  Do not 
attempt to defeat this safety feature. 
 

4.


Choose your desired setting (below) and enjoy your new fan. 


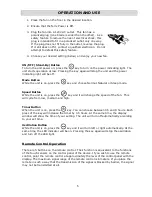
ON/OFF (Stand-By) Button 

To turn the unit power on, press the        key to turn on the power indicating light. The 
unit starts operation at low. Pressing the key again will stop the unit and the power 
indicating light will be off. 
 

Mode Button 

While the unit is on, press the        key and choose Normal, Natural or Sleep mode. 


Speed Button 

While the unit is on, press the         key and it will change the speed of the fan.  This 
will cycle from low, medium and high.


Timer Button 

When the unit is on, press the        key. You can choose between 0.5 and 8 hours. Each 
press of the key will increase the timer by 0.5 hours. At the same time, the display 
window will show the time of your setting. The unit will turn off automatically according 
to your set time. 
 

Oscillation Button 

While the unit is on, press the        key and it will turn left or right automatically. At the 
same time, the LED indicator will be on. Pressing the key again will stop the oscillation 
and turn off the LED light.


Remote Control Operation 

 
There are 5 buttons on the remote control. Their function is equivalent to the functions 
of the touch sensors on the control panel of the device. If you wish to use the remote 
control, point the remote control at approximately the level of the control panel with the 
display. The maximum signal range of the remote control is 6 meters. If you place the 
remote in such a way that the transmission of the signal is blocked by barrier, the signal 
may not be transmitted at all. 
 

OPERATION AND USE 

Summary of Contents for EE-5609

Page 1: ...ND SAVE ALL INSTRUCTIONS TO ENSURE THE SAFE AND EFFCTIVE USE OF THIS APPLIANCE If you have any questions about your tower fan please contact Crane Customer Care Toll Free 888 599 0992 Email customer service crane usa com Website Live Chat www crane usa com ...

Page 2: ...ntents P 1 Safety Instructions P 2 3 List of Main Parts Technical Specifications P 4 Operation and Use P 5 6 Maintenance P 6 Customer Care P 7 Warranty P 8 For information about all CRANE products please visit http www crane usa com ...

Page 3: ... 6 Use the fan only for its intended use as described in these operating instructions 7 Do not operate any appliance if its cord or plug is damaged after the appliance has malfunctioned or after it has been dropped or damaged in any way Always follow the warranty instructions 8 Place fan on a flat level surface to avoid it overturning 9 Avoid contact with moving parts 10 Never drop or insert any o...

Page 4: ...5 W and 2 the cord must be arranged so that it will not drape over the countertop or tabletop where it can be pulled on by children or accidently tripped over ELECTRIC POWER If the electric circuit is overloaded by other appliances this fan and or appliances may not operate properly The fan should be operated on a separate electrical circuit from other operating appliances POLARIZED PLUG This fan ...

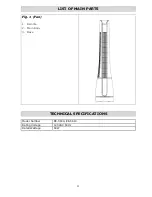
Page 5: ...4 LIST OF MAIN PARTS Fig 1 Fan 1 Remote 2 Main Body 3 Base TECHNICAL SPECIFICATIONS Model Number EE 5609 EE 5610 Rating Voltage 120VAC 60Hz Rated Wattage 60W ...

Page 6: ... and it will change the speed of the fan This will cycle from low medium and high Timer Button When the unit is on press the key You can choose between 0 5 and 8 hours Each press of the key will increase the timer by 0 5 hours At the same time the display window will show the time of your setting The unit will turn off automatically according to your set time Oscillation Button While the unit is o...

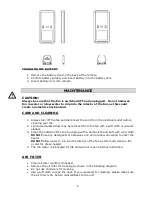
Page 7: ...ated dust may be removed from the fan with a soft cloth or vacuum cleaner 3 Clean the outside of the fan by wiping with a damp cloth and buff with a dry cloth DO NOT use any detergents or abrasives and do not allow any water to enter the heater DO NOT allow water to run into the interior of the fan as this could create a fire or electric shock hazard 4 The fan motor is lubricated for life and will...

Page 8: ...nday Friday 9 00am 4 00pm CST Email customer service crane usa com Website Live Chat http www crane usa com NOTE Spare Parts can also be purchased online at http www crane usa com ENVIRONMENTAL PROTECTION If the tower fan should no longer operate please be sure to dispose of the unit in an environmentally friendly way by taking it into a public collection point Please do not place broken appliance...

Page 9: ...bility under this warranty is limited to repair or replacement In no event shall liability exceed the purchase price paid by the purchaser of the product Under no circumstances shall there be liability for any loss direct indirect or incidental or consequential damage arising out of or in connection with the use of this product This warranty is valid only in the 48 contiguous states plus the Distr...

Reviews: