background image

Page 1

SNACK/REFRESHMENT CENTER PROGRAMMING GUIDE

1670002

April, 1999

A B C

D E F

G H J

1 2 3
4 5 6
7 8 9

0 #

Introduction

How to program your Snack or Refreshment Center.

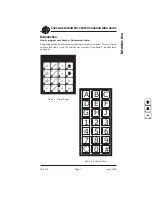
Some setup, test, and maintenance operations are computer controlled.  The control panel
switches (see figure 1) and the selection panel switches (see figure 2) regulate these
operations.

Introduction

Figure 2.  Selection Panel

Figure 1.  Control Panel

Summary of Contents for Refreshment Center 784

Page 1: ...NE NATIONAL VENDORS 167 168 267 268 764 765 COLD DRINKS A B C D E F G H J 1 2 3 4 5 6 7 8 9 Q 0 CRANE NATIONAL VENDORS 797 798 COLD DRINKS A B C D E F G H J 1 2 3 4 5 6 7 8 9 Q 0 CRANE NATIONAL VENDORS 785 786 788 789 COLD DRINKS A B C D E F G H J 1 2 3 4 5 6 7 8 9 Q 0 CRANE NATIONAL VENDORS 784 787 Exit To Menu ...

Page 2: ...Canadian Standards Association To maintain this degree of safety and to continue to achieve the level of performance built into this machine it is important that installation and maintenance be performed so as to not alter the original construction or wiring and that replacement parts are as specified in the Parts Manual Your investment in this equipment will be protected by using this Operator s ...

Page 3: ...you how you can make the machine do what YOU want Look over the PROGRAMMING TASK DIRECTORY below find what you want to do and read about it You will be directed to some simple step by step instructions that will tell you how to operate the feature AIR COMPRESSOR TEST 46 BILL VALIDATOR AND OPTIONS SELECT 11 BREWER TEST 47 CAN SELECTIONS COUPLE UNCOUPLE 18 UNIT OUT OF SERVICE SELECTION 19 UNIT TEMPE...

Page 4: ...OR TEST 45 FOOD UNIT TEMPERATURE VIEW 34 FREE VEND CODE SET 7 MESSAGE SELECT 31 OPTIONS SET 48 SALES VIEW BY TIME INTERVAL 39 TIME OF DAY SET 27 VIEW 39 FREEZE DRY SET 20 FRESH BREW SET 20 HOT DRINK SET UP 22 ID NUMBER VIEW 43 INHIBITED VENDING TIME OF DAY SET 27 LANGUAGE DISPLAY SELECT 12 LAST BILL STACK OPTIONS 13 LOW CHANGE CURRENCY ACCEPTANCE 13 MACHINE CONFIGURATION SET 16 MESSAGE CUSTOM EDIT...

Page 5: ...25 STANDBY MESSAGE SELECT 30 SUPERVISOR CODE 7 MODE 7 SWITCHES TEST 46 TEMPERATURE CAN OR FOOD UNIT VIEW 34 SET 25 TEST BREWER 47 COFFEE AIR COMPRESSOR 46 DISPLAY 43 DROP A CUP 46 FOOD DOOR 45 MOTORS 44 SWITCHES 46 VEND SELECTIONS 43 VENDS VIEW 42 WHIPPER S 47 TIME DATA VIEW 40 OF DAY SET 26 TIME OF DAY DISCOUNT VENDING SET 27 FREE VENDING SET 27 INHIBITED VENDING SET 27 TOTAL PAID SALES VIEW 36 V...

Page 6: ...EFROST MODE 24 DIAGNOSTIC MESSAGES 48 DISCOUNT SALES BY TIME INTERVAL 39 FREE VENDS 39 FREEVEND SALES BY TIME INTERVAL 39 MACHINE ID NUMBER 43 MOTOR STATUS BY TRAY 44 NONRESETTABLE SALES AND VEND DATA 36 NUMBER OF TEST VENDS 42 TIME DATA 40 TOTAL PAID SALES 36 TOTAL PAID VENDS 37 TOTAL UNPAID SALES 42 TOTAL UNPAID VENDS 42 WINNERS 40 WHIPPER S TEST 47 WINNER MODE SET UP 15 VIEW 40 YEAR SET 27 ...

Page 7: ...7 8 9 0 Introduction How to program your Snack or Refreshment Center Somesetup test andmaintenanceoperationsarecomputercontrolled Thecontrolpanel switches see figure 1 and the selection panel switches see figure 2 regulate these operations Introduction Figure 2 Selection Panel Figure 1 Control Panel ...

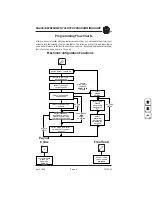
Page 8: ...NDARY PURPOSE THIS IS THE KEY S SECOND JOB FOR EXAMPLE THISKEYCANBEUSEDTODELETE A CHARACTER WHEN YOU ARE EDITING CUSTOMMESSAGES The Function Keys The MOVEMENT keys on the control panel let you move inside a mode and back and forth between modes To see how these keys let you move around study the flow diagram on the next page Other Keys The up and down arrow keys are your legs which let you move up...

Page 9: ...messages Edit messages Press this button to Set machine configuration Set which trays are active Set up hot drinks Couple and uncouple tray motors Set food or can unit temperature Press this button to Download data into your portable data collection device PDCD OR Set printer baud rate depending upon which device you are using Press this button to view total sales and vends by whole machine tray o...

Page 10: ...ICKELS DIMES OR QUARTERS PAGE 30 FreeVend SELECT FREE VEND OPTIONS PAGE 46 MachineConfigurationFunctions SELECT DISPLAY LANGUAGE SELECT TYPEOF BILL VALIDATOR USED SELECT TYPEOF COIN MECHANISMUSED SELECT TYPEOF CARD READER USED SELECT CHANGERETURN OPTIONS SELECT CURRENCY ACCEPTANCEON LOW CHANGE OVERBUY AND LAST BILL STACK OPTIONS SELECT CHANGESET POINT OF USEEXACT CHANGE MESSAGE SELECT DECLINING BA...

Page 11: ...COUNT PAGE 23 EDIT CUSTOM MESSAGES PAGE 28 SET MACHINE CONFIGURATION PAGE 13 SET WHEN CAN UNIT GOES OUT OF SERVICE 8 CAN ONLY PAGE 15 SET ACTIVE TRAYS PAGE 14 COUPLE UNCOUPLE ADJACENT MOTORS PAGE 14 SET TEMPERATURE OF CAN OR FOOD UNIT SUPERVISOR ONLY PAGE 21 CONTROL DEFROST MODE PAGE 20 COUPLE UNCOUPLE NON ADJACENT MOTORS PAGE 15 SET MACHINE AS FRESH BREW OR FREEZE DRY PAGE 16 SET UP HOT DRINKS PA...

Page 12: ...AGE 43 TEST THE DISPLAYS PAGE 39 SupervisorFunctions ASSIGN A NEW ACCESS CODE FOR THE SUPERVISOR PAGE 7 LOCK OR UNLOCK DATA CLEARING CAPABILITY FOR NON SUPERVISORS PAGE 9 PRINTER OR DEX OPTIONS PAGE 8 LOCK UNLOCK MODE PAYOUT KEYS PAGE 8 VIEW TEMPERATURE OF CHILLER CAN OR FOOD UNIT PAGE 30 VIEW SOFTWARE VERSION PAGE 21 VIEW SALES AND VEND DATA BILL AND COIN ACCEPTANCE DATA HEALTH CONTROL DATA PRICE...

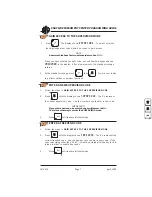
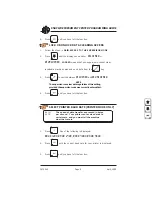
Page 13: ... NEW SUPERVISOR CODE 1 Follow the steps in GAIN ACCESS TO THE SUPERVISOR MODE 2 Press until the display shows SUPER XXXX The X s represent the current supervisor code Use the number keys to enter a new code IMPORTANT Ifyouenteranewcode besuretokeepawrittenrecordofit ThereisnootherwaytoaccesstheSUPERVISORmode 3 Press until you have left the function ENTER A FREEVEND CODE 1 Follow the steps in GAIN ...

Page 14: ...yone other than the supervisor tries to enter a locked mode the display shows LOCKED NOTE Thefollowingmodekeyscannotbelockedout 4 Press until you have left the function SET PRINTER OR DEX OPTIONS 1 Follow the steps in GAIN ACCESS TO THE SUPERVISOR MODE 2 Press until the display shows one of the following PRINTER means that data will be sent directly to a printer OR DEX ONLY means that data remains...

Page 15: ...witch between LOCKED and UNLOCKED NOTE Thesupervisorcancleardataregardlessofthissetting providedthesupervisorcodewascorrectlyenteredfirst 4 Press until you have left the function SELECT PRINTER BAUD RATE PRINTER MODE ONLY BAUD The speed of data transfer expressed in bytes RATE per second Your printer can receive data at a certain rate and you must tell the machine what that rate is 1 Press One of ...

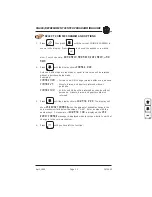
Page 16: ... CHANGE 0 00 Forced vend NO change returned without a purchase CHANGE 25 Nickels dimes and quarters returned without purchase CHANGE 1 00 1 bills and SBAs will be returned as change without purchase Nickels dimes and quarters are also returned 3 Press until the display shows LOW MSG X XX The display will show USE EXACT CHANGE when the amount of available change in the coin mechanism falls below th...

Page 17: ...2 5 10 and 20 bills Use BILL SELECTION METHOD below to change the bills which will be accepted BILL SELECTION METHOD The standard 1 2 5 10 and 20 bills are enabled by pressing the 1 2 5 6 or 7 key s respectively to display which bill s will be accepted MDB An MDB bill validator which accepts non standard bills or tokens is connected and operating Press to enter list of bills See INITIAL SETUP OF N...

Page 18: ...ill validator setup by pressing Bill information is now collected from the validator Re enter the bill validator selection screen and the non standard screen MDB will appear PULSE DBV The pulse bill validator will accept 1 bills Press to choose the desired option 2 Press until you have left the function SELECT DISPLAY LANGUAGE 1 Press The current LANGUAGE is shown in the display Press to choose th...

Page 19: ...e card REVALUE OFF Credit cannot be transferred to the card Press to display the desired choice 3 Press until you have left the function SELECT MONETARY OPTIONS This function lets you Set declining balance Set currency acceptance on low change Set overbuy options Set last bill stacking options 1 Press then press until one of the following is displayed DECLINE ON More than one vend is allowed with ...

Page 20: ... dollar bill or coin even though there is less than 1 00 s worth of change Entering 5 00 tells the machine to take a five even though there is less than 5 00 s worth of change and so forth NOTE This could cause a customer to be short changed Entering 0 00 means that bills or coins will only be accepted if there is enough change to cover them b The value of X XX tells the machine how much the custo...

Page 21: ...XX Press to display the desired choice If you selected WINNEROFF you can exit the function 2 The display shows WIN XXX XXX represents the number of vends which must occur per each winner vend For example an interval number of 50 means that a winner can happen any one time during the next 50 vends Using the number keys enter an interval number between 10 and 9999 3 Press The display shows The dashe...

Page 22: ... following is displayed CNF 0 SNACK Machine with all trays CNF 1 CHLLD Chilled snack machine CNF 2 CAN Machine with can unit CNF 3 CH CAN Chilled snack machine with can unit CNF 4 FOOD Any machine with refrigerated food module includes chilled CNF 5 FRZN Any machine with frozen food module includes chilled CNF 6 NDL Model 451 noodle machine only 2 Press to select the configuration appropriate to y...

Page 23: ...ome cases you may need to connect or disconnect the wire harness from a specific motor See your Setup Guide for more information NOTE An even numbered motor 0 2 4 etc may only be coupled to an odd numbered motor 1 3 5 etc 1 Press then press until the display shows CPL MTRS 2 Press the letter of the tray you want to couple or press to couple motors on tray A then press to get to the desired tray CO...

Page 24: ...the function COUPLE UNCOUPLE CAN SELECTIONS Adjacent can columns can be electronically coupled together to act as a single selection You can load two or more can columns with the same product and the coupled columns will alternatively vend as any of the individual columns are selected for sale Empty or jammed columns are automatically skipped Sales data is kept under the original selection 1 Press...

Page 25: ...t Motor is home leading apostrophe Motor is jammed SOME FINAL NOTES Make sure the coupled selections are set to the same price You cannot couple between rows E and F Coupling is disabled in TEST mode and defaults to direct selection SELECT WHEN THE CAN UNIT GOES OUT OF SERVICE 8 SELECT CAN UNIT ONLY 1 Press then press until the display shows either E F OFF 0 OR E F OFF 1 2 OFF 0 means that each ca...

Page 26: ... or you may reload the defaults for the present cup size To do this press and hold The display momentarily shows CLEARING then two beeps sound and FINISHED is displayed See the tables on the next page for the factory default times 3 Press until you have left the function SET WHETHER YOUR MACHINE IS FRESH BREW OR FREEZEDRY 1 Press then press until the display shows either J FB 0 4 6 8 9 OR J FD 0 4...

Page 27: ... 0 35 0 40 0 55 0 65 Extra lightener add to above time 0 15 0 15 0 10 0 15 Chocolate 2 60 2 90 3 40 3 80 Extra chocolate add to above time 0 30 0 35 0 65 0 65 Water for chocolate 8 65 10 20 12 00 13 00 Factory Default Throw Times Freeze Dry Machine Selections Throw times in seconds per size cup 5 oz 7 oz 8 oz 9 oz Coffee 1 00 1 10 1 50 1 90 Extra Coffee add to above time 0 25 0 30 0 30 0 35 Water ...

Page 28: ...ss 0 The display shows 0 ON This verifies that the 0 selection is turned on 3 Press The display shows 0 PROD 2 70 This means that the current selection 0 dry product throw time is 2 70 seconds For another selection the 0 would be replaced by that selection number Enter a new time if desired 4 Pressing after each display will cause the following screens to appear 0 PROD View and change the settings...

Page 29: ... the drink is chocolate 86 is coffee OPTIONS a At any of the preceding displays you can press to test throw that item b At any of the preceding displays you can press or on the selection switch panel to step through a list of that item s throw times for other selections where that item is active For example pressing at the 0WTR display will show the throw time for 4WTR This is a handy way to move ...

Page 30: ...d H MM shows the hours and minutes until the next defrost cycle If a plus sign is displayed H MM shows how long the unit has been defrosting 3 Press to start a manual defrost cycle 4 Press to end a defrost cycle in progress 5 Press The display shows DEFRST X DY X indicates the number of defrost cycles per day DY Press again to change the value of X 6 Press once to return to step 1 7 Press until yo...

Page 31: ... the display shows 38 F This means that 38 F is the current temperature setting 2 Press to raise the setting press to lower the setting 3 Press to choose between display in F or C 4 Press until you have left the function VIEW SOFTWARE VERSION 1 Press and press until the display shows VER XXXXXX XXXXXX represents the curent software version number 2 Press until you have left the function ...

Page 32: ...nt time using the number keys NOTE 9 00amisenteredwithaleadingzero likethis 0900 9 00 pmisenteredas2100 3 Press until you have left the function SET THE DAY OF THE WEEK 1 Press and press until the display shows SMTWTFS The letter representing the currently set day of the week will be flashing 2 Press until the correct day of the week is flashing 3 Press until you have left the function ...

Page 33: ... times a day 1 Press then press until the display shows INHIB 2 Go to the TIME INTERVAL EDITING procedure for an example of how to set up time of day inhibited vending SET TIME OF DAY FREE VENDING Vending can be free up to four times a day 1 Press then press until the display shows FREEV 2 Go to the TIME INTERVAL EDITING procedure for an example of how to set up time of day free vending SET TIME O...

Page 34: ...ume you just finished the SET TIME OF DAY DISCOUNT VENDING procedure Step 1 picks up where you left off 1 The display shows DISCT Press the number of the time interval you want to edit or to edit time interval 1 we ll use interval 1 for this example 2 The display shows 1 DISCT ON or 1 DISCT OFF This display tells you whether your time interval represented by 1 is on or off Press to change the cond...

Page 35: ...display now shows 1 M W F This discount interval is only active on Monday Wednesday and Friday 7 Press The display shows The dashes repre sent the trays affected by this time interval Press the appropriate letter key to enable a tray press the key again to disable it For example pressing A C and E will cause the display to look like this A C E _ meaning that all A C and E selections are affected b...

Page 36: ...ss 0 3 The selected message except the factory set message can be edited To do this press and follow the procedure given in EDIT CUS TOM MESSAGES 4 Press until you have left the function SELECT AN OUT OF SERVICE MESSAGE 1 Press then press until the display shows SERVICE XX XX represents the current message number selected to display when the machine is out of service Two dashes mean that the facto...

Page 37: ...ssage that displays when the machine is in the freevend mode Two dashes mean that the factory set message is selected 2 To select a message just press the corresponding number 1 through 8 To display the factory set message press 0 3 The selected message except the factory set message can be edited To do this press and follow the procedure given in EDIT CUS TOM MESSAGES 4 Press until you have left ...

Page 38: ... message number you pressed 2 Press The message text is displayed with the first character flashing 3 To view the message press The message scrolls across the display To stop the scrolling press 4 When the character you want to change is flashing either enter it directly or use and to step through the character set until the desired character is displayed Use the arrow keys to highlight different ...

Page 39: ... one screen at a time Steps forward and backward through the character list one character at a time Steps forward and backward through the message one character at a time Inserts an R at the flashing character Inserts an S at the flashing character Inserts a T at the flashing character Repeats the letter to the left of the flashing character Inserts a space at the flashing character Deletes the cu...

Page 40: ...exists and the displayed temperature is invalid A decimal point following the F or C means the compressor is running NOTE When the machine door is closed you can view the temperature of a food unit by pressing on the selectionpanel 3 Press until you have left the function PAYOUT COINS 1 Press If a dumb mech was selected the display shows NDQ 123 if an MDB mech was selcted the display shows PAY 123...

Page 41: ...his price SET ALL SELECTIONS ON A TRAY TO ONE PRICE a Press the letter key A J corresponding to the tray you want to price The display shows B X XX YY This display shows the maximum X XX and minimum YY prices set for the B tray b Press The display shows B X XX Enter a price using the number keys All selections on this tray are now set to this price c Press another letter key or to price another tr...

Page 42: ... data item shows its machine total To view the data by tray press the letter of the tray you want to see You can then press and to see data for all the active trays To view the data by individual selection press the letter and number of the selection you want to see You can then press and to see data for all the active selections If viewing data by individual selection press to view the date and t...

Page 43: ...n VIEW TOTAL PAID VENDS 1 Press then press until the display shows XX XX is the total number of paid vends for the entire machine 2 If desired view this data by tray and individual selection 3 Press until you have left the function CLEAR ALL RESETTABLE DATA 1 Press The display shows NR XX XX This is a running total and is not resettable 2 Press and hold Two beeps sound and the display shows CLEARI...

Page 44: ...cleared other data is not cleared 3 Press until you have left the function VIEW AMOUNT IN COIN BOX NOT SHOWN IF ZERO 1 Press then press until the display shows CBX XX XX XX XX is the dollar and cents amount in the coin box 2 Press until you have left the function VIEW AMOUNT IN VALIDATOR NOT SHOWN IF ZERO 1 Press then press until the display shows DBV XX XX XX XX is the dollar amount in the bill s...

Page 45: ...s until you have left the function VIEW DISCOUNT SALES BY TIME INTERVAL 1 Press then press until the display shows XX XX 2 Press The display shows 1 DSC 00 This is the total sales for discount interval 1 not shown if zero 3 Press to view intervals 2 through 4 4 Press until you have left the function VIEW FREE VENDS NOT SHOWN IF ZERO 1 Press then press until the display shows 0 XX XX 2 Press then p...

Page 46: ...1 30 at 10 13 am 10 13 Press If applicable similar displays will appear for intervals 2 3 and 4 Otherwise go to the next step 3 The following message scrolls across the display AUX 5 33M 01 30 10 58 This example shows the latest time interval the auxiliary food module door was open 5 It was open for 33 minutes and was opened on January 30 01 30 at 10 58 am 10 58 Press If applicable similar display...

Page 47: ...ays 2 hours and 47 minutes 00 2 47 7 Press The following message scrolls across the display FULL CLEAR 01 30 8 58 This example shows that the last time resettable sales was fully cleared was on January 30 01 30 at 8 58am 8 58 8 Press The following message scrolls across the display TIME SET 01 30 9 15 This example shows that the last time the time or date was set was on January 30 01 30 at 9 15 am...

Page 48: ... by tray and individual selection 3 Press until you have left the function VIEW TOTAL UNPAID VENDS 1 Press then press until the display shows _0 XX XX is the total number of unpaid vends for the entire machine 2 If desired view this data by tray and individual selection 3 Press until you have left the function VIEW NUMBER OF TEST VENDS NOT SHOWN IF ZERO 1 Press then press until the display shows T...

Page 49: ... display shows TEST 00 You may now test vend selections If you insert money into the machine the zeros in the display will be replaced with the amount of the credit After the item vends your money will be returned NOTE Youmaymakeonemoretestvendifyouclosethedoorwhile stillinTESTVENDmode 2 Press until you have left the function TEST THE DISPLAY 1 Press then press until the display shows DSPLY TEST 2...

Page 50: ...il the display shows TST MTRS 2 Press or the letter of the tray you want to view 3 The display will show the status of all motors on the tray Tray letter If motor is present If motor is present and coupled to the next odd motor blank If motor is not present and not coupled If motor is coupled but not present If the motor is home If there is a motor error such as jammed tray not detected or missing...

Page 51: ...FOOD DOOR FOOD OR FROZEN ONLY 1 Press then press until the display shows FOOD 0123 The display represents the states of various switches and display under the following conditions 0 Vend door lock switch is locked 1 Loading door is closed 2 Food door is open 3 Food door is closed Door is jammed or other error exists 2 Press to move the vend door to a new position vend door will lock if the door is...

Page 52: ...hen press until the display shows RINSE 9 2 Press to rinse the coffee mixing bowl press to rinse the chocolate bowl 3 Press until you have left the function TEST DROP A CUP AND TEST SWITCHES 1 Press then press until the display shows CUP T P M T Tank error low water P Waste pail full Cup turret empty M Mug switch actuated Actuate these switches to cause these codes to go on and off in the display ...

Page 53: ...til you have left the function TEST THE WHIPPER S 1 Press then press until the display shows WHIP 2 Press The whipper runs for one cycle If more than one whipper is installed each will run for one cycle 3 Press until you have left the function DOWNLOAD DATA TO A PDCD 1 Connect your portable data collection device PDCD per its operating instructions 2 Press Data is downloaded into your PDCD NOTE De...

Page 54: ...go out of service OR FREE W KEY All items are freevended while there is a closure on the keyswitch input Normal cash sales are supported when the keyswitch input is open If the free vend code selected under SUPERVISOR MODE is not 0000 the code must be entered first OR FREE ONCE A closure on the keyswitch input causes only the next item to be freevended Coin mechanism errors are ignored this state ...

Page 55: ...two beeps are heard and the display shows FINISHED TEMPREF The temperature reference on the main PCB cannot be read TEMPSENSE The temperature sensor cannot be read TEMPRANGE The temperature sensor is out of range CHKPRICE Price error detected and changed to maximum check prices CHKCONFIG A PRODUCT CONFIG value was out of bounds and set to nominal check all PRODUCT CONFIGs HEALTHOFF Presently out o...

Page 56: ...e sensors in the bill validator has failed The unit will disable itself until the error is corrected Check for bill stuck in the acceptance path If no bill is present replace the validator Cycle machine power OFF and then ON DBV ROM ROM checksum failure The unit will disable itself until the error is corrected Replace the validator DBV JAM A bill is jammed in the acceptance path The unit will disa...

Page 57: ...ting it has failed Replace unit CARD ERRXX Card reader has an error and indicates code XX The code is defined by the card reader manufac turer To correct contact card reader manufacturer The unit is still operational CARD F ERRXX Card reader has failed and indicates code XX The code is defined by the card reader manufacturer To correct contact card reader manufacturer CARD F JAM Card reader has fa...

Page 58: ...n event of vandalism fire or negligence or c incandescent lamps neon lamps fluorescent lamps ballasts starters or other expendable items or d when other manufactured components are installed in National Vendors Merchandisers National Vendors is not responsible for any cost of service rendered or repairs made by customer or its agents on Merchandiser or parts unless authorization to incur such expe...

Page 59: ......

Reviews: