background image

5

 Hardware

Index

 Contents

1

2 3 4

6

5

7

8

9

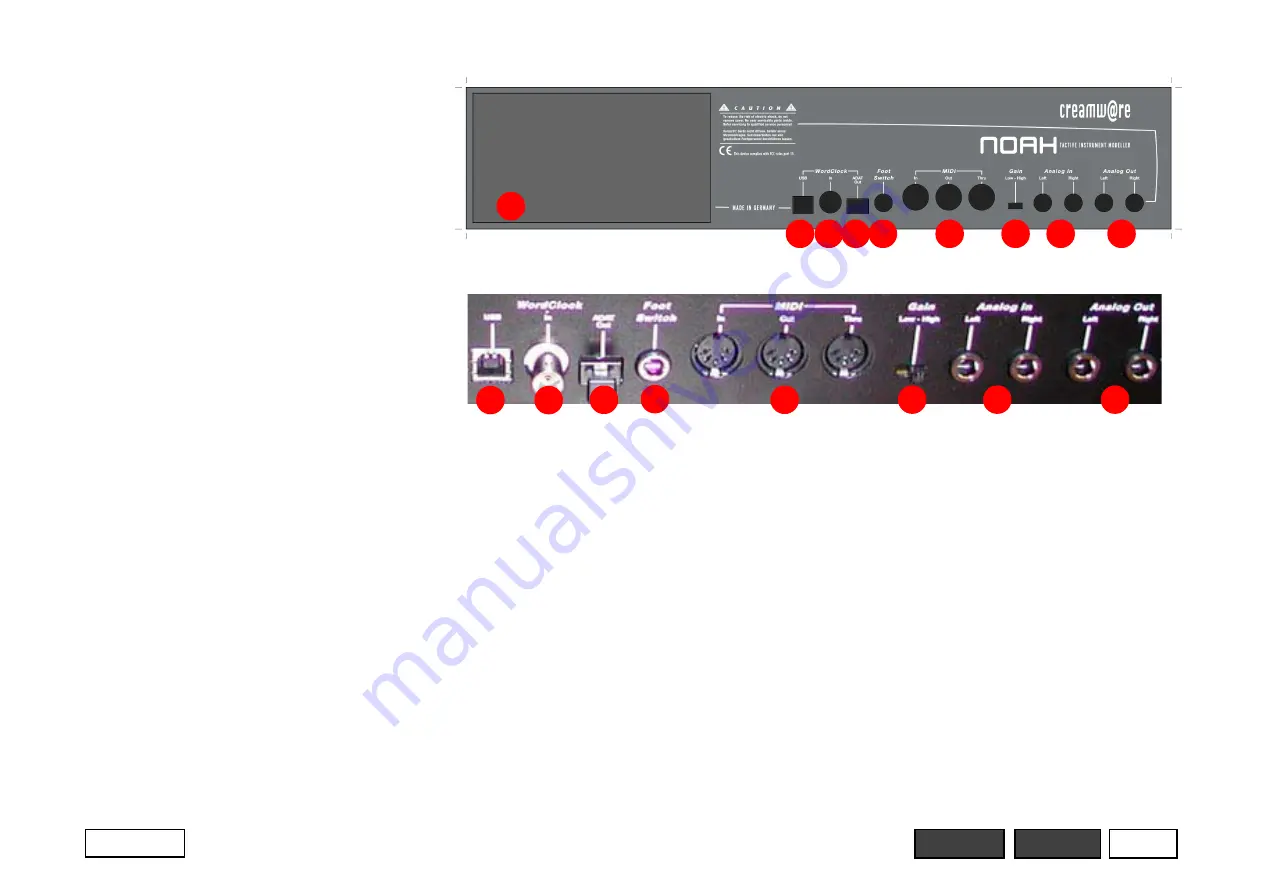
Back Panel

1 - Main Power Switch

This is the main power switch. Use it to
switch the Noah unit off if you are not using
Noah for a longer time or for transport
purposes.

2 - USB Port

Use the USB port to connect a computer
from which you can configure Noah easily
and conveniently. The USB port can also
transmit a USB audio signal between the
computer and Noah.

3 - Word Clock Input

Connect a word clock signal from an
external device to this BNC terminal.

4 - ADAT Output

Use this optical output to transmit 8 inde-
pendent audio channels digitally to an
external device with a compatible ADAT
input.

5 - Footswitch

Currently, the foot switch is not supported.

6 MIDI In / Out / Thru

These jacks connect Noah to a MIDI
keyboard, sequencer, or one other MIDI
device. Noah receives MIDI data at the
MIDI In jack and transmits data through
MIDI Out. The incoming MIDI data is
passed through to the Thru jack for
transmission to other MIDI devices.

7 - Gain Switch

Switches the analog input sensitivity
between -10 dB (Low) and -24 dB (High).

8 - Analog In Left / Right

Use these 6.35mm jacks to connect
external audio eignals for processing by
Noah.

9 - Analog Out Left / Right

The analog outs connect Noah to your
audio amplifier or monitoring system.

2

3

4

5

6

7

8

9

Summary of Contents for Noah

Page 1: ...1 Hardware Index Contents Noah Hardware MainTable of Contents Front Panel Back Panel Tactive Instrument Modeller Connections ...

Page 2: ...g of Presets without Keyboard 2 MIDI LED This LED flashes when the unit is receiving MIDI data 5 Continuous Controllers Use the four Continuous Controllers below the display to access the parameters shown in the lower display line Usually each of the four Continuous Controllers is assigned to one of the displayed parameters Pressing Pushing any of the Continuous Controller Push Function will open ...

Page 3: ...n Control Mode is active the LED above the button is lit red For more information see Operating Noah Performance Controllers 10 Exit Button Use the Exit button to abort an action or to move back up through the menu system For more information see Operating Noah Navigating the Menus 11 ControlWheel This control changes the value of a selected parameter and or preset The Control Wheel can also be us...

Page 4: ...which effects will be muted or not when the FX Bypass Button 18 is pressed When Bypass is active the LED below the button is lit red For more information see Edit Mode The FX Bypass Menu Muting Effects 19 Compare Button Lets you toggle between the current and the previously stored settings of the selected preset For more information see Operating Noah Presets 20 Write Button Opens the menu pages f...

Page 5: ...transmit 8 inde pendent audio channels digitally to an external device with a compatible ADAT input 5 Footswitch Currently the foot switch is not supported 6 MIDI In Out Thru These jacks connect Noah to a MIDI keyboard sequencer or one other MIDI device Noah receives MIDI data at the MIDI In jack and transmits data through MIDI Out The incoming MIDI data is passed through to the Thru jack for tran...

Page 6: ...ntents Connections The accompanying diagram shows the most important connections to be made to other devices before starting to use Noah Computer optional MIDI Keyboard Active monitors monitoring system MIDI Out USB Port ...

Page 7: ...ton 3 Control Wheel 3 Controllers 2 D Display 2 Down 3 E Edit Button 4 Enter Button 3 Exit Button 3 External Button 4 F Footswitch 5 Front Panel 2 FX Bypass Button 4 G Gain Switch 5 L LED 2 Left 3 M MIDI In Out Thru 5 MIDI LED 2 Mode Button 3 P Phones 2 Plus Minus Buttons 3 Power Button 4 R Right 3 S System Button 3 U Up 3 USB Port 5 USB LED 2 Utility 4 V Volume 2 W Word Clock Input 5 Write Button...

Reviews: