background image

7

ENGLISH

OPERATION

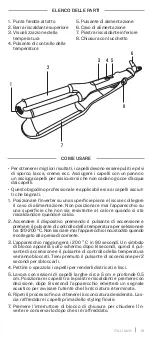
LIST OF PARTS

•  For the best result, hair should be clean and free from dirt, hair 

spray and hair cream, etc. Please dry your hair with a cloth or dry-

er until making sure that there is no extra water dropping from 

the hair.

•  This professional hair waver is applicable to both dry and damp hair.
1. 

Rest the waver on a smooth, flat surface and plug in the power 

cord. Never put the appliance on a surface that is not heat-resist-

ant when it’s heating up and when it’s hot.

2. Turn on the device by pressing the on/off switch and press the 

temperature control button to select from 120-200 ºC. Never 

leave the appliance unattended when it’s plugged in. 

3. The appliance will reach 200 ºC in 90 seconds. A lock symbol will 

appear on the display after 8 seconds and then the on/off button 

and temperature control button will be locked. Long press the 

on/off switch for 2 seconds to unlock them.

4. Comb or brush your hair so that it’s disentangled and smooth.
5. Work with hair sections that are about 2’’ wide and 1/4’’ deep. 

Place hair between the heating plates and press down firmly. Af

-

ter 8 seconds, the appliance will make a beeping sounds to alert 

the user that the curling is over.

6. Repeat the process until the desired hairstyle is achieved. Let the 

hair cool before final combing.

7. Press the lock-in close switch to close the waver for storage after 

it has cooled down.

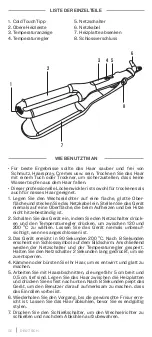
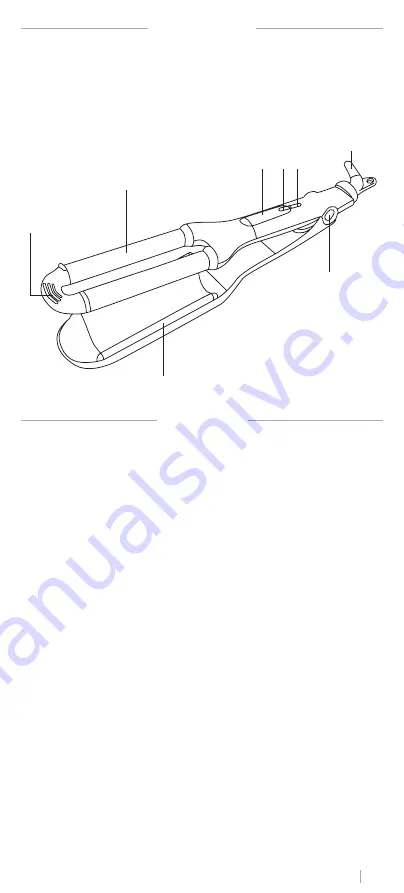
1.  Cool tip
2. Upper heating barrel
3. Temperature display
4. Temperature control button

5. On / Off button
6. Power cord
7. Lower heating plate
8. Lock-in close

1

2

7

8

3

4 5

6

Summary of Contents for CURLER CERAMIC

Page 1: ...CURLER CERAMIC HAIR WAVER ONDULADOR DE PELO USER MANUAL ...

Page 2: ......

Page 3: ......

Page 4: ...ce 8 ESPAÑOL Instrucciones de seguridad 9 Listado de partes 10 Modo de uso 10 Limpieza y mantenimiento 11 PORTUGUÊS Instruções de segurança 12 Lista de peças 13 Modo de uso 13 Limpeza e manutenção 14 FRANÇAIS Instructions de sécurité 15 Liste des pieces 16 Mode d utilisation 16 Nettoyage et entretien 17 ...

Page 5: ...H Sicherheitshinweise 21 Liste der einzelteile 22 Wie benutzt man 22 Reinigung und instandhaltung 23 NEDERLANDS Veiligheidsinstructies 24 Onderdelen lijst 25 Hoe te gebruiken 25 Schoonmaak en onderhoud 26 POLSKI Instrukcje bezpieczeństwa 27 Lista części 28 Jak używać 28 Czyszczenie i konserwacja 29 CURLER CERAMIC ...

Page 6: ...over the bathtub sinks etc When used in a bathroom unplug the appliance after using since the proximity of water presents a risk even when the appliance is turned off Keep the appliance out of the reach of children The heating plates and joint plastic parts can reach a high tempera turequickly Preventheatingsurfaceoftheappliancefromcontacting yourskin Only use the appliance on dry or damp hair Do ...

Page 7: ... will reach 200 ºC in 90 seconds A lock symbol will appear on the display after 8 seconds and then the on off button and temperature control button will be locked Long press the on off switch for 2 seconds to unlock them 4 Comb or brush your hair so that it s disentangled and smooth 5 Work with hair sections that are about 2 wide and 1 4 deep Place hair between the heating plates and press down fi...

Page 8: ...collection systems or contact the retailer from where the product was purchased They can take this product for environmentalsaferecycling CLEANING AND MAINTENANCE 1 Make sure the appliance is switched off and unplugged 2 Let the appliance cool down completely on a heat resistant sur face Never wind the power cord around the appliance 3 Clean the appliance with a damp cloth 4 Use the lock in close ...

Page 9: ...lo utilice cerca o so bre la bañera lavabos etc Cuando se utilice en un baño desen chufe el aparato después de su uso ya que la proximidad del agua representa un riesgo incluso cuando el aparato está apagado Mantenga el aparato fuera del alcance de los niños Las placas calefactoras y las piezas de plástico de las juntas pueden alcanzar una temperatura elevada rápidamente Evite que la superficie de...

Page 10: ...e candado en la pantalla después de 8 segundos y lue go el botón de encendido y el botón de control de temperatura se bloquearán Mantenga pulsado el botón de encendido durante 2 segundos para desbloquearlos 4 Peine o cepille su cabello para que quede desenredado y suave 5 Trabaje con secciones de cabello de aproximadamente 5 cm de ancho y 0 5 cm de profundidad Coloque el cabello entre las plac as ...

Page 11: ...n contacto con el establecimiento donde se adquirió el producto Ellos pueden recoger este producto para un reciclaje medioambientalseguro LIMPIEZA Y MANTENIMIENTO 1 Asegúrese de que el aparato esté apagado y desenchufado 2 Deje que el aparato se enfríe completamente sobre una super ficie resistente al calor Nunca enrolle el cable de alimentación alrededor del aparato 3 Limpie el aparato con un pañ...

Page 12: ...go Mantenha este aparelho longe da água Não use perto ou na ba nheira pias etc Ao usar no banheiro desligue o aparelho após o uso pois a proximidade da água representa um risco mesmo quando o aparelho está desligado Mantenha o aparelho fora do alcance das crianças As placas de aquecimento e as peças de plástico das juntas po dem atingir uma temperatura elevada rapidamente Evite que a superfície de...

Page 13: ...símbolo de cadeado aparecerá na tela após 8 segundos e em seguida o botão liga desliga e o botão de controle de temperatura serão bloqueados Pressione e segure o botão liga desliga por 2 se gundos para desbloqueá los 4 Penteie ou escove o cabelo para deixá lo desembaraçado e liso 5 Trabalhe com mechas de cabelo com aproximadamente 5 cm de largura e 0 5 cm de profundidade Coloque o cabelo entre as ...

Page 14: ...ão e recolha apropriadosoucontacteorevendedorondeoprodutofoiadquirido Eles podemrecolheresteprodutoparareciclagemambientalsegura LIMPEZA E MANUTENÇÃO 1 Certifique se de que o aparelho está desligado e desconectado 2 Deixe o aparelho esfriar completamente em uma superfície re sistente ao calor Nunca enrole o cabo de alimentação em volta do aparelho 3 Limpe o aparelho com um pano úmido 4 Use o botão...

Page 15: ...tranchants et ne le laissez pas pendre Tenez le cordon éloigné des zones chaudes et humides Avant utilisation vérifiez que l appareil fonctionne correcte ment L appareil ne doit pas être utilisé si Le câble de connexion est endommagé L appareil présente des dommages notables L appareil est tombé N enroulez jamais le câble principal autour de l appareil Le câble principal ne doit pas entrer en cont...

Page 16: ...rs de l utilisation de laque pour cheveux ou de produits similaires car la laque peut provoquer des brûlures lorsque la substance entre en contact avec les poils de la brosse lissante MODE D UTILISATION LISTE DES PIECES Pour de meilleurs résultats les cheveux doivent être propres et exempts de saleté de laque de crèmes etc Séchez les cheveux avec un chiffon ou un sèche cheveux pour vous assurer qu...

Page 17: ...d alimentation et mainten ez le enfoncé pendant 2 secondes pour les déverrouiller 4 Peignez ou brossez vos cheveux pour les rendre démêlés et liss es 5 Travaillez avec des mèches de cheveux d environ 5 cm de large et 0 5 cm de profondeur Placez les cheveux entre les plaques chauffantes et appuyez fermement après 8 secondes l appa reil émettra un bip pour alerter l utilisateur que le curling est te...

Page 18: ...ua Non utilizzare vi cino o sopra la vasca da bagno lavandini ecc Quando si utilizza in bagno scollegare l apparecchio dopo l uso poiché la vicinanza dell acqua rappresenta un rischio anche quando l apparecchio è spento Tenere l apparecchio fuori dalla portata dei bambini Le piastre riscaldanti e le parti in plastica delle guarnizioni pos sono raggiungere rapidamente una temperatura elevata Evitar...

Page 19: ...ondi Un simbolo di blocco apparirà sullo schermo dopo 8 secondi quindi il pul sante di accensione e il pulsante di controllo della temperatura verranno bloccati Tieni premuto il pulsante di accensione per 2 secondi per sbloccarli 4 Pettina o spazzola i capelli per renderli districati e lisci 5 Lavora con sezioni di capelli larghe circa 5 cm e profonde 0 5 cm Posizionare i capelli tra le piastre ri...

Page 20: ...eilprodottoè statoacquistato Essi possonoritirarequestoprodottoper il riciclaggio ambientalesicuro PULIZIA E MANUTENZIONE 1 Assicurarsi che l apparecchio sia spento e scollegato dalla pre sa di corrente 2 Lasciar raffreddare completamente l apparecchio su una su perficie resistente al calore Non avvolgere mai il cavo di ali mentazione attorno all apparecchio 3 Pulite l apparecchio con un panno umi...

Page 21: ...r fern Nicht in der Nähe oder auf der Badewanne Waschbecken usw verwenden Wenn Sie in einem Badezimmer arbeiten ziehen Sie nach dem Gebrauch den Netzstecker aus der Steckdose da die Nähe zum Wasser ein Ri siko darstellt auch wenn das Gerät ausgeschaltet ist Bewahren Sie das Gerät außerhalb der Reichweite von Kindern auf Die Heizplatten und die Kunststoffteile der Dichtungen können schnell eine hoh...

Page 22: ...erät erreicht in 90 Sekunden 200 C Nach 8 Sekunden erscheint ein Schlosssymbol auf dem Bildschirm Anschließend werden der Netzschalter und der Temperaturregler gesperrt Halten Sie den Netzschalter 2 Sekunden lang gedrückt um sie zu entsperren 4 Kämmen oder bürsten Sie Ihr Haar um es entwirrt und glatt zu machen 5 Arbeiten Sie mit Haarabschnitten die ungefähr 5 cm breit und 0 5 cm tief sind Legen S...

Page 23: ... oder wenden Sie sich an den Händler bei dem das Produkt gekauft wurde Diese können dieses Produkt für ein umweltgerechtes Recycling sammeln REINIGUNG UND INSTANDHALTUNG 1 Stellen Sie sicher dass das Gerät ausgeschaltet und vom Stromnetz getrennt ist 2 Lassen Sie das Gerät auf einer hitzebeständigen Oberfläche vollständig abkühlen Wickeln Sie niemals das Netzkabel um das Gerät 3 Reinigen Sie das G...

Page 24: ...rt van water Niet gebruiken in de buurt van of op de badkuip gootstenen enz Bij gebruik in een badkamer moet u na gebruik de stekker uit het stopcontact ha len aangezien de nabijheid van water een risico vormt zelfs als het apparaat is uitgeschakeld Houd het apparaat buiten bereik van kinderen De verwarmingsplaten en de kunststof onderdelen van de pak kingen kunnen snel een hoge temperatuur bereik...

Page 25: ...pcontact 3 Het apparaat bereikt 200ºC in 90 seconden Na 8 seconden ver schijnt een vergrendelingssymbool op het scherm en worden de aan uit knop en de temperatuurregelingsknop vergrendeld Houd de aan uit knop 2 seconden ingedrukt om ze te ontgren delen 4 Kam of borstel je haar om het ontward en glad te maken 5 Werk met haarsecties die ongeveer 5 cm breed en 0 5 cm diep zijn Plaats het haar tussen ...

Page 26: ... of neemt u contact op met het etablissement waarhetproductisgekocht Zekunnenditproductophalenvoorveilige milieurecycling SCHOONMAAK EN ONDERHOUD 1 Zorg ervoor dat het apparaat is uitgeschakeld en de stekker uit het stopcontact is gehaald 2 Laat het apparaat volledig afkoelen op een hittebestendige on dergrond Wikkel het netsnoer nooit om het apparaat 3 Maak het apparaat schoon met een vochtige do...

Page 27: ...knąć jakiegokolwiek niebezpieczeń stwa Trzymaj urządzenie z dala od wody Nie używaj w pobliżu lub na wannie zlewozmywakach itp W przypadku używania w łazience po użyciu odłącz urządzenie ponieważ bliskość wody stwarza zagrożenie nawet gdy urządzenie jest wyłączone Trzymaj urządzenie poza zasięgiem dzieci Płyty grzewcze i plastikowe części uszczelek mogą szybko osią gnąć wysoką temperaturę Unikaj k...

Page 28: ...00ºC w 90 sekund Po 8 sekundach na ekranie pojawi się symbol blokady a następnie przycisk zasi lania i przycisk sterowania temperaturą zostaną zablokowane Naciśnij i przytrzymaj przycisk zasilania przez 2 sekundy aby je odblokować 4 Rozczesz lub uczesz włosy aby je rozczesać i wygładzić 5 Pracuj z pasmami włosów o szerokości około 5 cm i głębokości 0 5 cm Umieść włosy między płytami grzewczymi i m...

Page 29: ...rotu i odbioru lub skontaktuj się z zakładem w którym produkt został zakupiony Mogą odebrać ten produktwcelubezpiecznegorecyklinguwśrodowisku CZYSZCZENIE I KONSERWACJA 1 Upewnij się że urządzenie jest wyłączone i odłączone od zasi lania 2 Pozostaw urządzenie do całkowitego ostygnięcia na powier zchni odpornej na ciepło Nigdy nie owijaj przewodu zasila jącego wokół urządzenia 3 Czyść urządzenie wil...

Page 30: ......

Page 31: ......

Page 32: ...32 Made in P R C ...

Reviews: