© Copyright 2010, Creative Playthings
MODEL PS10LIN
19764-100 Rev D (05-10)
Page 18
ASSEMBLY INSTRUCTIONS
Your gym comes with either a Swing Beam or Top
Ladder. Both come with instructions for assem-
bly and mounting. The instructions on this page
show the unique steps for mounting them to this
gym.
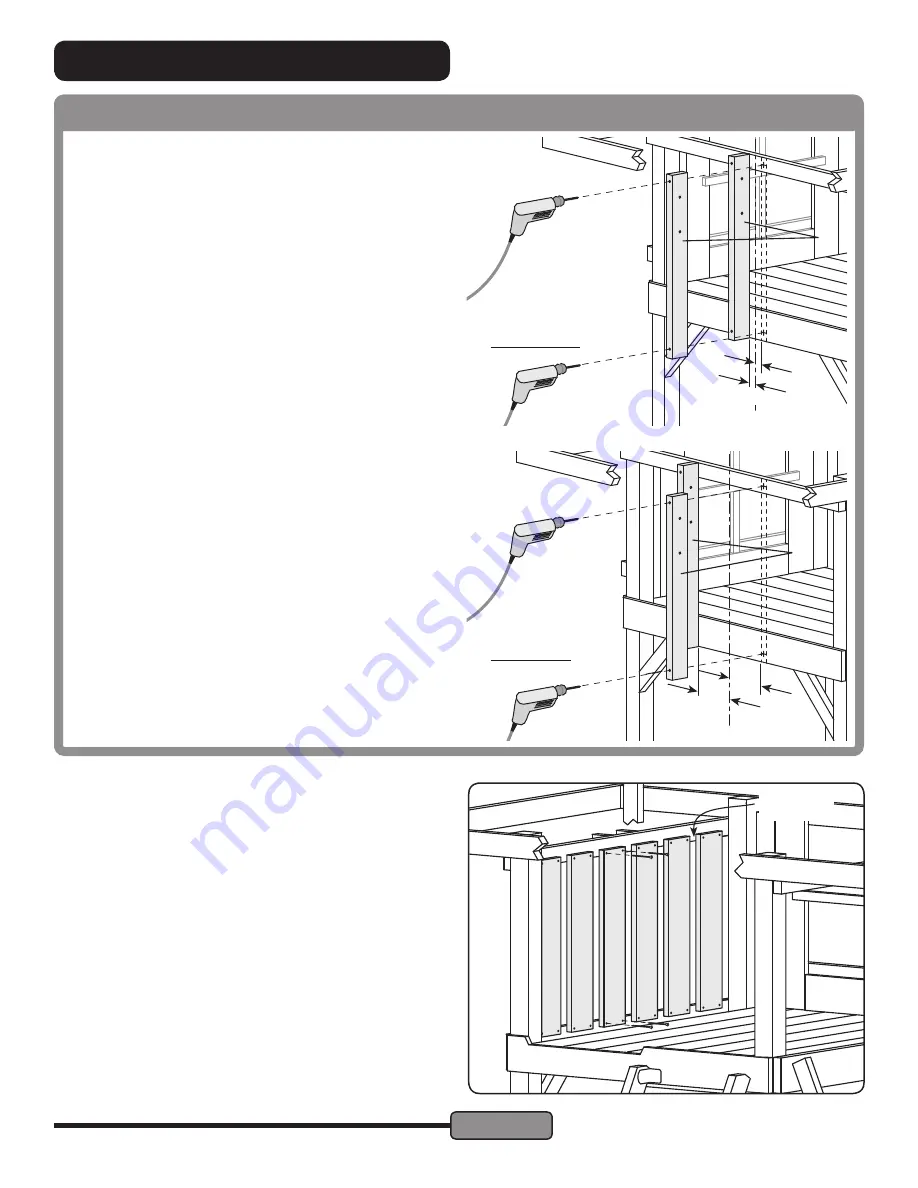
67(3³6ZLQJ0RXQWV
The Swing Mounts (AJ) for this gym fasten in a way very simi-
lar to the method shown in the instructions included with the
Swing Beam or Top Ladder that comes with this gym. Follow
those instructions for drilling 5/16" holes in the left Side Wall
Support and Left Platform Side.
Fasten the top of the Swing Mounts to the left Side Wall Sup-
port using one 1/4 x 4-1/2" Hex Bolt Assemblies each. Fasten
the bottom of the Swing Mounts to the Left Platform Side Us-
ing one 1/4 x 4" Hex Bolt Assembly each.
Mount the Swing Beam or Top Ladder as shown in the instruc-
tions provided.
67(3³:DOO6ODWV
Evenly space six Wall Slats (AN) between the Front and Back
Corner Posts. Fasten each using four #10 x 1-1/2" Screws.
The gap will be approximately 2-5/8" between slats.
Special addendum for Top Ladder:
The opening between
the Top Ladder Rails should be closed off using two Wall
Slats, unless the Top Ladder is to be used as Monkey Bars.
If this space is left open, the swings should be removed to
SUHYHQWDFRQÁLFWRISOD\
2-5/8" Typical
Gap
AJ
AJ
Top Ladder or Swing Beam
Swing Beam
Top Ladder
1-1/2"
1-1/2"
C
L
C
L
8-1/4"
8-1/4"
AN
AN
AN
AN
AN
AN


