6
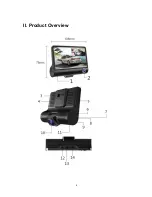
11. Up Button
•
The upturn key used in the menu selection of the recorder and the
volume adjustment.
12. Rear View Camera Port
•
The interface used to connect the rear-view backup camera to the
recorder.
13. Power Interface
•
The interface used to connect a car charger or a step-down line (AC
Hardwire included) to the recorder, or to connect the dash cam to your
computer for data transfer.
14. TF card slot (MicroSD Card)
•
Press down the MicroSD to insert and lock. Press down on the MicroSD
to pop it out.
II.1. Few detailed instructions for the camera
buttons functions
:
1. Plug the lighter charger into the camera and your cigarette spot. - make sure the
car is turned on because the camera needs power for initial startup. (or hook it up to
the Fuse Box for constant power).
2. Hold the middle "Turn On" button for a few seconds until it turns on.
3. The "M" (UP) button allows you to change the mode (video, photo or view
recorded files). You can hold "M" for a few seconds to go in the "Main Menu".
4. The "Ok" (low) button it's the "Enter" (confirmation button) - you can press it when
you when you want to start recording, take a photo or select a menu option.
5. The 'Right arrow" (the one towards the screen) turns on or off the microphone and
moves down the selection on the menu.
6. The "Left" arrow" (the one towards the back of the camera) changes the recording
mode (only front camera, only rear camera, picture-in-picture etc.) and moves up the
selection on the menu.
Summary of Contents for PRO2
Page 1: ...USER MANUAL FULL HD DASH CAM CAR PRO2 ...
Page 4: ...4 II Product Overview ...
Page 11: ...11 ...


