background image


III. Installation Guide 

1. Turn off your vehicle engine. 

2. Insert the MicroSD card into the dash cam’s slot. 

***Please use the high-speed SD card(Class 10 above), capacity of not less than 
512MB and the MicroSD card maximum support 64GB (only if formatted, if not, we 
recommend 32GB – The loop recording feature ensures that you will always have 
enough storage.) 

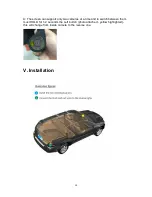
3. The recorder is fixed to the windshield using the included accessories. Its position 
can be your choice, but we recommend it to be installed under your rearview mirror 
because it doesn’t block much of your viewing angle. Please ensure that the glass 
surface is clean, so you can have a stronger adsorption force. 

4. Insert the car charger into the car cigarette lighter. 

5. Use extension cable to connect car charger and dash cam’s USB port for power 
sourcing. 

***Charger extension line can lay along the edge of the windshield when wiring. 

6. The backup camera is installed in the rear of the vehicle, pay attention to the 
direction of installation. Wiring can also be laid along the vehicle roof (not most 
common). After the installation is complete, connect rear camera cable to the dash 
cam’s rear camera interface. 

7. Adjust the lens position to ensure that the lens is parallel to the ground. Although, 
the backup camera metal hook is adjustable, please make sure you don’t change its 
position very often. 

8. Start the engine, check if the recorder has been installed correctly. 

***When the machine is properly installed, the system lights work, the dash cam 
enters the recording mode, the recording indicator light flashes. Remember to check 
on the display screen if it’s normally positioned, if the display screen is mirrored, 
please contact us! 

9. For any questions regarding installation please contact us at 

support@creative-

xp.com

 and we will help you ASAP. Also, we have a YouTube Channel “CreativeXP 

HD Dash Cam” where we post tutorials, installation videos etc. 


Summary of Contents for PRO2

Page 1: ...USER MANUAL FULL HD DASH CAM CAR PRO2 ...

Page 2: ...refully In addition due to production date different batches instructions may differ from the actual use of the product If you have any suggestions or questions don t hesitate to contact us at support creative xp com Please check our YouTube HD Dash Cam Channel for more tutorials installation videos Finally we sincerely wish you all the best quiet moments on the road Kind regards CreativeXP Team ...

Page 3: ...e Front camera Up and down adjustable Joint USB2 0 AV OUT Battery capacity 320MAH USB USB2 0 high speed transmission Size 78 108mm Working temperature 20 to 40 degrees Celsius 10 80 Power supply Built in lithium battery vehicle charger Memory card Maximum support for 32GB MicroSD Video format 1920x1080 720 848 480 640 1280x480 HDMI No HDMI HD video output Microphone Built in 24 hour parking monito...

Page 4: ...4 II Product Overview ...

Page 5: ... the use of the HD Dash Cam in the high temperature environment 6 Menu Photo Playback Key Access the menu login option the collection key of photos and videos the playback mode accessed by the short press or long press 7 Power Button The power button will turn on and off the dashboard recorder Long Press Turn on and off the dash cam screen Short Press 8 Down Button The downturn key for menu select...

Page 6: ...our cigarette spot make sure the car is turned on because the camera needs power for initial startup or hook it up to the Fuse Box for constant power 2 Hold the middle Turn On button for a few seconds until it turns on 3 The M UP button allows you to change the mode video photo or view recorded files You can hold M for a few seconds to go in the Main Menu 4 The Ok low button it s the Enter confirm...

Page 7: ...the edge of the windshield when wiring 6 The backup camera is installed in the rear of the vehicle pay attention to the direction of installation Wiring can also be laid along the vehicle roof not most common After the installation is complete connect rear camera cable to the dash cam s rear camera interface 7 Adjust the lens position to ensure that the lens is parallel to the ground Although the ...

Page 8: ...its performance over time Is a lithium battery included A Yes it does include a lithium battery 150 mAh 0 55 Wh but it s just for short functionality not for long term power storage The dash camera needs to be powered via lighter charger or hardwired to record long videos Does the smart assist beep when you come to close to cars while parking A The backup assistance won t beep when you come close ...

Page 9: ...he license plates ahead during low light situations Does it have IR lenses A Our current HD Dashcam Pro2 can record license plates ahead during low light situations Low light Night Vision included but it doesn t feature IR lenses for complete darkness Can the rear camera record videos if yes at what resolution A Yes the rear view camera can record and the recording can be shown on the dashcam s sc...

Page 10: ...en can support only two cameras at a time and to switch between them must HOLD for 1 2 seconds the Left button photo attached yellow highlighted this will change from inside camera to the reverse one V Installation ...

Page 11: ...11 ...
Reviews: