Assembly instructions
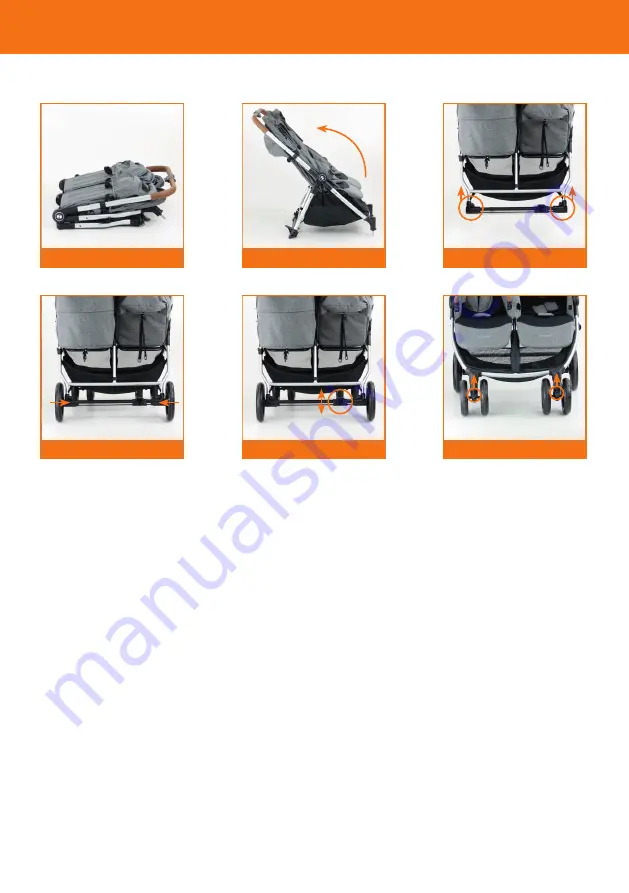
1. To open the chassis
Pull the folding catch to the side and lift the
handle upwards (2) until the handle locks in
place.
3. Attach rear axle and wheels and functions
Push the axle onto the rear legs (4) until the
spring clips have popped through the holes.
Push the stems of the rear wheels into the
axle until they click in place. Pull the wheel
gently to make sure they are secure. To re-
move the rear wheels, push the silver button
in and pull the wheel outwards.
5. To operate the brakes
With your foot, push the foot pedal on the
right si de down until it clicks in to place (3).
Lift upwards to release the breaks.
WARNING! Ensure that all the locking
devices are engaged before use.
6. Front wheel assembly and functions
Push the front wheels on to the front legs of
the chassis until they click into place. Pull
them gently to make sure they are secure.
Push the swivel catch up to select fixed
wheels or down for swivel wheels.
To remove the front wheels you can either
push the button in and pull the wheel unit
and stem off or you can just remove the
wheel unit by pushing the button located
on the bottom of the leg and pull the wheel
unit off.
1. Chassis
Out of the box the Comfort is fully assemb-
led and ready for use except wheels, seatu-
nit and canopy.
2. To unfold
To open the Comfort chassis stand behind
the pushchair and, with both hands on the
pushbar, pull-up until the chassis clicks into
place.
3. Attach the wheels
Open the wheel lock by pressing. Place the
wheel into the axle. Release locking catch
when fully inserted and wheel should lock
into position. Pull on wheel to ensure that it
is securely fitted. This process is repeated
all around.
4. Attaching the seat unit or carrycot
Engage the brake and place the seat unit
or carrycot over the chassis. When the seat
unit or carrycot is correctly fitted a click will
be heard on each side. Ensure that it is se-
curely attached before use.
4b. Detaching seat unit or carrycot
Press the release buttons on both sides
and lift straight up. Marked by arrow.
5. Attaching the canopy
Fit the canopy by linserting the canopy hol-
ders in the holes on both sides.
6. Adjusting the backrest
Use the handle on the rear of the backrest
to adjust the backrest to desired position.
3
2
4
1
5
6
Summary of Contents for duo lightway
Page 16: ...crescentbarnvagnar se ...


