Monteringsanvisningar
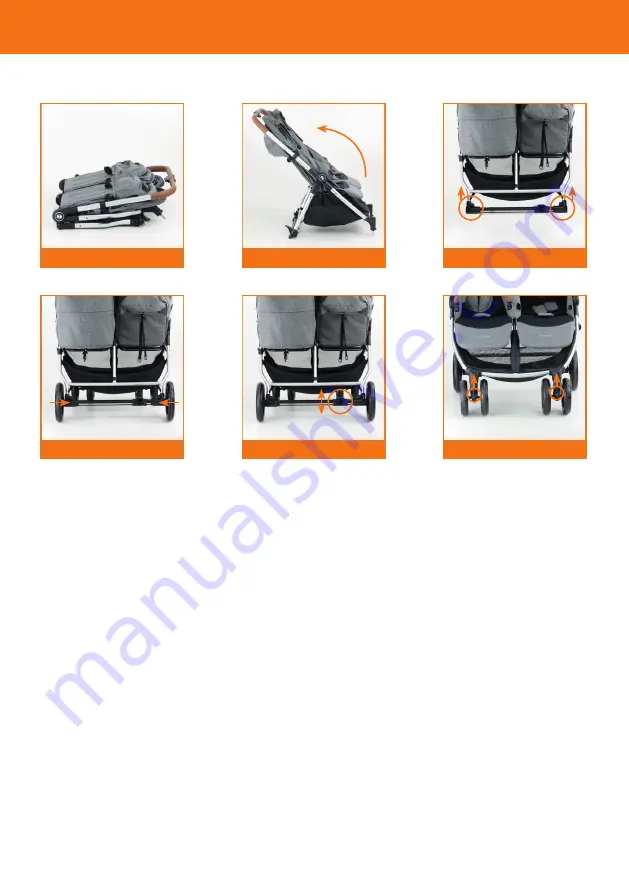
1. För att fälla upp chassit
Dra fästhaken åt sidan och lyft handtaget
uppåt (2) tills handtaget låser på plats.
3. Montera bakaxel och hjul
Tryck axeln upp i sina fästen på chassit (4)
tills det klickar på båda sidor. Klicka på bak-
hjulen. Dra försiktigt i hjulet så att de sitter
säkert fast. För att ta bort bakhjulen trycker
du in silverknappen och drar hjulet utåt.
5. För att använda bromsen
Med foten trycker du fotpedalen nedåt tills
den klickar. Lyft uppåt för att släppa på
bromsen.
VARNING! Kontrollera att alla låsanord-
ningar är inkopplade före användning.
6. Framhjulsmontering och funktioner
Skjut framhjulen på framkanten på chassit
tills de klickar på plats. Drag i dem försiktigt
för att kontrollera att de är säkra.
Tryck justeringen uppåt för att välja fasta
hjul eller nerår för svängbara hjul.
För att ta bort framhjulen kan du antingen
trycka in knappen och dra i hjulet nedåt
eller så kan du ta bort hjulet genom att
trycka på knappen på botten av benet och
dra av hjulet.
1. Chassis
Out of the box the Comfort is fully assemb-
led and ready for use except wheels, seatu-
nit and canopy.
2. To unfold
To open the Comfort chassis stand behind
the pushchair and, with both hands on the
pushbar, pull-up until the chassis clicks into
place.
3. Attach the wheels
Open the wheel lock by pressing. Place the
wheel into the axle. Release locking catch
when fully inserted and wheel should lock
into position. Pull on wheel to ensure that it
is securely fitted. This process is repeated
all around.
4. Attaching the seat unit or carrycot
Engage the brake and place the seat unit
or carrycot over the chassis. When the seat
unit or carrycot is correctly fitted a click will
be heard on each side. Ensure that it is se-
curely attached before use.
4b. Detaching seat unit or carrycot
Press the release buttons on both sides
and lift straight up. Marked by arrow.
5. Attaching the canopy
Fit the canopy by linserting the canopy hol-
ders in the holes on both sides.
6. Adjusting the backrest
Use the handle on the rear of the backrest
to adjust the backrest to desired position.
3
2
4
1
5
6
Summary of Contents for duo lightway
Page 16: ...crescentbarnvagnar se ...


