background image

48


Installation & Operation Manual

10  

Operating information   

Monitor external limits

Connections are provided on the connection board for 
external limits such as an additional high limit.  The 
SMART TOUCH control will shut off the burner and 
inhibit relighting whenever any of these external limits 
open.

Run-time and alarm outputs

The boiler provides dry contacts for indicating when the 
boiler is running, and when it is unable to operate.

Run-time and cycle counting

The control uses four timers to monitor the total hours of 
burner operation:
75 - 100% 


50 - 75%

25 - 50% 


<25%

The control uses four (4) ignition counters to monitor 
the amount of boiler cycles.  The first counter counts all 
ignitions of the control.  The second counter counts only 
ignition attempts that have failed.  The third and fourth 
counters are the same as the first and second respectively, 
but can be reset by the installer.

Service reminder

The control can be programmed for service reminder 
notification.  This notification will become active when 
either a set amount of time has expired, or a set amount of 
running hours or cycles has expired (all adjustable by the 
installer).  The service reminder notification can be reset 
by the installer.  The service company’s name and phone 
number can be programmed to display when service is due.

Error logging

The control will hold in memory the last 10 blocking faults 
as well as the last 10 lockout faults.  The date and time of 
the occurrence will be recorded as well.  Only the 10 most 
recent occurrences will be held in memory.

Boiler temperature regulation

Operating temperature (target)

The SMART TOUCH control module senses water 
temperature and regulates boiler firing and firing rate to 
achieve a target temperature.  The target temperature can 
be set between 32°F (0°C) and 185°F (85°C).

•   Target temperature is fixed when the outdoor 
 

sensor is not installed.

•   Target temperature is calculated as described 
 

under “Outdoor Reset Operation” and “Target 


Temperature Boost” when the outdoor sensor is 

 connected. 


High limit operations

The Crest SMART TOUCH control has two (2) integral limits, 
one auto reset and one manual reset.  The Crest also has one 
auxiliary manual reset high limit.  The integral and auxiliary 
high limits are UL353 certified.

When the outlet temperature exceeds 195°F (90.6°C) (Installer 
Adjustable Parameter), integral auto reset high limit action 
occurs.  The boiler will shut down until the outlet water cools 
down and the timer expires.

If the outlet temperature exceeds 200°F (93.3°C) (User 
Adjustable Dial), auxiliary manual reset high limit action 
occurs.  The boiler will shut down until the outlet water cools 
down and the boiler is reset through the user interface.

If the outlet temperature exceeds 205°F (93.3°C) (Installer 
Adjustable Parameter), integral manual reset high limit action 
occurs.  The boiler will shut down until the outlet water cools 
down and the boiler is reset through the user interface.

Low water cutoff protection

A low water cutoff device with test and reset functionality is 
provided in the boiler as standard equipment.

Flow sensing device

The SMART TOUCH control module uses temperature sensing 
of both supply and return temperatures of the heat exchanger.  
If the flow rate is too low or the outlet temperatures too high, 
the control module modulates down and will shut the boiler 
off.  This ensures boiler shutdown in the event of low flow 
conditions.

Outdoor reset operation, if used

Target temperature with outdoor reset

This feature improves the system’s efficiency as the outdoor 
temperature warms up.

See the Crest Service Manual to change the settings.

Reset curve

The reset curve looks at outdoor air temperature and adjusts 
the set point.

 NOTICE

If a mechanical flow switch is required to 
meet local code requirements the Crest 
boiler can be equipped with a field supplied 
outlet switch.  Please reference page 38 of 
this manual for more information.


Summary of Contents for 1.5

Page 1: ...luding this manual and the Crest Service Manual before installing Perform steps in the order given Failure to comply could result in severe personal injury death or substantial property damage WARNING Save this manual for future reference FB I O Rev H Installation Operation Manual Models 1 5 2 0 2 5 3 0 3 5 ...

Page 2: ...ng Options Vertical Vent 14 Direct Venting Options Vert Vent Opt Rm Air 14 Direct Venting Options Vert Vent Sidewall Air 14 Install Vent and Combustion Air Piping 15 Air Inlet Pipe Materials 15 Requirements for Installation in Canada 15 Vent and Air Piping 16 Air Intake Vent Connections 16 Min Max Combustion Air Vent Piping Lengths 17 Vent and Air Piping 17 Common Venting 18 3 VERTICAL DIRECT VENT...

Page 3: ...tantial property damage Do not use homemade cures or boiler patent medicines Serious damage to the boiler personnel and or property may result Continual fresh make up water will reduce boiler life Mineral buildup in the heat exchanger reduces heat transfer overheats the stainless steel heat exchanger and causes failure Addition of oxygen carried in by makeup water can cause internal corrosion in s...

Page 4: ...rs allowing gas to flow only if the gas valves are powered and combustion air is flowing 18 Blower proving switches Prove adequate airflow during prepurge 19 High limit devices primary and backup The high limit devices are used to monitor the outlet water temperature if either device senses the water temperature exceeding the predetermined setting the boiler will shut down 20 Ignition electrode An...

Page 5: ...nside unit The Crest How it works continued 5 Installation Operation Manual Models 1 5 2 0 2 5 3 0 3 5 2 11 1 39 Front View 7 36 6 35 9 29 5 19 10 Rear View 33 12 13 17 34 3 37 25 26 21 22 29 20 12 27 14 32 4 15 16 23 19 28 31 30 34 18 ...

Page 6: ...y for the requirements of the building and nothing need be added for normal piping and pickup Ratings are based on a piping and pickup allowance of 1 15 3 Crest boilers require special gas venting Use only the vent materials and methods specified in the Crest Installation and Operation Manual 4 Standard Crest boilers are equipped to operate from sea level to 4 500 feet only with no adjustments 5 H...

Page 7: ...e manufacturer to be held responsible for water damage in connection with this appliance or any of its components 3 Check area around the boiler Remove any combustible materials gasoline and other flammable liquids This appliance requires a special venting system Use only the vent materials specified in this manual Failure to follow all instructions can result in flue gas spillage and carbon monox...

Page 8: ...ng The Crest requires a special gas vent system designed for pressurized venting The boiler is to be used for either direct vent installation or for installation using indoor combustion air When room air is considered see page 23 of this manual Note prevention of combustion air contamination below when considering vent air termination Vent and air must terminate near one another and may be vented ...

Page 9: ...iance see Section 2 General Venting Table 2A For stainless steel venting an adapter of the same manufacturer Table 2B may be used at the flue collar connection Size To ensure proper pipe size is in place see Table 2C Check to see that this size is used throughout the vent system Manufacturer Only use the listed manufacturers and their type product listed in Table 2A for CAT IV positive pressure ve...

Page 10: ...ust fan Close fireplace dampers DANGER WARNING At the time of removal of an existing boiler the following steps shall be followed with each appliance remaining connected to the common venting system placed in operation while the other appliances remaining connected to the common venting system are not in operation d Place in operation the appliance being inspected Follow the lighting instructions ...

Page 11: ... tools required Do not drop the boiler or bump the jacket on the floor or pallet Damage to the boiler can result REAR FRONT BOLT WASHERS LOCKNUT 3X LAG BOLTS TABS 3X Figure 1 2 Boiler Mounted on Shipping Pallet NOTICE Maintain minimum specified clearances for adequate operation All installations must allow sufficient space for servicing the vent connections water pipe connections piping and other ...

Page 12: ...OT be of Tight Construction 3 A combination of indoor and outdoor combustion air may be utilized by applying a ratio of available volume to required volume times the required outdoor air opening s size s This must be done in accordance with the National Fuel Gas Code NFPA 54 ANSI Z223 1 Figure 1 5_Combustion Air Through Ducts 2 If combustion and ventilation air is taken from the outdoors using a d...

Page 13: ...air supply and or cause a downdraft in the venting system Spillage of flue products from the venting system into an occupied living space can cause a very hazardous condition that must be corrected immediately The combustion air supply must be completely free of any flammable vapors that may ignite or chemical fumes which may be corrosive to the appliance Common corrosive chemical fumes which must...

Page 14: ...14 Installation Operation Manual Vertical 2 General venting Sidewall Direct venting Vertical Vent Sidewall Air Sidewall Vertical Optional room air ...

Page 15: ... s instructions can result in personal injury death or property damage Mixing of venting materials will void the warranty and certification of the appliance NOTICE The use of double wall vent or insulated material for the combustion air inlet pipe is recommended in cold climates to prevent the condensation of airborne moisture in the incoming combustion air Sealing of Type B double wall vent mater...

Page 16: ...d carbon monoxide emissions causing severe personal injury or death The Crest uses model specific combustion air intake and vent piping sizes as detailed in Tables 2B and 2C on page 17 Increasing or decreasing combustion air or vent piping to sizes not specified in this manual is not authorized NOTICE 2 General venting Use only the materials vent systems and terminations listed in Table 2A DO NOT ...

Page 17: ...tructions in Section 1 page 10 of this manual when removing a boiler from an existing vent system Vent and air piping Vent and air system Installation must comply with local requirements and with the National Fuel Gas Code NFPA 54 ANSI Z223 1 for U S installations or CSA B149 1 for Canadian installations You must also install air piping from outside to the boiler air intake adapter The resultant i...

Page 18: ...ommon vent must be connected and controlled with the integral Crest SMART TOUCH Cascade a The Leader may be controlled through the Crest SMART TOUCH control through BMS external 0 10V signal ModBus or its own internally calculated set point b The Cascade Members must be controlled by the Crest Leader boiler using the efficiency optimized Cascade For approved common vent sizing contact the factory ...

Page 19: ...ubstantial property damage Installation must comply with local requirements and with the National Fuel Gas Code NFPA 54 ANSI Z223 1 latest edition for U S installations or CSA B149 1 Installation Code for Canadian installations WARNING NOTICE WARNING Do not connect any other appliance to the vent pipe or multiple boilers to a common vent pipe except as noted in Section 2 on page 18 Failure to comp...

Page 20: ...ection It is not classified as a forced air intake with regard to spacing from adjacent boiler vents 36 914 MM 36 914 MM 12 305 MM 12 305 MM 12 305 MM 12 305 MM 12 305 MM 12 305 MM Figure 3 3 Vertical Terminations with Multiple Boilers 36 914 MM 12 305 MM 36 914 MM 12 305 MM Figure 3 4 Alternate Vertical Terminations with Multiple Boilers WARNING 3 The vent piping must terminate in an up turned co...

Page 21: ...or substantial property damage Installation must comply with local requirements and with the National Fuel Gas Code NFPA 54 ANSI Z223 1 for U S installations or CSA B149 1 for Canadian installations Determine location Locate the vent air terminations using the following guidelines 1 The total length of piping for vent or air must not exceed the limits given in the General Venting Section on page 1...

Page 22: ... air connection as described in this manual FIG 4 4 WARNING 22 Installation Operation Manual 4 Sidewall direct venting Vent air termination sidewall 4 4 Figure 4 2 Clearance to Doors and Windows VENT TERMINATION IF LESS THAN 10 36 MIN FORCED AIR INLET AIR TERMINATION Figure 4 3 Clearance to Forced Air Inlets Prepare wall penetrations 1 Air pipe penetration a Cut a hole for the air pipe Size the ai...

Page 23: ...itered 23 Elbow Figure 4 5 Direct Vent Terminations ROOM AIR DIRECT EXHAUST TERMINATIONS Vent Termination 23 Elbow 45 Elbow 90 Elbow Figure 4 6 Room Air Direct Exhaust Terminations Room air AIR INLET COVER Figure 4 7 Room Air Installation The Crest boiler may be installed with a single pipe carrying the flue products to the outside while using combustion air from the equipment room Follow the requ...

Page 24: ...n of the Crest 5 2 thru 5 5 1 Connect the system return to the 4 flanged connection marked Inlet make sure to install with a suitable gasket between flanges 2 Connect the system supply to the 4 flanged connection marked Outlet make sure to install with a suitable gasket between flanges 3 Install purge and balance valve or shutoff valve and drain on system return to purge air out of each zone 4 Ins...

Page 25: ...TURE RISE APPLICATIONS Model BOILER CONNECTION SIZE 20 F 40 F 60 F GPM FT HD GPM FT HD GPM FT HD FB 1500 4 138 3 4 69 1 5 46 1 0 FB 2000 4 184 4 1 92 1 6 61 1 0 FB 2500 4 230 4 6 115 1 3 77 0 7 FB 3000 4 277 5 6 138 1 2 92 0 7 FB 3500 4 323 7 5 161 1 2 108 0 7 0 1 2 3 4 5 6 7 8 9 10 11 12 13 14 15 16 0 50 100 150 200 250 300 350 FBN1500 FBN2000 FBN2500 FBN3000 FBN3500 Flow Rate GPM Pressure Drop F...

Page 26: ...is recommended when storing domestic hot water above 115 F 46 C 8 Pressure relief valve Factory supplied The pressure relief valve is sized to ASME specifications 9 System temperature sensor Lochinvar supplies a system temperature sensor The sensor is to be installed in the heating loop downstream from the boiler hot water piping and heating loop junction The sensor should be located far enough do...

Page 27: ...T WATER GENERATOR WATER GENERATOR CIRCULATOR BOILER PUMP FLOW CHECK VALVE TYPICAL Y STRAINER RECOMMENDED RELIEF VALVE BALL VALVE TYPICAL AIR SEPERATOR DRAIN PORT TYPICAL SYSTEM CIRCULATOR BACK FLOW PREVENTER PRESSURE REDUCING VALVE PRESSURE GAUGE EXPANSION TANK 12 MAX FROM SYSTEM TO SYSTEM MAKE UP WATER BOILER DRAIN SYSTEM RETURN SENSOR SYSTEM SUPPLY SENSOR System flow should always remain higher ...

Page 28: ... SYSTEM MAKE UP WATER BOILER DRAIN TYPICAL SYSTEM RETURN SENSOR SYSTEM SUPPLY SENSOR Figure 5 3 Multiple Boilers Common Header Recommended Primary Secondary Flow Model Number of Units 2 3 4 5 6 7 8 Recommended Common Header Pipe Sizes in Inches FB 1500 4 4 5 5 6 6 7 FB 2000 4 5 5 6 7 7 8 FB 2500 5 5 6 7 7 8 10 FB 3000 5 6 7 7 8 10 10 FB 3500 5 6 7 8 10 10 10 NOTICE A system supply sensor factory s...

Page 29: ... for all equipment and detailing required by local codes NOTICE Y STRAINER RECOMMENDED RELIEF VALVE BALL VALVE TYPICAL AIR SEPERATOR DRAIN PORT TYPICAL SYSTEM CIRCULATOR BACK FLOW PREVENTER PRESSURE REDUCING VALVE PRESSURE GAUGE EXPANSION TANK FROM SYSTEM TO SYSTEM MAKE UP WATER BOILER DRAIN Figure 5 4 Single Boiler Alternate Fixed or Variable Flow Primary System Piping ...

Page 30: ...AL AIR SEPERATOR DRAIN PORT TYPICAL SYSTEM CIRCULATOR BACK FLOW PREVENTER PRESSURE REDUCING VALVE PRESSURE GAUGE EXPANSION TANK FROM SYSTEM TO SYSTEM MAKE UP WATER BOILER DRAIN TYPICAL SYSTEM RETURN SENSOR SYSTEM SUPPLY SENSOR Figure 5 5 Multiple Boilers Alternate Common Header Fixed or Variable Flow Primary When installing multiple Crest boilers in fixed or variable flow primary applications util...

Page 31: ...g system by closing a manual shutoff valve during any pressure testing of the gas supply piping system at test pressures equal to or less than 1 2 PSIG 3 5 kPa c The appliance and its gas connection must be leak tested before placing it in operation The gas valve and blower will not support the weight of the piping Do not attempt to support the weight of the piping with the boiler or its accessori...

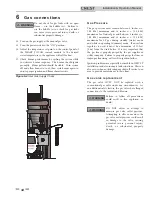
Page 32: ...during boiler startup Maximum inlet gas pressure must not exceed the value specified Minimum value listed is for the purposes of input adjustment WARNING WARNING NOTICE WARNING Ensure that the high gas pressure regulator is at least 10 feet 3 m upstream of the appliance FIG 6 3 Check boiler rating plate to determine which fuel the boiler is set for Crest boilers CAN NOT be field converted Failure ...

Page 33: ...djustments are needed proceed on to Step 11 10 If the gas pressure is out of range contact the gas utility gas supplier qualified installer or service agency to determine the necessary steps to provide proper gas pressure to the control 11 Turn the power switch to the OFF position 12 Shut off the gas supply at the manual gas valve in the gas piping to the appliance 13 Remove the manometer from the...

Page 34: ...for LP gas during standby static mode and while in operating dynamic mode If an in line regulator is used it must be a minimum of 10 feet 3 m from the Crest boiler It is very important that the gas line is properly purged by the gas supplier or utility company Failure to properly purge the lines or improper line sizing will result in ignition failure Ignition problems are especially noticeable in ...

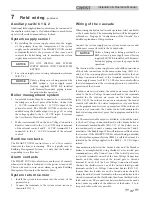
Page 35: ...voltage terminal strip in the junction box as shown in FIG 7 1 2 Provide and install a fused disconnect or service switch sized per the boiler amp draw shown on the boiler rating plate as required by the code see FIG 7 1 3 When connecting the boiler system and hot water generator pumps connect the wiring to the line voltage terminal strip as shown in FIG 7 1 Maximum current is 1 5 amps Install a f...

Page 36: ...inals Use shielded 2 wire twisted pair cable If desired the shield can be connected to ground by installing a jumper wire between terminals 1 and 3 on connector X5 on the ModBus interface module Hot Water Generator HWG thermostat 1 Connect the HWG tank thermostat to the Tank Thermostat terminals on the connection board FIG 7 3 Hot Water Generator HWG tank sensor 1 By installing a HWG tank sensor t...

Page 37: ...FIG s 5 5 and 5 6 The system supply sensor should be wired to the Low Voltage Connection Board at the terminals marked for the system supply sensor see FIG 7 3 The Leader control will use the water temperature at the system supply sensor to control the operation of the Cascade If outdoor air reset is desired the outdoor air sensor should be wired to the Low Voltage Connection Board at the terminal...

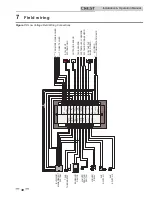
Page 38: ...R SENSOR SENSOR SENSOR TANK SYSTEM SUPPLY SYSTEM RETURN BOILER PUMP OUT OUT RATE MODBUS SHIELD SHIELD B A SHIELD SHIELD B A BUILDING MANAGEMENT SYSTEM TANK THERMOSTAT ENABLING DEVICE LOUVER PROVING SWITCH LOUVER RELAY AUX SWITCH 1 AUX SWITCH 2 FROM PREVIOUS BOILER TO NEXT BOILER A B B A SHIELD SHIELD 0 10V INPUT SYSTEM PUMP OUTDOOR SENSOR TANK SENSOR SYSTEM SUPPLY SENSOR SYSTEM RETURN SENSOR 0 10V...

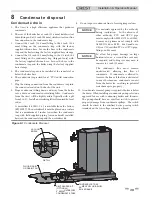
Page 39: ...e neutralizer kit must be placed on a surface that is a minimum of 3 inches lower than the condensate trap with field supplied piping vacuum break installed between the condensate trap and the neutralizer kit Use materials approved by the authority having jurisdiction In the absence of other authority PVC and CPVC pipe must comply with ASTM D1785 or D2845 Cement and primer must comply with ASME D2...

Page 40: ...quire a backflow preventer or actual disconnect from city water supply 3 When using freeze protection fluid with automatic fill install a water meter to monitor water makeup Freeze protection fluid may leak before the water begins to leak causing concentration to drop reducing the freeze protection level Fill and test water system 1 Fill system only after ensuring the water meets the requirements ...

Page 41: ...and the gas may no longer have an odor Before startup and periodically thereafter have the propane supplier verify the correct odorant level in the gas Check thermostat circuit s 1 Disconnect the two external wires connected to the enable terminals on the connection board 2 Connect a voltmeter across these two incoming wires Close each thermostat zone valve and relay in the external circuit one at...

Page 42: ...ter piping 1 Check system piping for leaks If found shut down the boiler and repair immediately See WARNINGS on pages 40 and 41 startup regarding failure to repair leaks 2 Vent any remaining air from the system using manual vents Air in the system will interfere with circulation and cause heat distribution problems and noise Check vent piping and air piping 1 Check for gastight seal at every conne...

Page 43: ...o inspect the appliance and to replace any part of the control system and any gas control which has been under water OPERATING INSTRUCTIONS 1 STOP Read the safety information above on this label 2 Set the thermostat to lowest setting 3 Turn off all electric power to the appliance 4 This appliance is equipped with an ignition device which automatically lights the burner Do not try to light the burn...

Page 44: ...e Set Points Menu Press the following buttons to navigate to the Set Points Menu from the Home Screen After pressing SETUP the Password Screen will appear Entering the correct password will allow access to all Installer Level adjustable parameters Press ENTER without a password to access the User Level parameters 1 To change a set point use the arrows to highlight a user set point parameter and pr...

Page 45: ...evel adjustable parameters Press ENTER without a password to access the User Level parameters The SMART TOUCH control has a built in clock that it uses for its night setback feature and for logging events This clock must be set when the boiler is installed and anytime the boiler has been powered off for more than one day Use the following procedure to set the clock 1 To set the clock highlight Clo...

Page 46: ... HW thermostat or sensor to the low voltage connection board When the HW thermostat or sensor calls for heat the control module activates the HW pump shuts down the boiler pump and immediately sets the target outlet water temperature to 180 F 82 2 C This provides automatic priority heat allocation to the HW Generator for maximum response and recovery The HW pump continues for 60 seconds after the ...

Page 47: ...ailable This output may be connected to a Building Management System BMS to allow it to monitor the actual firing rate Connect the terminal to the COM or terminal on the BMS and connect the terminal to the 0 10V or terminal on the BMS Ramp Delay For systems with lower flow the SMART TOUCH can limit the firing rate when enabled when a space heating call for heat starts or when switching from a DHW ...

Page 48: ... is not installed Target temperature is calculated as described under Outdoor Reset Operation and Target Temperature Boost when the outdoor sensor is connected High limit operations The Crest SMART TOUCH control has two 2 integral limits one auto reset and one manual reset The Crest also has one auxiliary manual reset high limit The integral and auxiliary high limits are UL353 certified When the o...

Page 49: ...time at a lower rate thus more efficient This Cascade is also required when cascading boilers in a common vent application Lead Lag The Lead Lag method is chosen when the application requires firing as few boilers at a time as possible This method will not bring on another boiler until the current number of boilers cannot meet the demand This Cascade is NOT allowed in a common vent application The...

Page 50: ...o the desired set point temperature 9 If the current call for heat is for space heating and a HW call for heat becomes active the control will turn on the HW pump relay output then turn off the boiler pump It will then modulate the blower speed in order to maintain the outlet temperature to the desired HW outlet set point temperature 10 If the first combustion system in the boiler is unable to mai...

Page 51: ...his screen Main Menu button Pressing this button brings up the Main Menu Screen From this screen navigation to nine 9 other screens is possible Reference the Main Menu Screen section on page 52 of this manual for more information regarding this screen Modulation button Pressing this button brings up the Modulation Screen This screen shows overall boiler modulation individual fan speeds and flame c...

Page 52: ...12 other screens for the adjustment of the control parameters Cascade Shows the status of multiple boilers connected together in a cascade arrangement Leader only Modulation Shows the status of the two 2 gas train systems used in the boiler BMS Shows the information from a Building Integration System Pumps Allows the installer to configure the boiler system and DHW pumps History Shows the operatin...

Page 53: ...out and performance verification per Section 9 Flame inspection stable uniform Check both flame signals at least 10 microamps at high fire Clean the heat exchanger Test low water cutoff reference the Crest Service Manual If combustion or performance indicate need Clean heat exchanger Remove and clean burner using compressed air only Clean the blower wheels ANNUAL START UP Owner maintenance see the...

Page 54: ...ed in Section 1 of this manual If any of these are present in the boiler intake air vicinity they must be removed If they cannot be removed reinstall the air and vent lines per this manual Inspect boiler interior 1 Remove the front access covers and inspect the interior of the boiler 2 Vacuum any sediment from inside the boiler and components Remove any obstructions Clean condensate trap 1 Inspect...

Page 55: ...iping before proceeding further Safety relief valves should be re inspected AT LEAST ONCE EVERY THREE YEARS by a licensed plumbing contractor or authorized inspection agency to ensure that the product has not been affected by corrosive water conditions and to ensure that the valve and discharge line have not been altered or tampered with illegally Certain naturally occurring conditions may corrode...

Page 56: ...remove and clean the burner Clean the burner thoroughly using a vacuum cleaner or compressed air Do not use compressed air to clean the burner if cleaning is performed inside a building Shut down the boiler Follow the To Turn Off Gas to Appliance instructions for the boiler in Section 9 Startup Do not drain the boiler unless it will be exposed to freezing temperatures If using freeze prevention fl...

Page 57: ...n in this appliance contains ceramic fiber material Ceramic fibers can be converted to cristobalite in very high temperature applications The International Agency for Research on Cancer IARC has concluded Crystalline silica in the form of quartz or cristobalite from occupational sources is carcinogenic to humans Group 1 Normal operating temperatures in this appliance are below the level to convert...

Page 58: ...ENSOR 0 10V 0 10V BMS IN SYSTEM PUMP IN SHIELD SHIELD A B CASCADE LARGE CONNECTION BOARD CN6 1 CN3 6 CN3 7 CN3 14 CN3 13 CN3 11 CN3 9 CN3 8 CN3 1 CN3 2 CN3 3 CN3 4 CN6 2 CN6 3 CN3 10 CN3 12 MODBUS BOARD X4 1 X4 2 X4 3 X6 3 X6 1 X6 2 X8 20 X8 10 X7 8 X8 13 X8 14 X8 12 INTEGRATED CONTROL CN3 4 X8 15 X7 7 X8 11 X8 6 X8 16 X8 7 X8 17 X8 1 T T T T T T T T T INLET SENSOR OUTLET SENSOR S9 OUTLET SENSOR S...

Page 59: ... SWITCH 2 SHIELD SHIELD A B MODBUS OPTION RATE OUT BOILER PUMP OUT SYSTEM RETURN SENSOR SYSTEM SUPPLY SENSOR 0 10V 0 10V TANK SENSOR OUTDOOR SENSOR 0 10V 0 10V BMS IN SYSTEM PUMP IN SHIELD SHIELD A B CASCADE R R R O R O L B K B R B R Y R O HIGH LIMIT SWITCH R R X6 1 X6 2 X6 3 Y G R R P MODBUS BOARD L B R L B R R B W R O OR W P W L B K B J3 5 J3 4 J3 6 LWCO BOARD J3 3 J3 2 J2 1 J2 2 X6 3 R O OR BK ...

Page 60: ... of Full Flow Revision E ECO C08841 reflects changes made to 3 on page 42 additional information added to the humidity warning on page 7 along with references to the Dual Fuel Supplemental Manual Revision F ECO C09629 reflects the update of the AHRI and ASME logos on page 6 and the update of condensate disposal information and Figure 8 1 on page 39 Revision G ECO C10325 reflects a kit number corre...

Reviews: