background image

                                                                                   CRESTRON                                                                                   

4  

••

  3-Card Expansion Cage: CNXCAGE

Operations & Installation Guide - DOC. 8119

appropriate connector. There is no danger of improperly connecting
the CNXCAGE.

8.


Reposition the CNMSX-AV right-side-up on a flat surface and insert
the CNXCAGE 

 with attached cable assembly 

 into the CNMSX-

AV through the opening at the top and side of the unit.

9.


Attach the cable assembly 

 to the P3 connector on the CNMSX-AV

CPU.

10.


Secure the CNXCAGE 

 to the CNMSX-AV with four screws 

 and

two screws 

.

CNXCAGE Installation (4 of 4)

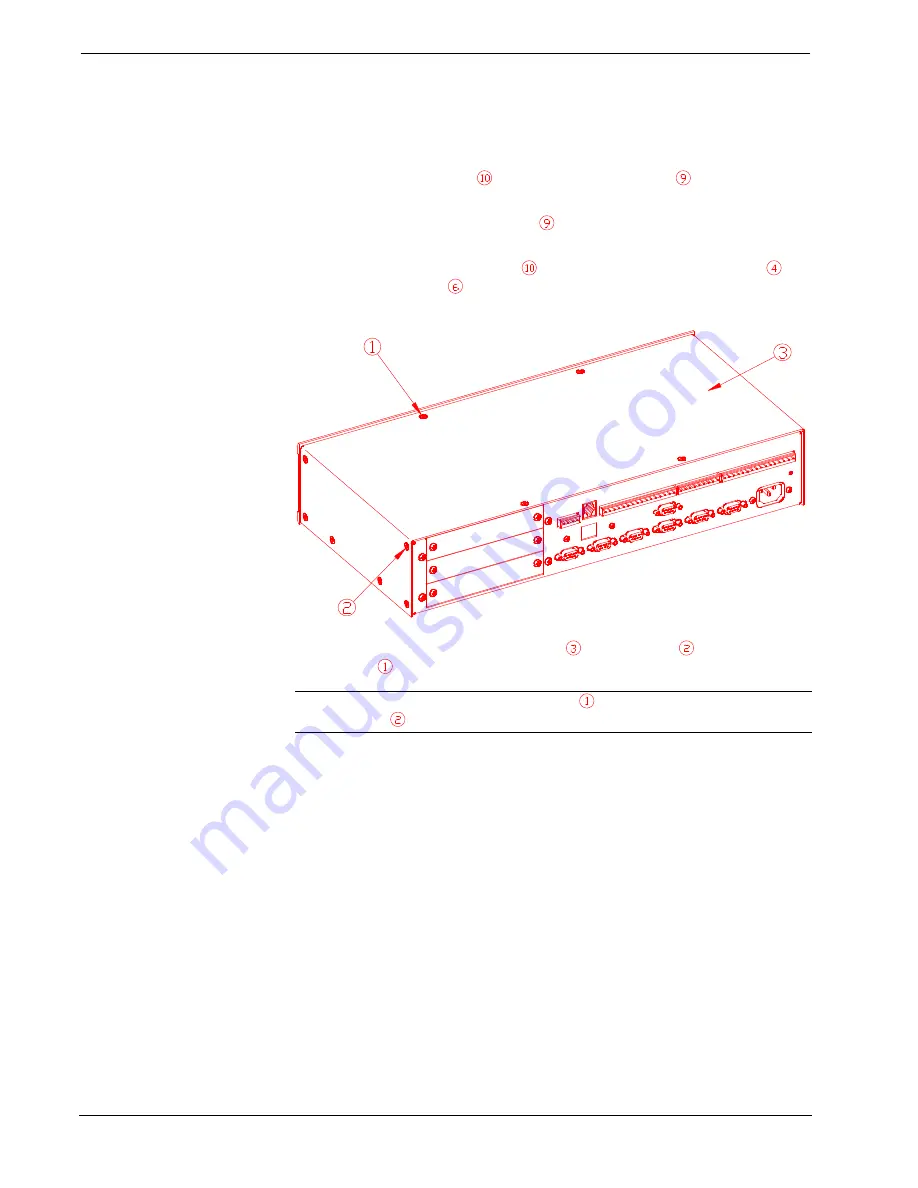
11.


Secure CNMSX-AV top cover 

 with 12 screws 

 and four screws

.

NOTE:

  Verify that four short screws (6 mm) 

 are installed on top and 12 long

screws (9 mm) 

 are installed on the side.

Summary of Contents for CNXCAGE

Page 1: ......

Page 2: ......

Page 3: ...ents 3 Card Expansion Cage CNXCAGE 1 Description 1 Functional Description 1 Physical Description 1 Installation 2 Problem Solving 5 Troubleshooting 5 Further Inquiries 5 Return and Warranty Policies 6 Merchandise Returns Repair Service 6 CRESTRON Limited Warranty 6 ...

Page 4: ......

Page 5: ...below is a box like unit that fits into a CNMSX AV Two blank plates are attached to the CNXCAGE when shipped Plates must be removed if more than one expansion card is inserted At the opposite end of the CNXCAGE there are a total of four connectors Three are within the interior portion of the CNXCAGE they are used to connect to expansion cards The fourth connector is used to connect the CNXCAGE to ...

Page 6: ...375 LG 12 3 CNMSX AV Top Cover Not Applicable 1 4 Screw 6 32 x 0 375 LG 4 5 CNMSX AV Cover Plate Not Applicable 1 6 Screw 6 32 x 0 375 LG 2 7 Nut 6 32 2 8 Washer 6 2 9 Cable Assembly 15743 1 10 CNXCAGE ZA11051 1 CAUTION The CNMSX AV must be opened to install the CNXCAGE To prevent electric shock disconnect the line cord before opening the unit Observe precautions for handling electrostatic sensiti...

Page 7: ... 2 of 4 4 Remove four screws that secure cover plate to CNMSX AV 5 Remove cover plate 6 Turn CNMSX AV onto its side and remove two screws two nuts and two washers from the underside of the unit CNXCAGE Installation 3 of 4 7 Attach the supplied cable assembly to the P1 connector on the CNXCAGE The cable assembly has been design to fit the ...

Page 8: ...GE with attached cable assembly into the CNMSX AV through the opening at the top and side of the unit 9 Attach the cable assembly to the P3 connector on the CNMSX AV CPU 10 Secure the CNXCAGE to the CNMSX AV with four screws and two screws CNXCAGE Installation 4 of 4 11 Secure CNMSX AV top cover with 12 screws and four screws NOTE Verify that four short screws 6 mm are installed on top and 12 long...

Page 9: ...Damaged cable assembly Follow installation procedures in this guide and inspect cable assembly Further Inquiries If after reviewing this Operations Installation Guide for the CNXCAGE you cannot locate specific information or have questions please take advantage of Crestron s award winning technical support team by calling In the US and Canada call Crestron s corporate headquarters at 1 888 CRESTRO...

Page 10: ...odel number to be free from manufacturing defects in materials and workmanship for a period of three 3 years from the date of shipment to purchaser Disk drives and any other moving or rotating mechanical parts are covered for a period of one 1 year CRESTRON warrants all its other products for a period of one year from the defects mentioned above excluding touchscreen display components which are c...

Page 11: ......

Page 12: ......

Reviews: