background image

Install the Retractor

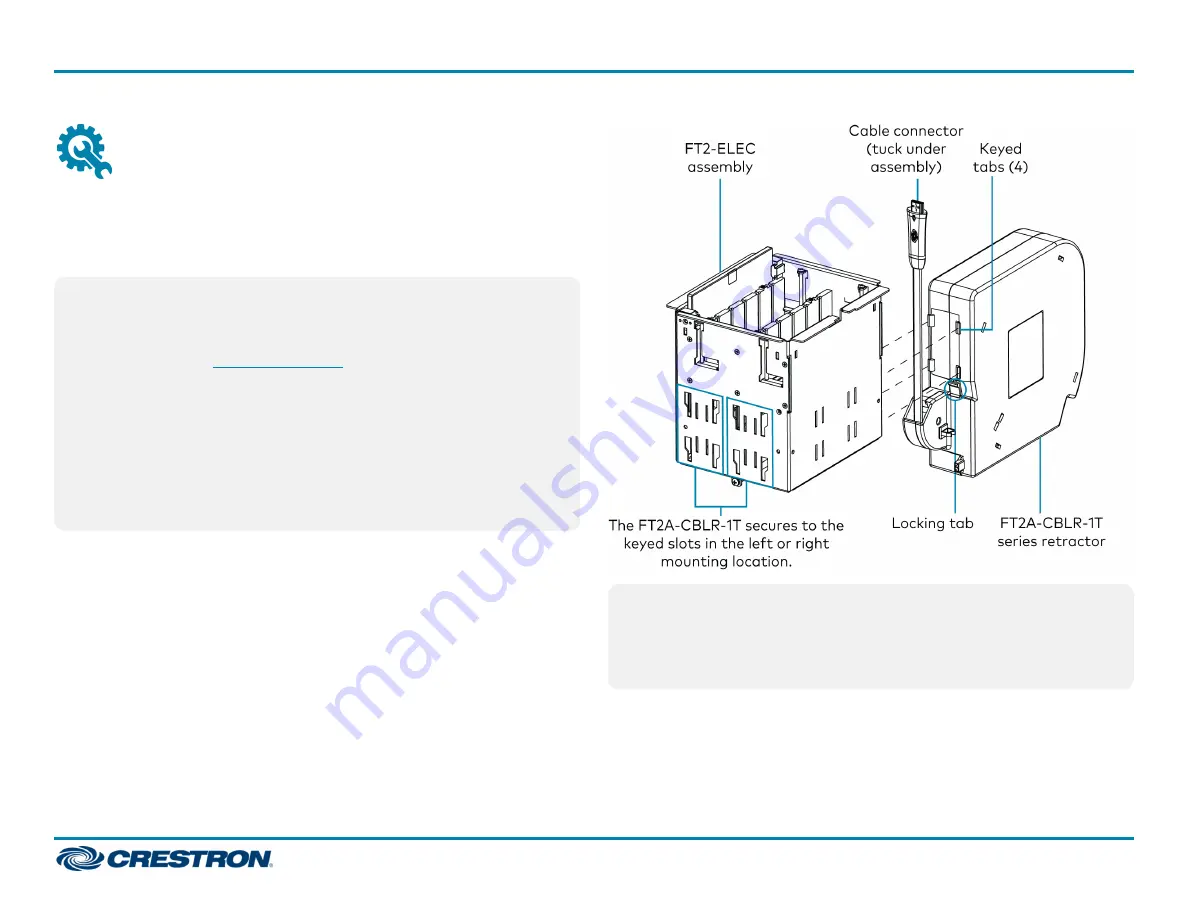
Install the FT2A-CBLR-1T series retractors into an FT2-ELEC assembly
previously mounted into a table. Complete the FT2A-CBLR-1T series
installation before installing the FT2A-CBLR-1T series pass-through
module.

NOTES:

l

The FT2A-CBLR-1T series retractors are installed at the end of
the module rows on either side of the FT2-ELEC assembly
enclosure. If a

FT2A-CBLR-BRKT

(not included) is used, the

bracket and retractor are installed to the front and/or rear of
the FT2-ELEC assembly.

l

The FT2A-CBLR-1T series retractors extend 11.16 in. (283 mm)
vertically and 8.32 in. (212 mm) horizontally underneath the table.

l

The amount of retractor mounting locations (four keyed slots)
varies for each FT2-ELEC assembly. For example, if installing
the retractor into an FT2-700-ELEC device, there are four
possible locations (two per side).

1. Pull the cable connector out of the retractor and tuck it underneath

the FT2-ELEC assembly.

2. Align the four keyed tabs on the retractor neck with the four keyed

slots on the FT2-ELEC assembly. Then, push the retractor up and into
the slots so that the keyed tabs engage the wide end of the slots.

3. Slide the retractor downward until the keyed tabs are secured inside

the narrow end of the slots.

NOTE:

Once the FT2A-CBLR-1T series retractor is secured into the

FT2-ELEC assembly, a locking tab prevents the retractor from being
easily removed. To remove the retractor after it has been installed,
press the locking tab while pulling the retractor up and out of the slots
in the assembly.

2

FT2A-CBLR-1T Series

Quick Start

FlipTop™ One-Touch Cable Retractors

Summary of Contents for FlipTop FT2A-CBLR-1T Series

Page 1: ...or In the Box 1 FT2A CBLR 1T Series FlipTop One Touch Cable Retractors Additional Items FT2A CBLR 1T 4K DP and FT2A CBLR 1T 4K DP HD Only 1 DisplayPort pass through module 4526967 FT2A CBLR 1T 4K MDP...

Page 2: ...for each FT2 ELEC assembly For example if installing the retractor into an FT2 700 ELEC device there are four possible locations two per side 1 Pull the cable connector out of the retractor and tuck i...

Page 3: ...losable fastener strips One fastener strip is placed on the FT2 ELEC assembly and the other strip is placed on the adapter NOTES l This procedure is intended for the FT2A CBLR 1T USBC PWR retractor on...

Page 4: ...FT2 ELEC assembly 4 Remove the protective backing from the remaining fastener strip and press it firmly onto the power adapter 5 Align the power adapter s fastener strip with the assembly s fastener...

Page 5: ...s broken 2 Unscrew and remove the two locking bars on either side of the module row that is required for installation For example if installing the FT2A CBLR 1T series pass through module in the botto...

Page 6: ...Top View Install the Module into the FT2 ELEC Assembly 1 Orient the module so that its LED is facing toward the front of the FT2 ELEC assembly as shown in the following illustration 2 Feed the module...

Page 7: ...mbly 4 Route the module s power cable through the wire saddle on the retractor and then connect the cable to the retractor as shown in the following illustration CAUTION If the FT2A CBLR 1T series pas...

Page 8: ...series retractor retracts automatically FT2A CBLR 1T series check the following l The FT2A CBLR 1T series pass through module is properly seated within the FT2 ELEC assembly l The FT2A CBLR 1T series...

Page 9: ...ract the cable back into its seat The LED backlight provides the cable connector status l Solid The cable retracted successful l Flashing The cable did not fully retract after the cable retractor butt...

Page 10: ...cover Crestron products are listed at www crestron com legal patents Certain Crestron products contain open source software For specific information visit www crestron com opensource Crestron the Cre...

Reviews: