background image

Crestron 

FSKTPS-5000/6000

                                                Isys™ Touchpanels

Field Service Guide - DOC. 5956

Field Service for Isys™ TouchPanel: FSKTPS-5000/6000  

••

  5

Installation of New Nose


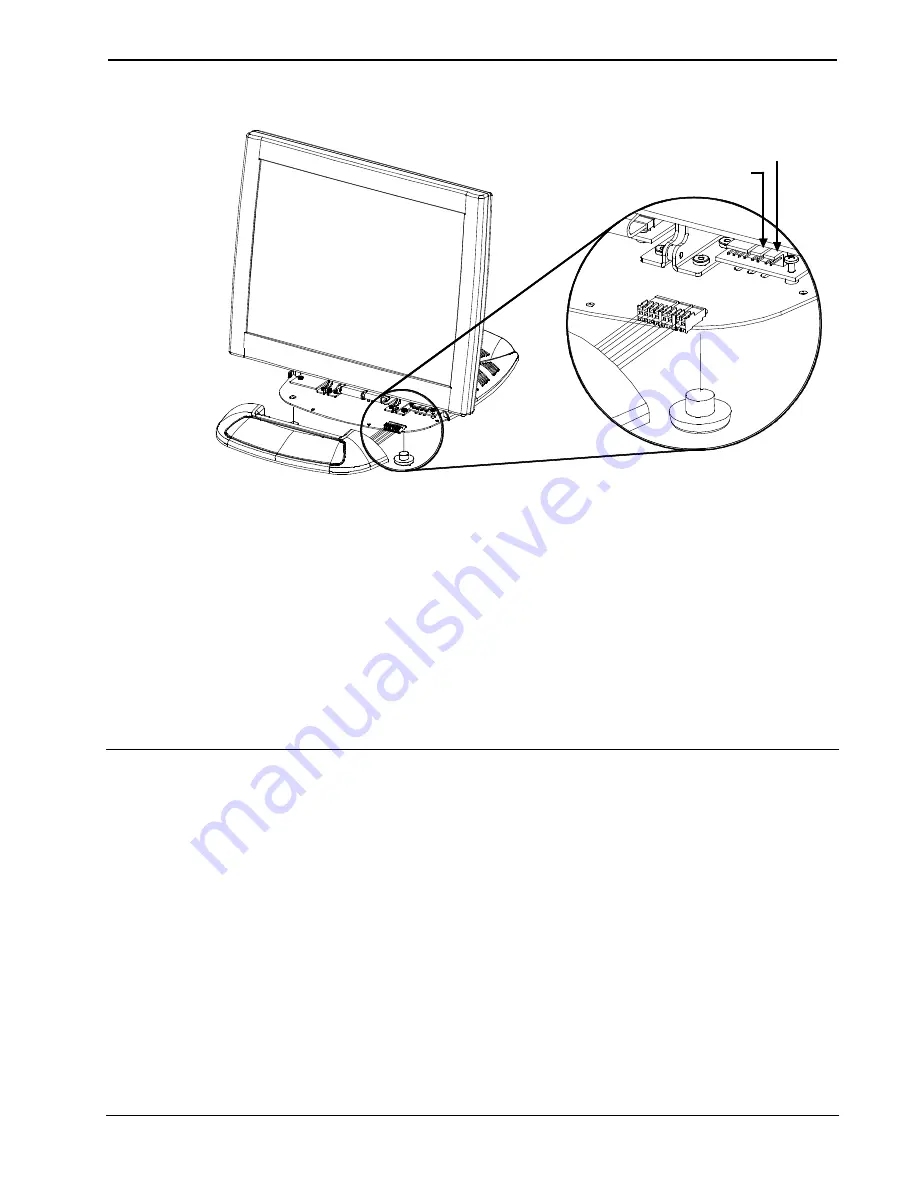
LEFT

SPEAKER

CONNECTOR

RIGHT

SPEAKER

CONNECTOR

RETURN FEET

ONLY IF

REMOVED.

21.


Attach the three cables from the new nose to the proper connectors on the panel.
For example, the left speaker wire (marked L) from the new nose connects to the
connector on the panel marked 'left speaker connector' in the diagram, above.

22.


Carefully slide the new nose onto the panel.

23.


Hold the nose in place and position the touchpanel facedown onto a padded
surface to prevent scratching of the screen.

24.


Re-install the 

four

 base cover screws to 

finger-tight

 then, using a Philips

screwdriver, tighten an additional 

1/8-turn

.

25.


Re-connect all cables attached to the touchpanel rear panel ports and apply
power.

Further Inquiries

If after reviewing this Field Service Guide, you cannot locate specific information or have
questions, please take advantage of Crestron's award winning customer service team by
calling:


In the US and Canada, call Crestron’s corporate headquarters at
1-888-CRESTRON [1-888-273-7876] or 1-201-767-3400.


In Europe, call Crestron International at +32-15-50-99-50.


In Asia, call Crestron Asia at +852-2341-016.


In Latin America, call Crestron Latin America at +525-260-4336.

For local support from exclusive Crestron factory-trained personnel call:


In Australia, call Soundcorp at +613-9488-1555.


In New Zealand, call Amber Technologies at +649-410-8382.

Summary of Contents for Isys FSKTPS-5000

Page 1: ......

Page 2: ...This document was prepared and written by the Technical Documentation department at Crestron Electronics Inc 15 Volvo Drive Rockleigh NJ 07647 1 888 CRESTRON...

Page 3: ...ls Field Service Guide DOC 5956 Contents i Contents Field Service for Isys TouchPanel FSKTPS 5000 6000 1 Nose Replacement 1 Further Inquiries 5 Return and Warranty Policies 6 Merchandise Returns Repai...

Page 4: ......

Page 5: ...s Perform the following procedure while wearing a grounding strap that is properly grounded or on a grounded workstation to avoid damaging the touchpanel NOTE If the angle of the touchscreen needs to...

Page 6: ...ose Refer to the diagram below Remove Touchpanel Nose Screws 6 Place the touchpanel upright on the work surface 7 As shown on the next page slide the nose forward to expose the three connectors and gr...

Page 7: ...of the base plate place strips of masking tape over the two holes that housed the rubber feet and the two smaller screw holes in between them WARNING Bix Stripper is an irritant to skin eyes and respi...

Page 8: ...a few minutes while the stripper lifts bubbles the paint from the metal surface 17 Use a cotton swab or cloth non abrasive to wipe away the loose paint from the interior face of the base plate 18 Repe...

Page 9: ...l the four base cover screws to finger tight then using a Philips screwdriver tighten an additional 1 8 turn 25 Re connect all cables attached to the touchpanel rear panel ports and apply power Furthe...

Page 10: ...ears from the date of shipment to purchaser Disk drives and any other moving or rotating mechanical parts are covered for a period of one 1 year CRESTRON warrants all its other products for a period o...

Page 11: ...Crestron FSKTPS 5000 6000 Isys Touchpanels Field Service Guide DOC 5956 Field Service for Isys TouchPanel FSKTPS 5000 6000 7 This page intentionally left blank...

Page 12: ...Crestron Electronics Inc Field Service Guide DOC 5956 15 Volvo Drive Rockleigh NJ 07647 05 01 Tel 888 CRESTRON Fax 201 767 7576 Specifications subject to www crestron com change without notice...

Reviews: