background image

INSTALLATION 


Please follow carefully, all dimensions and recommendations provided on the individual 
specification sheet for your model of heater.  These dimensions comply with the required 
standards of New Zealand (AS/NZS 2918:2001) 

A permit is required for any installation of a solid fuel space heater (wood burner) and is obtained 
through your local council. 

* * * * * * * * * * * * * * * * * * * * * * 

Inspect the outside of the building to ascertain the point of roof penetration for the flue system. 

If a flue system is built and installed to the correct height it will normally prevent down draught 
problems during windy weather and eliminate smoke spillage problems due to lack of draught.   


Check suitable position for appliance and size of floor protector.  Ensure position of the flue pipe 
and, if possible, enter the ceiling space to check that no major structural members will be affected 
by the flue pipe path. 


Check that the sub-structure is capable of carrying the heater (i.e. weight consideration on the 
floor). 

Check measurements of the heater to combustibles or shield. 

Locate the heater in the required position.  

Using a plumb line, mark the flue penetration hole in the ceiling using a thin nail, driven through 
the ceiling. 

Cut the square ceiling hole to the required size and frame out. 

Install the flue system (see flue installation instructions supplied with flue system).  Remember:   

  The flue system should rise vertically from the appliance with as few offsets as possible.  

Offsets should be avoided where possible as each change in direction creates a 
resistance to airflow. 
 

  The flue system must be well sealed with a minimum of 3 fixings at each joint. 


  The flue pipe penetrating the chimney must continue to the minimum length of 4.6m 

from the top of the floor protector to the cowl. 
 

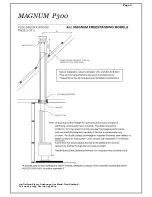
  Flue exiting more than 3 metres from the ridgeline must not terminate less than 1 metre 

above the roof penetration (see diagram 1 below). 
 

  Where the top of the flue pipe is more than 2 metres above its highest fixing point, it 

must be stayed against high winds. 


See Diagram on following page: 

Summary of Contents for JAYLINE CS600

Page 1: ...Installation Operation Manual 100 Neilson Street Onehunga Auckland New Zealand Tel 09 634 1483 Fax 09 634 6804 www crighton co nz ...

Page 2: ...Pallet 2 Top Grill In position 3 Top Baffle Fitted inside firebox 4 Rear Cast Iron Baffle Packaged inside firebox 5 Plastic Bag packaged containing Installation and Operation Manual Specification Sheet Please Note The Rear Baffle will require fitting into position Ensure the patterned surface is facing forward and the words Top Front are at the top of the baffle ...

Page 3: ...arrying the heater i e weight consideration on the floor Check measurements of the heater to combustibles or shield Locate the heater in the required position Using a plumb line mark the flue penetration hole in the ceiling using a thin nail driven through the ceiling Cut the square ceiling hole to the required size and frame out Install the flue system see flue installation instructions supplied ...

Page 4: ... efficiently both the water and the room or area where the fire has been installed In this instance the fire is performing a dual function and without being operated at a sufficiently higher temperature smoking and fly ash can emit from the fire into the room and creosote can form easily inside the fire box thus causing damage internally With properties less than 5 acres in size this model complie...

Page 5: ...EL WITHIN HEATER INSTALLATION CLEARANCES 5 WARNING OPEN AIR CONTROL AND DAMPER WHEN FITTED BEFORE OPENING FIRING DOOR 6 CAUTION THIS APPLIANCE SHOULD NOT BE OPERATED WITH A CRACKED GLASS 7 CAUTION THIS APPLIANCE SHOULD BE MAINTAINED AND OPERATED AT ALL TIMES IN ACCORDANCE WITH THESE INSTRUCTIONS 8 CAUTION THE USE OF SOME TYPES OF CHEMICALLY TREATED WOOD AS A FUEL CAN BE HAZARDOUS 9 USE ONLY DRY WO...

Page 6: ...lighters optional 3 A quantity of finely split dry soft wood kindling in a variety of sizes and 4 Seasoned firewood split into a range of piece sizes The first step is to crumple half a dozen sheets of newspaper and put them just inside the firebox The amount of newspaper you need will depend on the firebox size and the dryness and fineness of the kindling you are using The drier and finer the kin...

Page 7: ...e new load should be expected Allow the fire to burn with bright turbulent flames until the wood is completely alight This usually takes between 15 and 30 minutes depending on the size of the pieces and the moisture content of the wood When the wood is burning well reduce the air setting to produce the amount of heat and length of burn desired Reducing the air control setting in two or three stage...

Page 8: ...ber bed The long burning fire To achieve a long burning fire rake the embers towards the air inlets as with the small hot fire and use larger and more pieces of wood Place the pieces in a similar pattern to the small hot fire using more pieces and larger pieces especially the top layer Always make certain that there is a gap between the pieces to ensure that the combustion air can reach all pieces...

Page 9: ...o the house There are three main reasons why some woodstoves smoke Bad installation Incorrect flue installation resulting in low flue temperatures and low draft can make a wood heater more likely to spill smoke For example flue systems that run up the outside wall of the house and are not correctly insulated can rob the heat from the flue and produce very little draft Each elbow in the flue pipe a...

Page 10: ...ady for burning when required Look for checks or cracks in the end grain as a sign of dry wood The stacks of firewood should be in an open area so that air can circulate through them During the summer as warm breezes flow through the stacks carrying away the evaporating water the moisture content of the wood will fall to around 20 per cent At this moisture content the wood is ready for burning Alt...

Page 11: ...et any heat or air escape However if a piece of brick or a corner does break away you will need to replace that brick immediately In the event this may occur the internal wall of the fire box could sustain buckling or damage from intense direct heat from the flames if the brick isn t replaced DOORS Check all gaskets used for wear and replace if necessary Adjust door fitting if required LUBRICATION...

Page 12: ...s may require checking more often if the fuel or operation of the appliance is incorrect When a flue system becomes excessively blocked or requires frequent cleaning advice should be sought to investigate the installation and the operation of the heater Flue pipes can deteriorate very quickly with incorrect firing Warnings Below is a list of warnings to ensure efficient and safe operation of your ...

Page 13: ... 614 439 882 865 1150 983 529 735 729 515 170 367 562 Dimension C is taken from front of door seal lip to front edge of floor protector All dimensions are in millimetres are set as a minimum in accordance with test report 07 1655 under ASNZS 2918 2001 R Wetback Option Rural Only Floor Protector Non Insulated Estimated Peak Output kW 18kW Tested Average Output kW 8 5 kW on 3 pieces 4kg wood Magnum ...

Page 14: ...MAGNUM P300 100 Neilson Street Onehunga Auckland New Zealand Tel 09 634 1483 Fax 09 634 6804 Page 2 ...

Page 15: ...y be issued if the work required falls within the warranty guidelines expressed in this document Installation Crighton Engineering recommends that all installations be carried out by a recognized Installer or a Registered Home heating association installer Failure to install correctly will void the warranty Warranty Crighton Engineering will warrant their fire for five years 5 with the exception o...

Page 16: ...driftwood and unseasoned wood Policy It is the position of Crighton Engineering that the first visit to a customer is to be at the expense of the dealer If the problem cannot be resolved on the first visit and it is confirmed to be a warranty issue Crighton Engineering will recompense the Dealer for the time spend on this warranty Crighton Engineering will pay 0 65 cents per kilometer however a Pu...

Page 17: ...ial Number _________________________________________________ Description of damage _________________________________________________ _________________________________________________________________________ _________________________________________________________________________ Date Received _________________ Consignment Note ____________________ Parts Required for repair _______________________...

Reviews: