background image

3

F55A-0001

INSTALL INSTRUCTIONS

 Instrucciones de instalación 

 Instructions d’installation 

1a-1

1a-2

1a-4

drill depth

65mm / 2.5”

drill diameter

6mm

7/32”

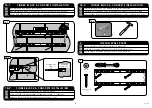
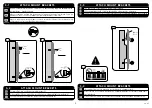
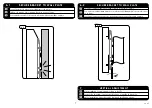
Use a 6mm - 7/32” wood bit to make a 65mm - 2.5” hole on marks.

Utilice un 6mm - 7/32” para perforar la madera poco 65mm - 2.5” agujeros.

Utilisez un 6mm - 7/32 bits de perçage pour percer des trous 65mm - 2.5”.

WOOD STUD INSTALLATION

1a-4

Using level draw a vertical line at stud center.

Con un nivel trace una línea vertical en el centro de postes de madera.

Utilisez un niveau et tracez une ligne verticale au centre du montant.

WOOD STUD INSTALLATION

1a-2

1a-3

Use wall plate (C) to mark hole location on center line.

Utilice

 la placa de pared (C) para marcar la ubicación de los agujeros en la línea 

central.

Utilisez la plaque murale (C) pour marquer l’emplacement des trous dans la ligne 

médiane.

WOOD STUD INSTALLATION

1a-3

Using stud finder locate centers of 2 studs.

Uso de localizador de montantes de localizar los centros de 2 montantes estructura-

les.

Utilisez localisateur de montants pour localiser les centres de deux piliers structurels.

WOOD STUD INSTALLATION

1a-1

Summary of Contents for F55A

Page 1: ...e directions or have doubts about the safety of the installation contact Crimson AV Customer Service or call a qualified contractor Crimson AV is not liable for damage or injury caused by incorrect mo...

Page 2: ...bit 11mm 7 16 Socket wrench 13mm Hammer if necessary Madera poco 6mm 7 32 poco mamposter a 11 mm 7 16 Toma llave de 13 mm Hammer si es necesario Bois peu 6mm 7 32 peu ma onnerie 11mm 7 16 13mm Cl dou...

Page 3: ...rtical en el centro de postes de madera Utilisez un niveau et tracez une ligne verticale au centre du montant WOOD STUD INSTALLATION 1a 2 1a 3 Use wall plate C to mark hole location on center line Uti...

Page 4: ...olpear en caso de necesidad Ins rer B dans les deux trous Utilisez un marteau pour enfoncer dans le cas ch ant 1b 3 CINDER BLOCK CONCRETE INSTALLATION B Use 11 mm 7 16 drill bit to drill 65mm 2 5 hole...

Page 5: ...on back of TV Fasten using supplied hardware with a screwdriver Hand tools only Alinee el soporte de montaje E a los agujeros en la parte posterior de la televisi n Sujete con partes que vienen con un...

Page 6: ...o para permitir el acceso a los insumos en la parte posterior de la televisi n Accrocher le haut du support sur le support mural puis plus bas et l inclinaison vers le mur Engager b quille afin de per...

Page 7: ...o lock monitor in place Con un destornillador para apretar el tornillo de seguridad para bloquear el monitor en su lugar En utilisant un tournevis serrer les vis de fixation pour verrouiller suivre en...

Page 8: ...ra tiene en su poder un pro ducto fabricado con materiales resistentes basado en un dise o muy bien meditado Por ello Crimson AV LLC responde de los posibles defectos de material o fabricaci n con una...

Page 9: ...duits Crimson AV LLC par une personne ne travaillant pas pour Crimson AV LLC Les sp cifications sont sujettes changement sans pr avis GARANTIE NOTICE TO CUSTOMERS OUTSIDE THE UNITED STATES CRIMSON PRO...

Reviews: