background image

9

7

Using a 5mm allen key, turn plumb adjustment screw.  Turn screw clockwise to adjust 

the screen towards the wall and counterclockwise to adjust away from the wall.
Usando una llave Allen de 5mm gire el tornillo de ajuste vertical. Girar el tornillo en 

sentido horario para ajustar la pantalla hacia la pared y en sentido contrario para 

ajustar lejos de la pared.

En utilisant une clé Allen de 5mm tourner la vis de réglage vertical. Tournez la vis vers la droite 

pour ajuster l’écran à la paroi et dans le sens antihoraire pour régler l’écran de la paroi.

8

PLUMB ADJUSTMENT

Only use 4V power drill or 

less for adjustment screws

WARNING

!

!

Using a 5mm allen key, turn height adjustment screw.  Turn screw clockwise to raise 

screen and counterclockwise to lower screen.
Usando una llave Allen de 5 mm de altura de viraje tornillo de ajuste. Gire el tornillo 

hacia la derecha para aumentar la pantalla y la izquierda para bajarlo.
En utilisant une clé Allen de 5 mm tour réglage de la hauteur vis. Tournez la vis vers la 

droite pour augmenter l’écran et la gauche pour diminuer.

9

ROLL/HEIGHT ADJUSTMENT

8

Only use 4V power drill or 

less for adjustment screws

WARNING

!

!

VW4600G3-0002

Summary of Contents for VW4600G3

Page 1: ...these directions or have doubts about the safety of the installation contact Crimson AV Customer Service or call a qualified contractor Crimson AV is not liable for damage or injury caused by incorrec...

Page 2: ...m Llave 5mm Hammer si es necesario Bois peu 6mm 7 32 peu ma onnerie 11mm 7 16 13mm Cl douille Cl allen 5mm Marteau si n cessaire M4 M5 Spacer R 4 M6 M8 Spacer S 4 M8 x 40mm P 4 M8 x 16mm N 4 M8 x 20mm...

Page 3: ...te C to mark hole location on center line Use la placa de pared C para marcar la ubicaci n de los agujeros en la l nea cen tral Utilisez la plaque murale C pour marquer l emplacement des trous dans la...

Page 4: ...h meets ASTM C 90 specifica tions Do not drill into mortar joints Do not install to a concrete wall or cinder block that has any type drywall or other finishing Se monta est n dise ados para ser insta...

Page 5: ...is A et la rondelle U INSTALL WALL PLATE WOOD STUD 2b 2b 1b 3 Insert B into both holes Use a hammer to tap in if necessary Insertar B en ambos orificios Utilice un martillo para golpear en caso de nec...

Page 6: ...para elimi nar la holgura Si les vis touch le fond puis utiliser des rondelles non inclus afin d liminer mou ATTACH MOUNT BRACKETS 3 3 3 2 Spacer R or S Align mount bracket C to holes on back of TV Fa...

Page 7: ...support sur le support mural puis plus bas et l inclinaison vers le mur HANG TV 4 5 2 Remove key then push lock button This will engage the lock pin securing the bracket to the wall plate Quite la ll...

Page 8: ...appuyez sur la TV sur les bords simultan ment Les serrures de support vont se d sengager et pop la t l vision Tirez d plier compl tement 6 EXTEND BRACKET 7 To retract bracket push TV at edges simulta...

Page 9: ...la paroi et dans le sens antihoraire pour r gler l cran de la paroi 8 PLUMB ADJUSTMENT Only use 4V power drill or less for adjustment screws WARNING Using a 5mm allen key turn height adjustment screw...

Page 10: ...AV LLC responde de los posibles defectos de material o fabricaci n con una garant a de 10 a os Crimson AV LLC no se hace responsable de modificaciones instalaciones inadecuadas o instalaciones que sup...

Page 11: ...utiliser des produits Crimson AV LLC Crimson AV LLC r fute galement toute responsabilit pour quelque dommage accessoire ou indirect Ceci s applique notamment aux frais de main d oeuvre pour la r para...

Page 12: ...tips www crimsonav com support crimsonav com Full motion Articulating Wall Mount VW4600 TM Monitor size diagonal Horizontal distance between wall plates Determine horizontal distance between wall plat...

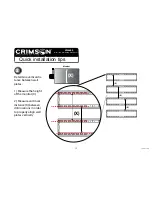
Page 13: ...ll motion Articulating Wall Mount VW4600 TM Determine vertical dis tance between wall plates 1 Measure the height of the monitor X 2 Measure and mark distance X between drill locations in order to pro...

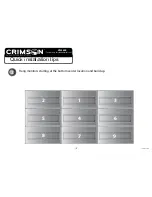
Page 14: ...installation tips www crimsonav com support crimsonav com Full motion Articulating Wall Mount VW4600 TM Hang monitors starting at the bottom center location and build up 3 1 4 3 6 5 79 8 9 7 2 VW4600...

Reviews: