F
IBER
S
CAN
ONE
™
4 - Button CENTER, it is a contextual function button, the operation
performed is dependent on the cursor position and/or selected menu
5 - Button ROTATE, with this keys it is possible to rotate the screen by 180°
for left-hand users. The key mapping is also mirrored: for example, the
UP keys become DOWN key in screen rotate mode.
When the sensor & telescopic pole have been properly connected to the control
unit, the LED “I” (see figure 3) will light up confirming the proper connection,
along with the LED (Q) on the sensor head.
In case the sensor is accidentally disconnected, the operator is warned in real
time by the LED “I” switching off. In case this happen, please check the
connections as described in paragraph 4.
The battery level is shown at the upper right corner of the display.
On the lower part of the display it is shown the instrument menu; using the
LEFT and RIGHT arrow keys, the cursor can be moved between the various
menu option.
Paragraph 5 will describe the FiberScanONE™ option menus in greater detail.
The central part of the display shows measurement data and other useful
information.
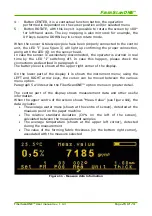
When the upper centre of the screen shows “Meas. Value” (see figure
11
), the
data includes:
•
The average water mass (shown at the centre of screen), detected at the
measure point on the paper machine
•
The relative standard deviation (CV% on the left of the screen),
calculated between the measurement samples
•
The average temperature (shown at the upper left corner), detected
during the measurement
•
The value of the forming fabric thickness (on the bottom right corner),
associated with the measure selected
Figure 11 - Measure data information
FiberScanONE™
User
manual
rev.
1.0.3
Page
26 of 74


