background image

10

GB

avoid damage to property!

• Do not erect the tent so that the tent entrance  
  is in the direction of the wind. Wind could  
  damage the tent.
• All the tent materials suffer material fatigue  
  and bleaching if they are exposed to  
  prolonged, strong sunlight. For this reason,  
  when the tent is to be used over longer  
  periods, erect it in a shady position.  
  Do not leave the tent assembled  
  unnecessarily.

assembly

note!

Perform a test assembly before the camping trip. 
In doing so, ensure that all the accessories are 
present.

selecting a location for  

placing the tent

Choose a place that is as flat and clean as 
possible. Avoid dips in the ground.
Remove stones, branches and other sharp ob-
jects in order to prevent damage to the tent floor. 
Use natural shade, such as hedges, rocks, etc.
Use the appropriate pegs for sandy ground in 
order to prevent accidental loosening of the 
tension.

note!

Insert the pegs into the ground at a slight angle 
to achieve good strength but without causing 
tension in the tent surface. The tent material and 
tension points should only be slightly taut, so that 
it can compensate for pressure from the wind. 
Ensure that there is not too much pressure on the 
tent. Check the tent tension according to weather 
condition.

note!

Water condensation occurs basically in every 
tent, however particularly during strong fluctu-
ations in temperature. After a night in the tent, 
there will be drops of condensation on the inner 
wall. Condensation is not evidence of leakiness. 
Good ventilation reduces condensation in the 
tent.

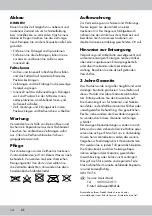
1. Spread the base of the inner tent flat on the  
  ground, close the zips for the entrance and fix  
  the loops at all four corners with the pegs  
  (Fig. B).
2. Build together the segments of the tent poles  
  (3) and (4). Slide the two black tent poles (3)  
  diagonally through the loops in the middle of  
  the inner tent (Fig. C). Secure the inner tent on  
  the tent poles using the clips (Fig. D). 
3. Turn the tent around and insert the metal pins  
  at the corners of the inner tent into the end  
  of the tent poles so that these are under  
  tension (Fig. E). 
4. The storage net (9) can now be hooked onto  
  the roof ridge in the interior of the inner tent  
  (Fig. F). 
5. Place the outer tent over the inner tent  
  (Fig. G). Secure the outer tent using the bands  
  to the tent poles and at the crossing point in  
  the frame. Push the grey tent poles (4) through  
  the frame tunnel in the outer tent (Fig. H).  
  Right the frame up and insert the metal pins  
  from the corners of the inner tent into the end  
  of the tent poles. Secure the outer tent with  
  10 pegs and ensure that the loops at the four  
  corners are fixed with the pegs of the inner  
  tent (Fig. I).
6. Secure each of the 6 guy ropes with a peg.  
  The length of the guy ropes can be adjusted  
  with the tensioner (Fig. J).

disassembly

note!

Disassemble the tent, if possible, when clean 
and dry to prevent the formation of mould and 
mildew. After disassembling in rain, immedia-
tely dry the tent. Clean all the parts thoroughly 
before packing them away.
• Remove the pegs and guy ropes.
• Remove the tent poles, fold them together  
  and disassemble the inner and outer tents.

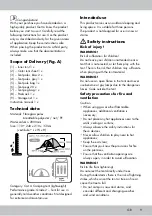
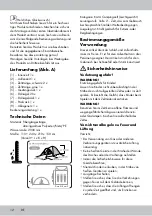
Summary of Contents for 96716

Page 1: ...IAN 96716 Iglu stan s dvojitou stenou Iglu stan s dvojitou stenou Návod na obsluhu DOUBLE ROOF TENT Instruction manual Iglu Doppeldachzelt Bedienungsanleitung ...

Page 2: ...2 1 6 7 8 2 3 4 5 9 A B C D E F G ...

Page 3: ...3 H I J ...

Page 4: ...4 ...

Page 5: ... 3 roky záruka 8 Lieferumfang 12 Technische Daten 12 Bestimmungsgemäße Verwendung 12 Sicherheitshinweise 12 13 Aufbau 13 Abbau 14 Wartung 14 Pflege 14 Aufbewahrung 14 Hinweise zur Entsorgung 14 3 Jahre Garantie 14 Scope of Delivery 9 Technical data 9 Intended use 9 Safety instructions 9 10 Assembly 10 Disassembly 10 11 Maintenance 11 Care 11 Storage 11 Notes for disposal 11 3 years warranty 11 ...

Page 6: ...t Je vhodný pre tri osoby Produkt nie je konštruovaný na používanie v zimnom období počas sneženia alebo v búrkach Bezpečnostné pokyny Nebezpečenstvo zranenia VAROVANIE Nebezpečenstvo ohrozenia života detí udu sením Deti nenechávajte v blízkosti stanu bez dozoru pokiaľ stan nie je postavený ani ich nenechávajte bez dozoru v postavenom stane Deti sa môžu počas hry zadusiť materiálom zo stanu VAROVA...

Page 7: ...noci strávenej v stane sa na vnútorných stenách stanu vytvoria kvapky kondenzovanej vody Kondenzácia preto neznamená netesnosť stanu Tvorbu kondenzovanej vody vo vnútri stanu môžete znížiť dobrým vetraním 1 Vystrite podlahu stanu aby priľahla na podklad zapnite zipsy na vchodoch a kolíkmi upevnite pútka na všetkých štyroch rohoch Obr B 2 Spojte segmenty tyčí 3 a 4 Obidve čierne tyče 3 diagonálne v...

Page 8: ...a likvidáciu Obal a produkt zlikvidujte ekologicky a separovane Produkt odovzdajte v príslušnej autorizovanej zberni alebo ho zlikvidujte pro stredníctvom komunálnej správy vo Vašej obci Rešpektujte platné predpisy 3 roky záruka Produkt bol vyrobený s maximálnou zodpovednosťou a v priebehu výroby bol neus tále kontrolovaný Na tento produkt máte tri roky záruku od dátumu kúpy produktu Pokladničný l...

Page 9: ...r three persons The product is not designed for use in snow or storms Safety instructions Risk of injury WARNING Risk of suffocation for children Do not leave your children unattended near a tent that is not erected or let them play with the tent There is the risk that children may suffocate when playing with the tent material WARNING Do not use an open flame in the tent and never use benzine or g...

Page 10: ... Condensation is not evidence of leakiness Good ventilation reduces condensation in the tent 1 Spread the base of the inner tent flat on the ground close the zips for the entrance and fix the loops at all four corners with the pegs Fig B 2 Build together the segments of the tent poles 3 and 4 Slide the two black tent poles 3 diagonally through the loops in the middle of the inner tent Fig C Secure...

Page 11: ...arated according to materials and in an environmentally friendly manner Dispose of the product through an approved waste disposal firm or by using your local municipal administrati on Observe the current applicable legislation 3 years warranty The product was produced with great care and under constant supervision You receive a three year warranty for this product from the date of purchase Please ...

Page 12: ...t Nicht gedacht für Extrem oder Bergbedingungen Bestimmungsgemäße Verwendung Dieser Artikel dient als Schlaf und Aufenthalts raum im Freien Er ist für den Aufenthalt von drei Personen geeignet Der Artikel ist nicht für den Gebrauch bei Schneefall oder Sturm konstruiert Sicherheitshinweise Verletzungsgefahr WARNUNG Erstickungsgefahr für Kinder Lassen Sie Kinder nicht unbeaufsichtigt in der Nähe des...

Page 13: ...darauf dass nicht zuviel Spannung auf dem Zelt ist Prüfen Sie die Zeltspannung je nach Witterung HINWEIS Wasserkondensation kommt grundsätzlich in allen Zelten vor jedoch insbesondere bei starken Temperaturschwankungen Nach einer Nacht im Zelt befinden sich Kondenswassertropfen an der Innenwand Kondensation ist daher kein Hinweis auf Undichtigkeit Gute Belüftung vermindert Kondensation im Inneren ...

Page 14: ...i längerem Nichtgebrauch nehmen Sie den Artikel aus dem Packsack und bewahren Sie ihn an einem trockenen vor direkter Sonneneinstrahlung geschützten Ort auf Hinweise zur Entsorgung Verpackung und Artikel bitte umweltgerecht und sortenrein entsorgen Entsorgen Sie den Artikel über einen zugelassenen Entsorgungsbetrieb oder über Ihre kommunale Gemeindever waltung Beachten Sie die aktuell geltenden Vo...

Page 15: ...15 ...

Page 16: ...IAN 96716 DELTA SPORT HANDELSKONTOR GMBH Wragekamp 6 D 22397 Hamburg Version 03 2014 Delta Sport Nr ID 1814 ...

Reviews: