background image


ƒ


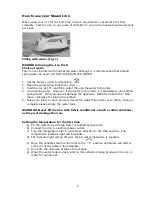
If the iron is left motionless in the vertical position for more than 8 minutes, the 
iron will be switched off, automatically.   

ƒ


To indicate that the iron has shut off automatically, the auto shut-off indicator 
will start blinking and six sound signals will be audible. 

ƒ


WARNING RISK OF BURNING: Please be aware that when the auto shut-off 
indicator is activated the soleplate is still extremely hot and will need adequate 

time to cool down. DO NOT TOUCH HOT SOLEPLATE!   

 
To switch the iron back on after it has automatically been shut off please note 

the following instructions


When picking up the iron again, the auto shut-off indicator will stop blinking. 


The temperature indicator light will illuminate indicating that the iron is heating up.  


Wait for the temperature indicator light to go off indicating that the iron has reached 

its desired temperature.  Then you can resume ironing. 


MAINTENANCE 
CAUTION:  

Always be sure that the appliance is unplugged before cleaning or attempting to store 

the item. 

 
MAINTENANCE AND CLEANING  

WARNING: Unplug the iron first! 

ƒ


Allow to cool completely. 

ƒ


Hold the iron at an angle and empty the water tank. 

ƒ


After iron is thoroughly cooled wipe the housing and the soleplate with a damp 

cloth only.  If the soleplate is very dirty, iron a linen cloth soaked in white vinegar 
then wipe with a clean damp cloth. 

ƒ


Avoid scratching the plate with steel wool. 

ƒ


DO NOT immerse the iron in any liquid. 

ƒ


Store the iron upright and not on the soleplate (risk of corrosion). 

ƒ


Do not wind power cord tightly around iron. 

ƒ


Avoid hard water with impurities that cause residue build-up. 

ƒ


Regularly clean the soleplate. 

ƒ


Avoid pressing iron over sharp objects like zippers and buttons. 

ƒ


Do not place iron face down on rough areas. 

ƒ


Empty the tank after each use and hold horizontally for a few seconds until 

remaining moisture is removed. (Use caution as steam and boiling water can 
cause burns). 

ƒ


Do not use abrasive cleaners to remove burnt-on residues.  

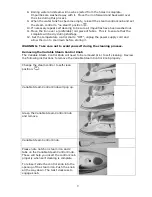
Self Cleaning Function 

It is important to apply “self-cleaning” at least every two weeks to remove impurities 
etc. The harder the water the more the iron should be self-cleaned. 

1.


Open the water filling inlet and fill the water tank up to the MAX position, then 
close the inlet cover. 

2.


Plug in steam iron into electrical wall socket. 

3.


Set the temperature control to MAX. 

4.


Allow the iron to heat up until the temperature indicator light goes off. 

5.


Hold the iron horizontally over the sink. 

6.


Turn the steam control knob to the self-clean position 

. 

7.


Remove the steam control knob as described in the section below “Removing the 
Variable Steam Control Knob” 


8

Summary of Contents for ES-139B

Page 1: ...STEAM IRON MODEL ES 139B ITEM 1996 05 PLEASE READ THESE AND SAVE ALL INSTRUCTIONS TO ENSURE THE SAFE AND EFFECTIVE USE OF THIS APPLIANCE...

Page 2: ...ty Instructions P 3 List of Main Parts Tech Specifications Contents of Packaging P 4 Operation and Use P 5 8 Maintenance P 8 Self Cleaning P 8 9 Removing Variable Steam Control Knob P 9 10 Trouble Sho...

Page 3: ...d that they cannot pull the power cord DANGER OF BURNS Burns can occur from touching hot metal parts hot water or steam Use caution when you turn iron upside down there may be hot water in the water t...

Page 4: ...ay be used if care is exercised in their use If an extension cord is required special care and caution is necessary Also the cord must be 1 marked with an electrical rating of 125 V and at least 13 A...

Page 5: ...ntrol dial F Power on Auto shut off indicator M Soleplate G Temperature indicator light TECHNICAL SPECIFICATIONS Model Number ES 139B Item 1996 05 Rating Voltage 110 120 volt Rating Wattage 1200 watt...

Page 6: ...roning articles that need to be ironed at lowest temperature such as those made of synthetic fiber 3 Temperature guide Follow the ironing instructions on the garment label If there are no instructions...

Page 7: ...NEVER fill above the Max mark otherwise the tank will overflow 5 Make sure that you have securely closed the water filling inlet cover When ironing is complete please empty the water tank WARNING Nev...

Page 8: ...elease the surge of steam button to produce a powerful surge of vertical steam This feature is ideal for steaming curtains and hanging suits Place iron in a vertical position By pressing the steam but...

Page 9: ...with a damp cloth only If the soleplate is very dirty iron a linen cloth soaked in white vinegar then wipe with a clean damp cloth Avoid scratching the plate with steel wool DO NOT immerse the iron in...

Page 10: ...w the iron to cool down before storing it WARNING Take care not to scald yourself during the cleaning process Removing the Variable Steam Control Knob The Variable Steam Control Knob will need to be r...

Page 11: ...ake several uses before your iron adjusts to the new mixture and the issue is corrected The iron is spitting and leaking First check the water you use DO NOT USE DISTILLED WATER We recommend using tap...

Page 12: ...at Wachsmuth Krogmann Inc Tel 1 888 367 7373 Business hours Mon Fri 9 00am 4 00pm CT Website http www wk usa com ENVIRONMENTAL PROTECTION If the appliance should no longer work at all please make sure...

Page 13: ...er no circumstances shall there be liability for any loss direct indirect incidental special or consequential damage arising out of in connection with use of this product This warranty is valid only i...

Page 14: ...n original materials including original parts and workmanship until August 22 2007 or 2 year with proof of purchase Please fill in your details below and send it together with the product and purchase...

Reviews: